Prerequisites
Are you ready to connect Ninja Labs with WireGuard on your Mac? This comprehensive guide walks you through every step needed to establish a secure and seamless connection. By following these instructions, you’ll gain efficient access to Selfmade Ninja Labs, the perfect cloud lab environment for coding, development, and IT training. Whether you’re an aspiring IT professional or an experienced developer, this guide will make it easy to connect Ninja Labs with WireGuard and start exploring the possibilities.
- Selfmade Ninja Lab account (Don’t have one? Create one here)
Hey There!
Are you ready to embark on a thrilling journey into the digital world? Today, I’ll guide you through a simple, free way to connect to Selfmade Ninja Labs on your Mac.
This guide ensures a seamless setup, connecting your Mac to the ultimate destination for coding and development—Selfmade Ninja Lab cloud lab training for aspiring IT students.
Let’s Get Prepared!
Before we dive into the deep end, let’s make sure you have everything you need:
-
A Mac Computer: No need for the most advanced technology; any Mac that can run the latest or recent macOS will suffice.
-
A Stable Internet Connection: A steady and reliable internet connection is crucial as it acts as your bridge to the vast online world, ensuring uninterrupted access to Selfmade Ninja Labs.
Connect to Selfmade Ninja Labs
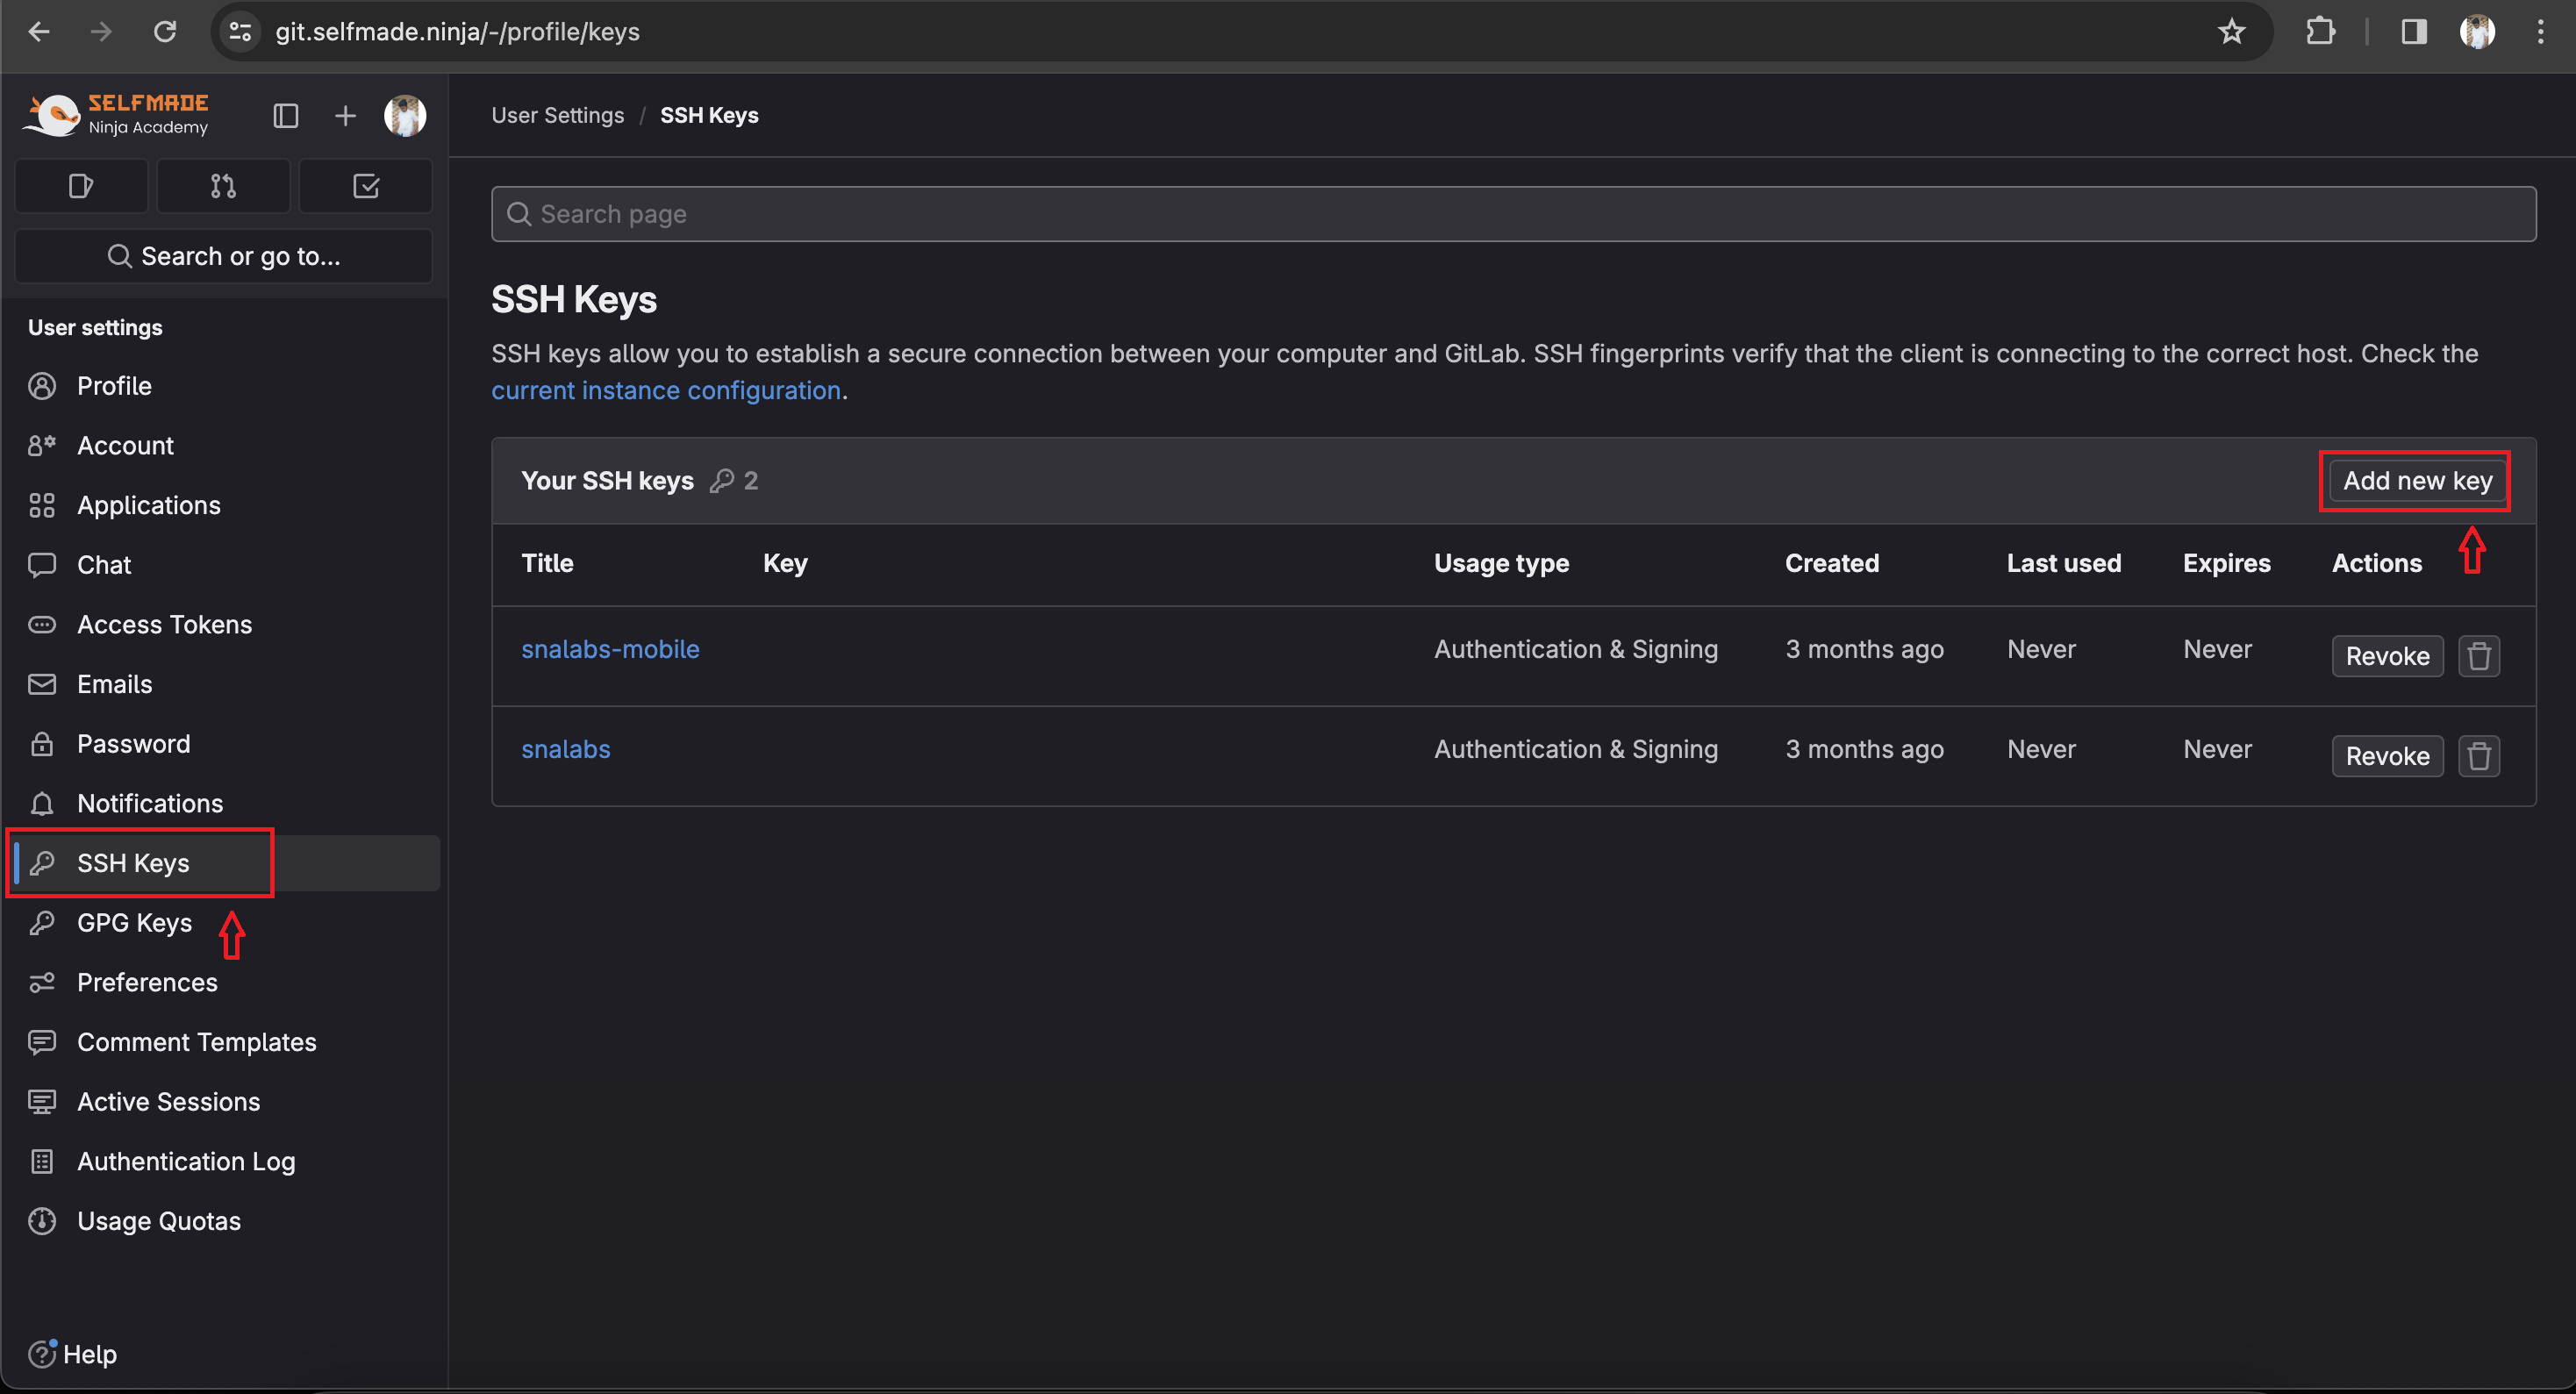
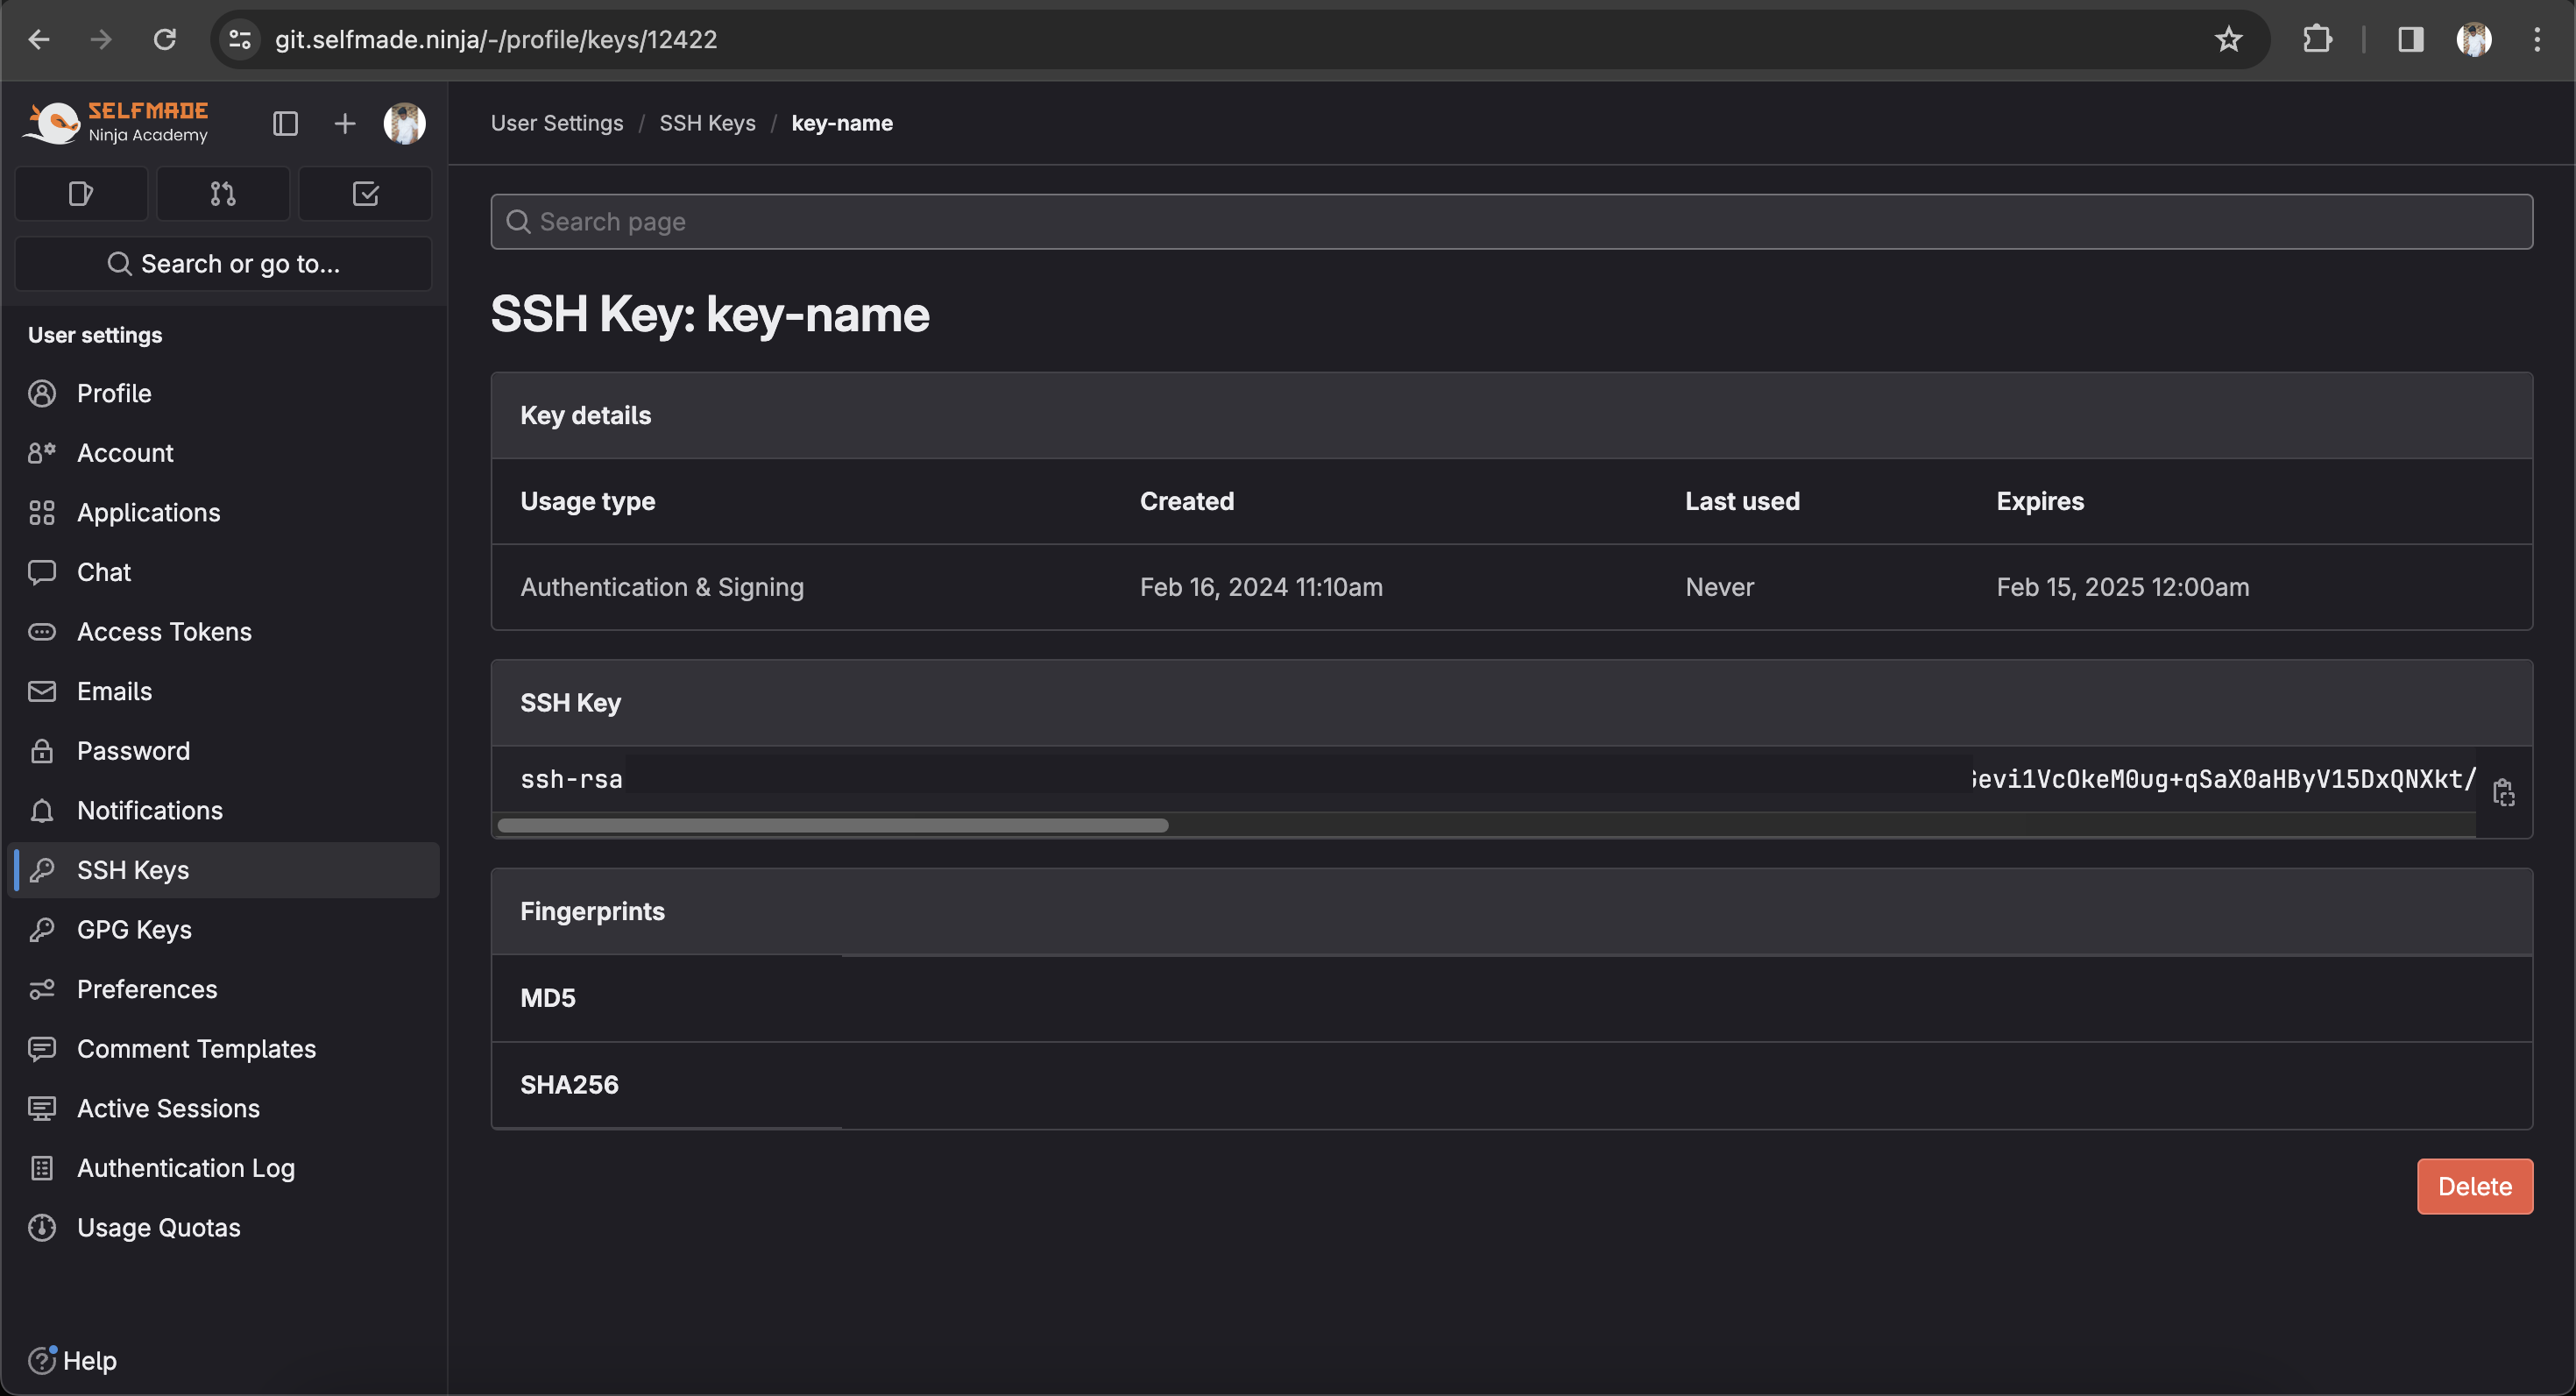
- Your first step involves accessing GitLab with your credentials. This is crucial for establishing a secure connection to Selfmade Ninja Labs. Click here.

- Within the ‘Preferences’ tab, locate and select ‘SSH Keys’. This area allows you to add new keys, a vital part of securing your connection to Selfmade Ninja Labs. Adding an SSH key allows your SNA Labs to be accessed from your computer securely.

-
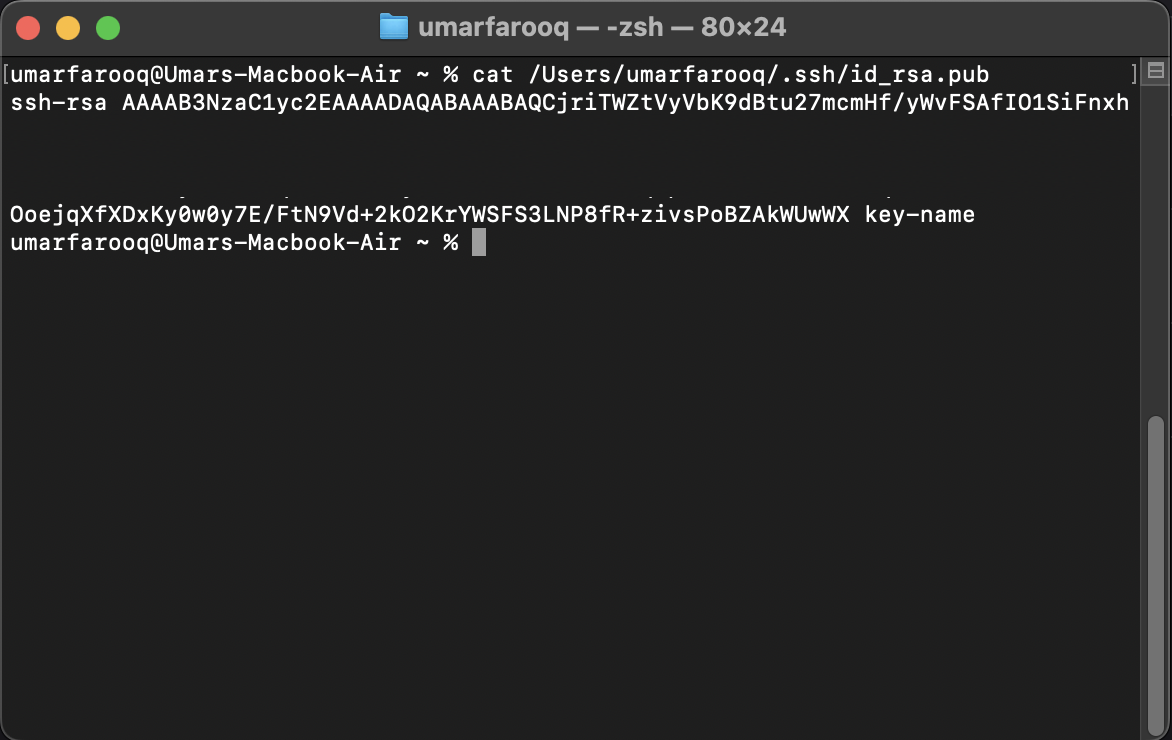
Open your Mac’s terminal and execute the below command to generate a new SSH key. This process creates a unique identifier for your device, enhancing the security of your connection to Selfmade Ninja Labs.
ssh-keygen -t rsa -b 2048 -C “your-key-name”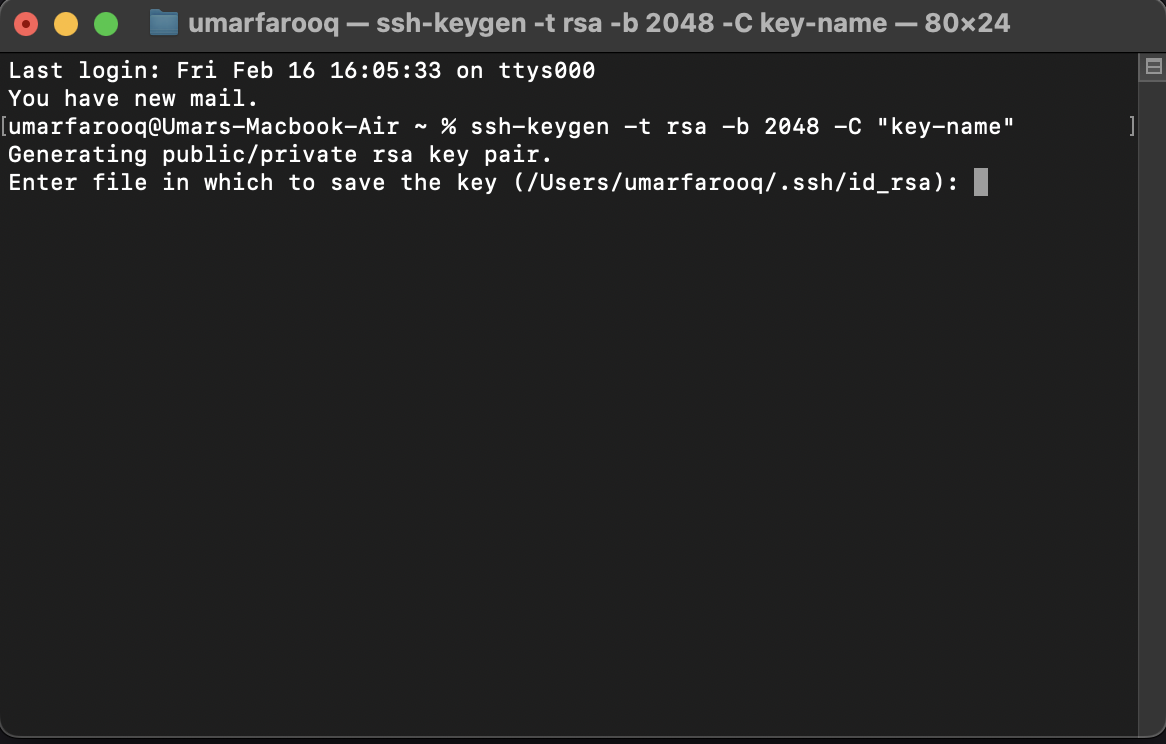
Incorporating SSH keys into your security protocol is crucial for enhancing the safety and integrity of your digital communications. Here’s a succinct explanation of their importance:
-
Enhanced Security: SSH keys offer a more secure alternative to password-based logins. They utilize cryptographic algorithms, making them nearly impervious to brute force attacks, significantly reducing the risk of unauthorized access.
-
Key Pair Mechanism: Generating SSH keys creates a pair: a public key for sharing and a private key kept secure on your device. This mechanism ensures that only the holder of the private key can access the linked server or service, safeguarding your connection.
-
Identity Verification: The unique pairing of SSH keys provides non-repudiation, affirming the identity of the user without the possibility of impersonation, thanks to the cryptographic proof of ownership.
-
Mitigated Cyber Threats: By avoiding password transmission, SSH keys minimize the risk of interception by malicious actors, offering a robust defense against many forms of cyber attacks.
In essence, SSH keys are fundamental to securing your digital channels, providing a balance of accessibility, security, and efficiency in managing secure connections.
After generating your SSH key, use the terminal command below to display and then copy this key.
cat your_key_location
- Paste it into the appropriate field in GitLab under the ‘SSH Keys’ section. and hit ‘Add Key’ option. This action completes the loop of securing your connection.
-
WireGuard is a modern, secure VPN required for connecting to Selfmade Ninja Labs. Installation is straightforward via the App Store. Once installed, it’s a crucial tool for creating a secure tunnel to SNA Labs, ensuring your data remains safe. Click here to download.
-
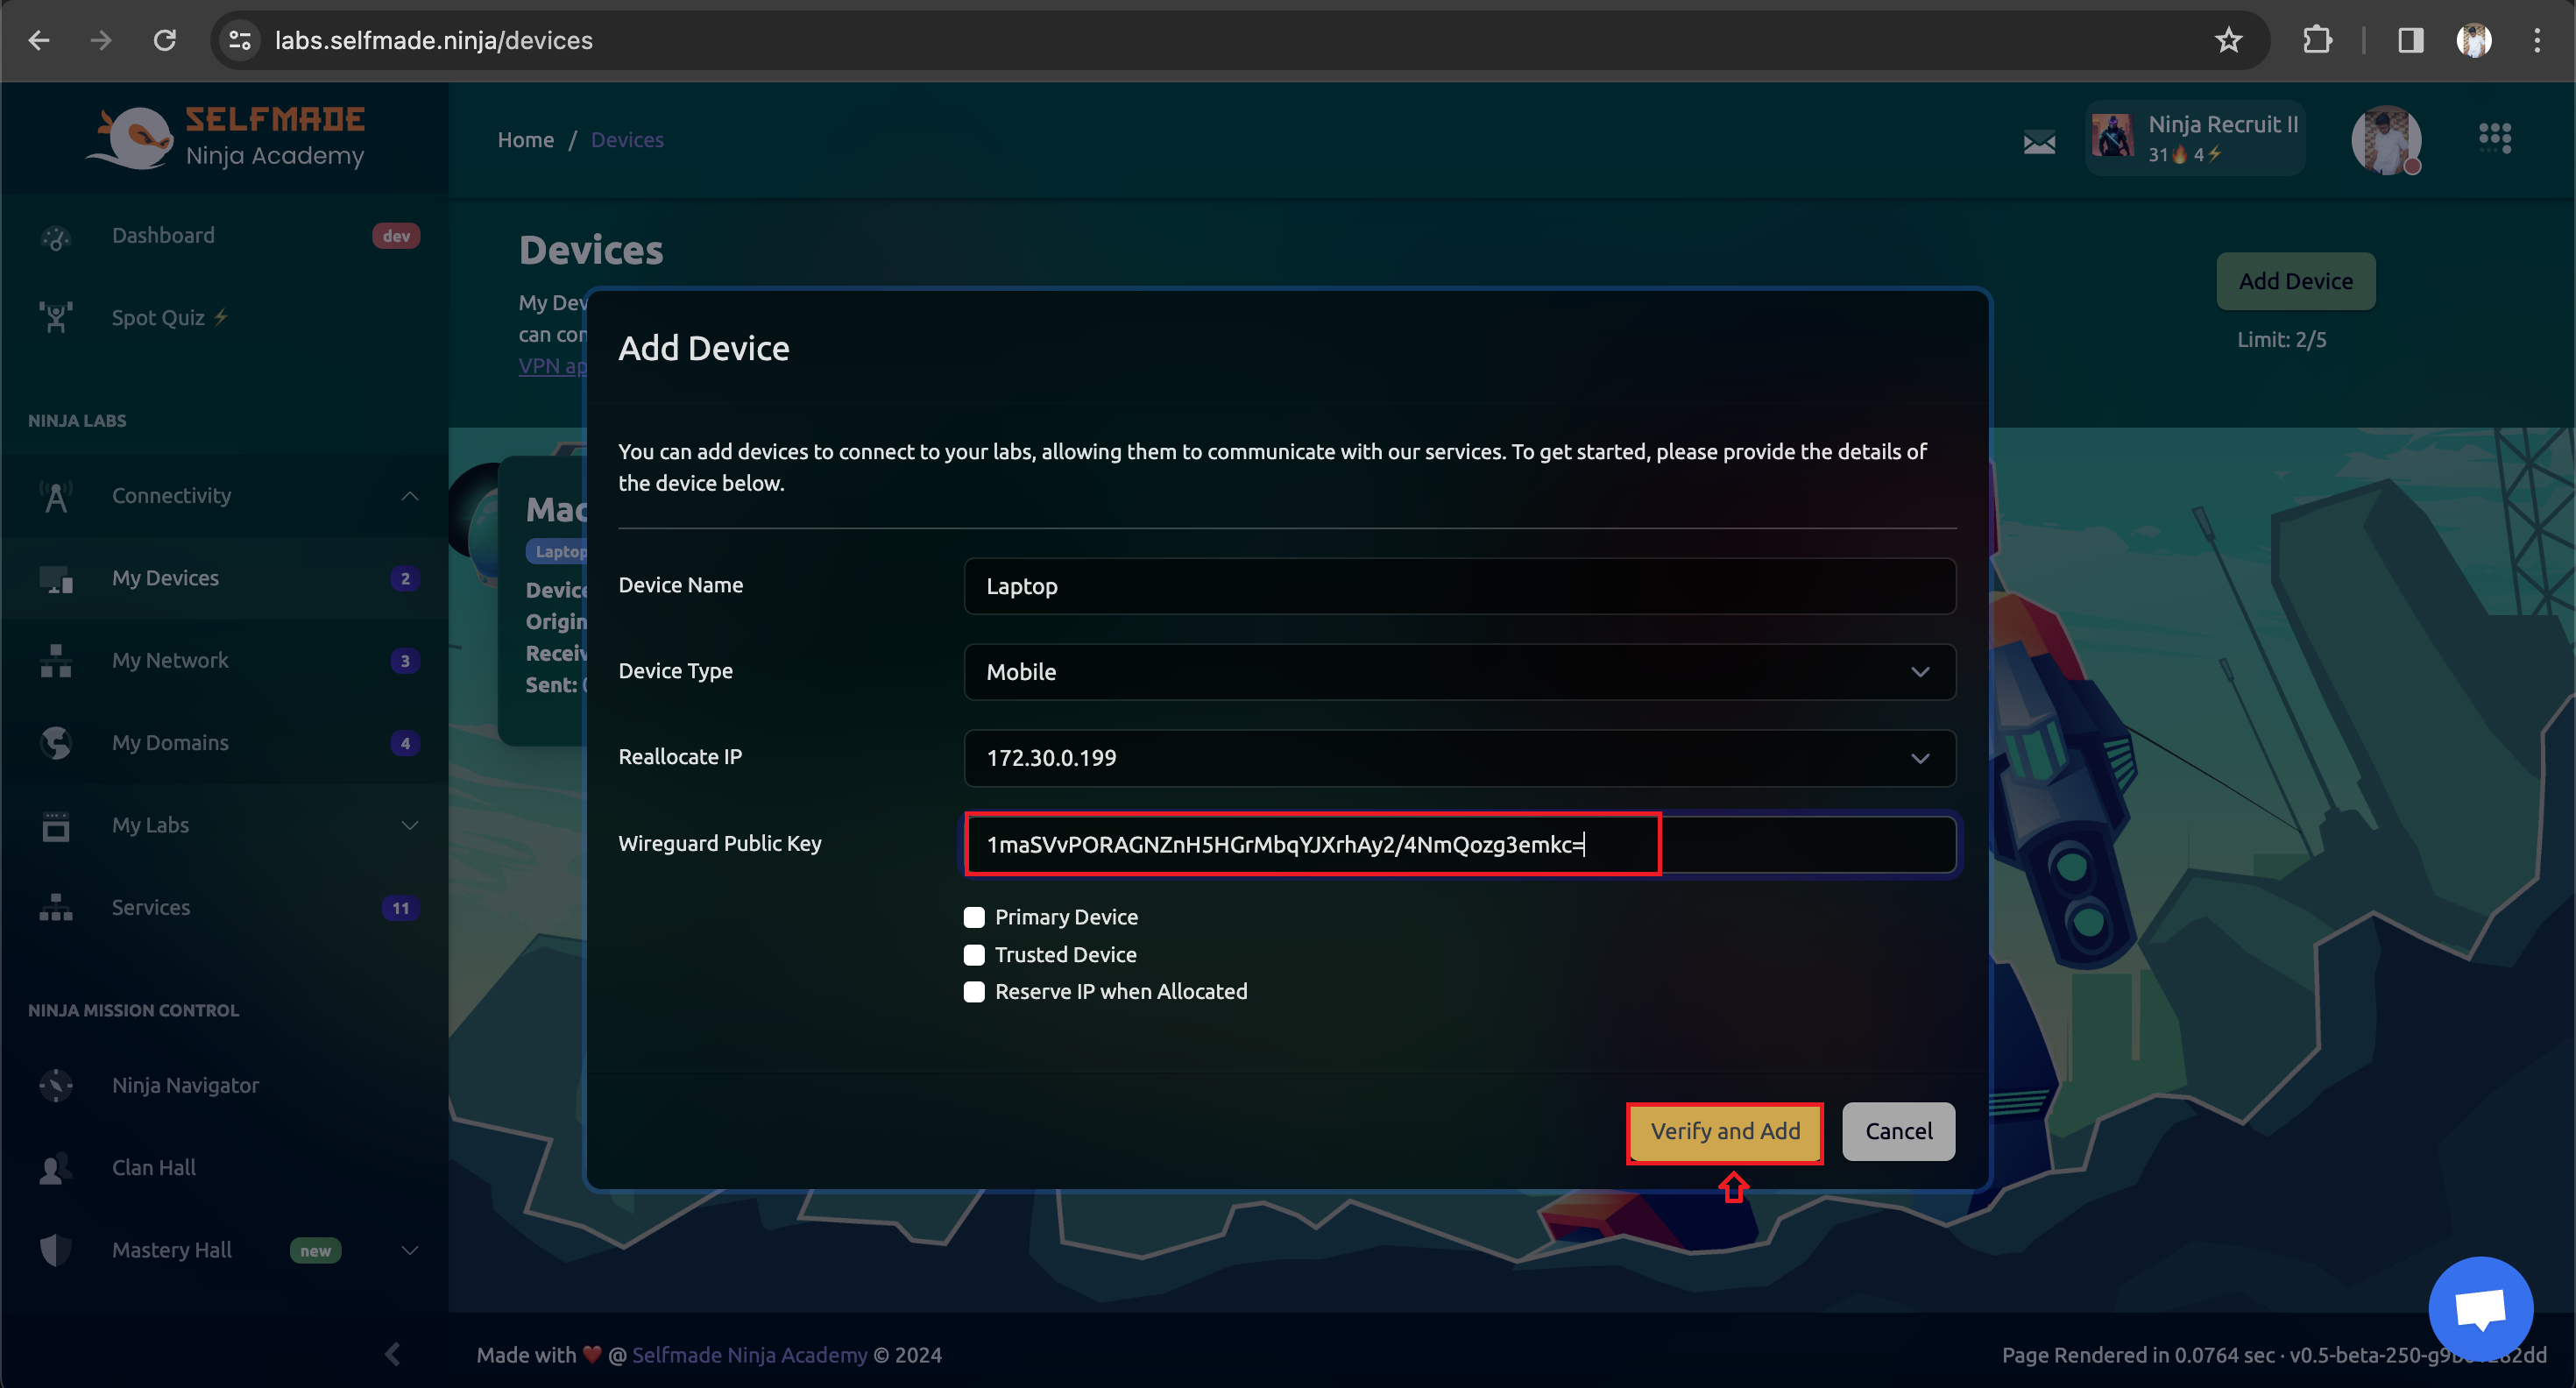
After installation, navigate to the ‘Connectivity’ tab within Selfmade Ninja Labs and select ‘My Devices’. Here, you’ll add your device and configure WireGuard with a public key provided by the platform. This step is essential for establishing a secure, encrypted connection.

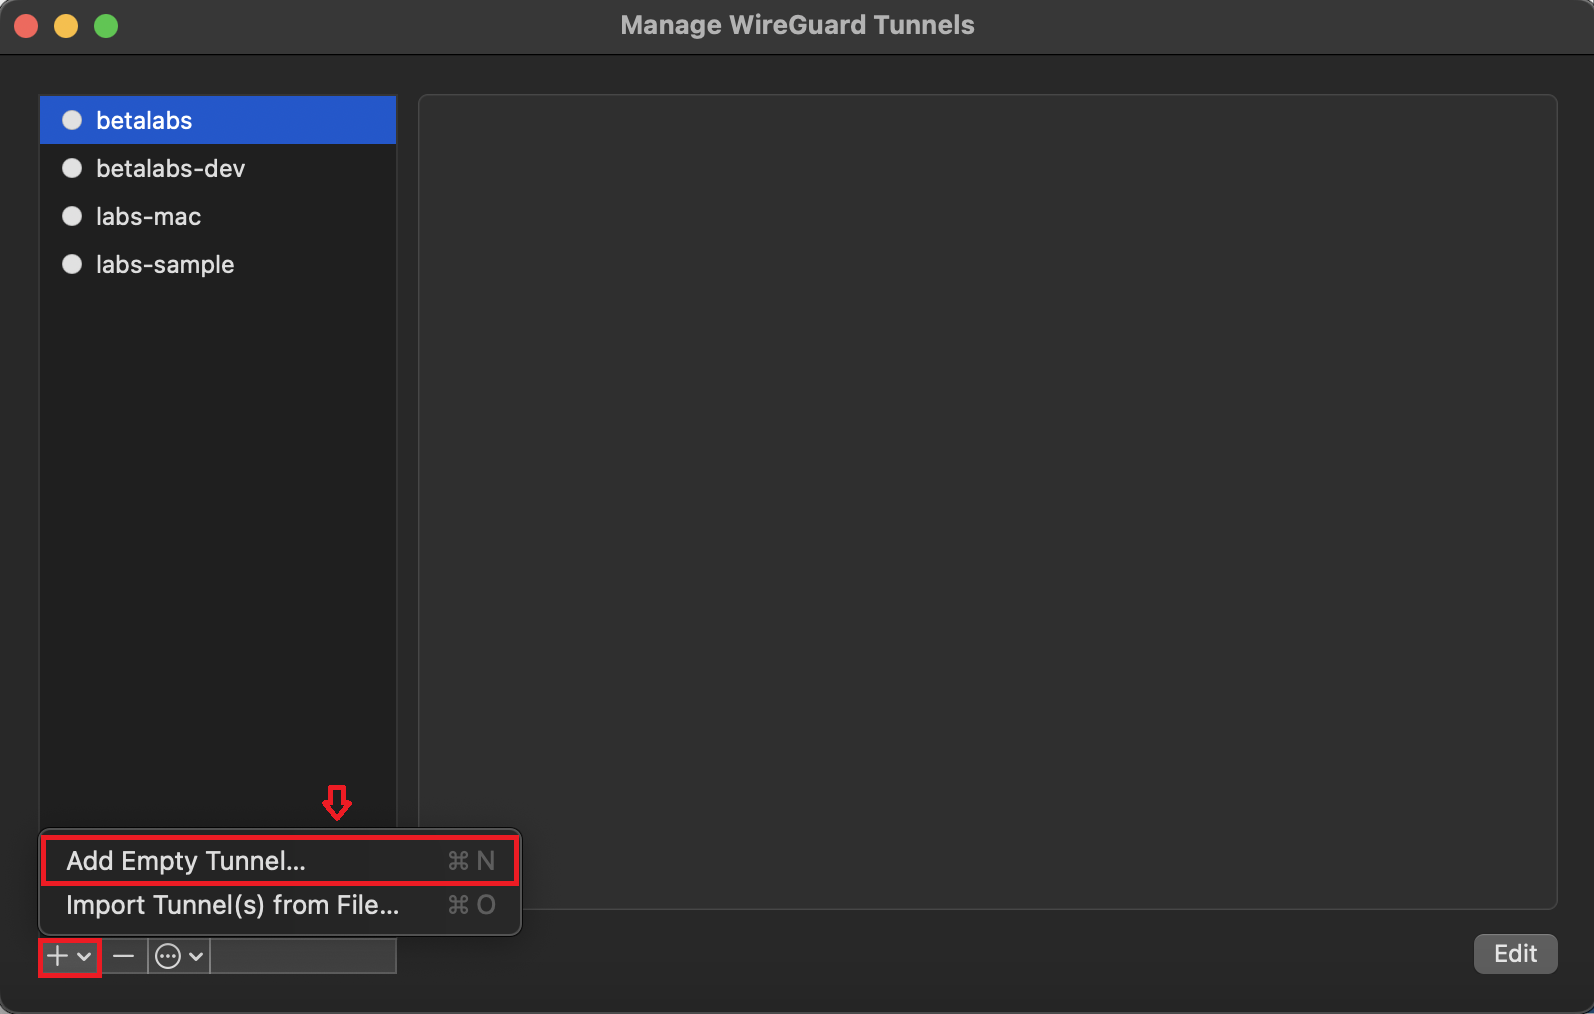
- Begin by opening the WireGuard application on your Mac. Look for the ‘+’ symbol within the app’s interface, which signifies the option to add a new connection. Click on ‘Add an empty tunnel’ to start configuring a new secure tunnel for your connection.
- WireGuard operates using a pair of cryptographic keys (public and private) to ensure a secure connection. you will need to copy this public key into the
Wireguard Public Keyfield of theAdd Devicedialogue box.

- After entering your public key, proceed by clicking on the ‘Verify and add’ option. This action adds the device you’ve provided, ensuring it’s correct and viable for use in setting up a secure tunnel.
- With your public key verified and added, the next step involves configuring the tunnel itself. Select your device listed in WireGuard and click on ‘Show Configuration’. This will display the current configuration settings for your tunnel, including the IP address and other relevant details.

- Copy all necessary configuration details starting from the ‘Address’ field. These details are critical for ensuring your tunnel correctly routes the traffic to and from your Mac. Paste these settings into the WireGuard configuration section, ensuring every detail matches the configuration.
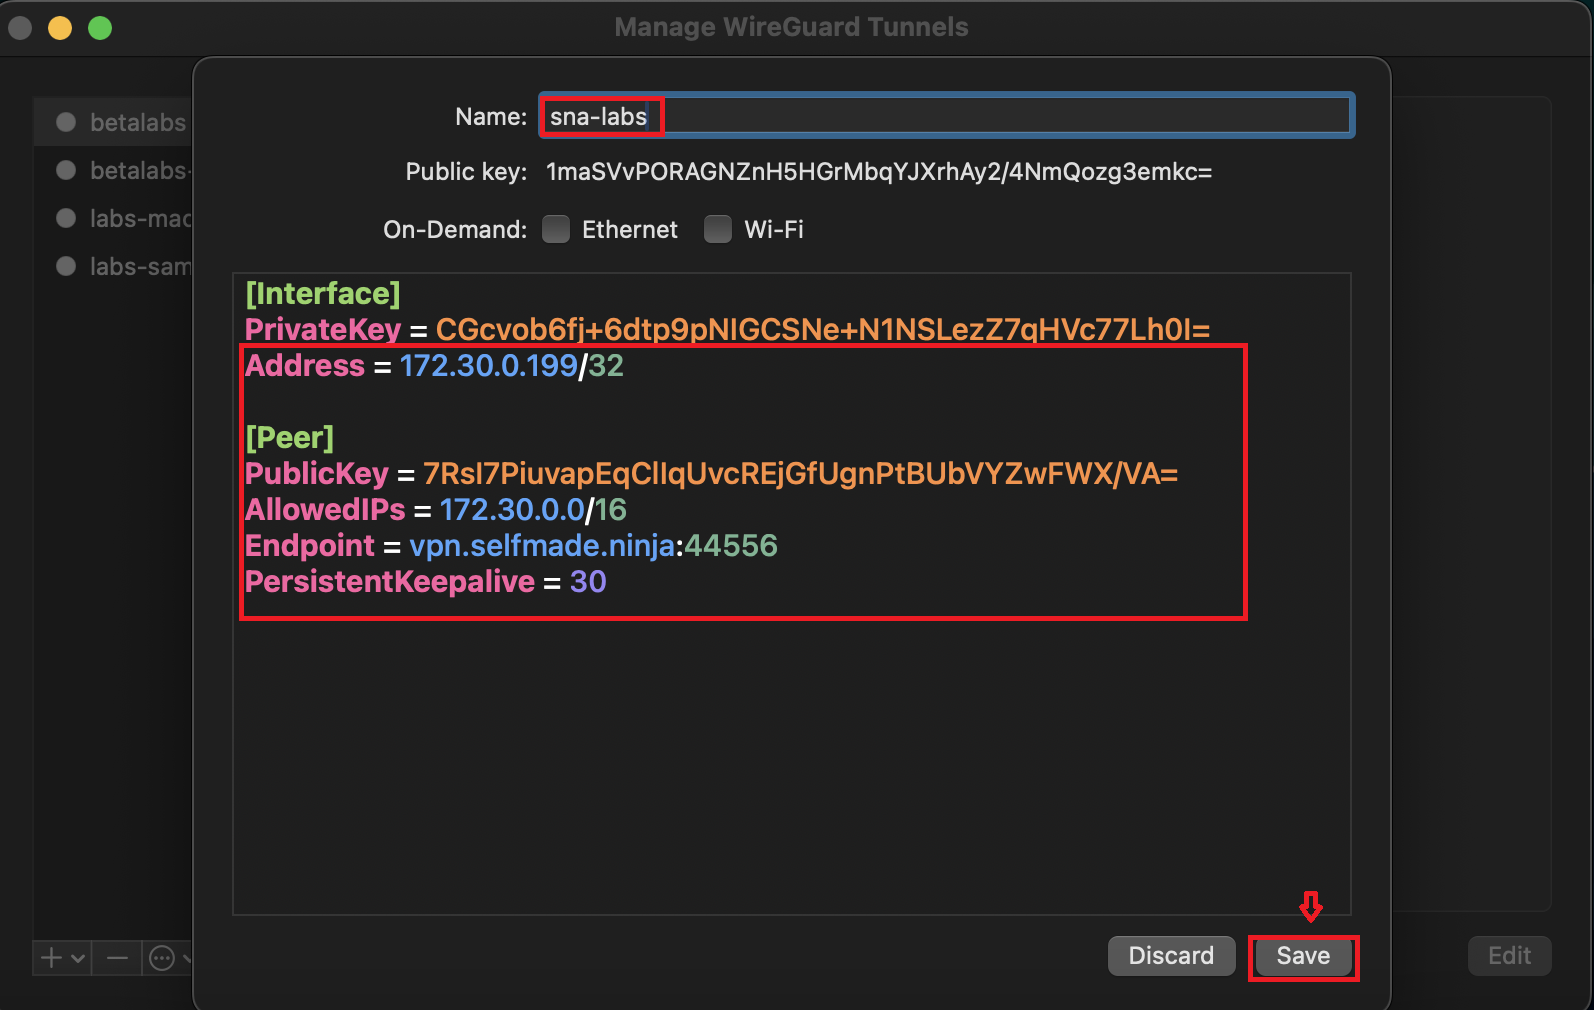
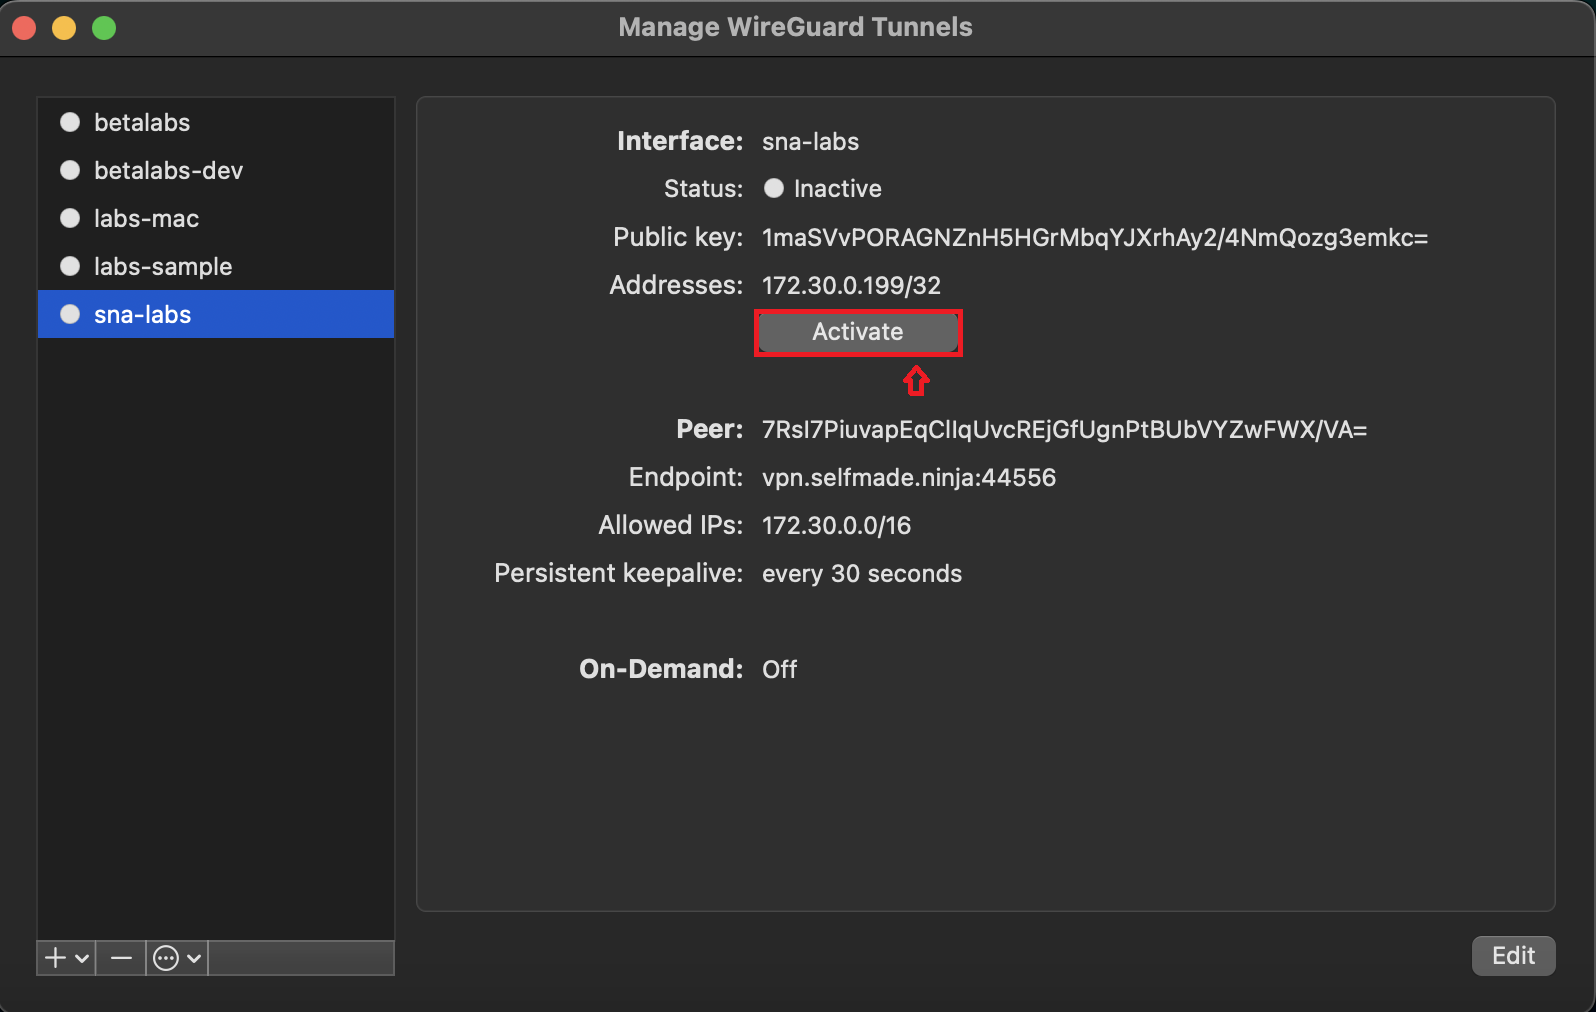
- The final step in the configuration process is to activate the tunnel you’ve just set up. Click on ‘Activate’ within WireGuard to establish the connection using your new tunnel. This action activates the secure connection, routing your internet traffic through the configured tunnel, effectively securing your online activities.
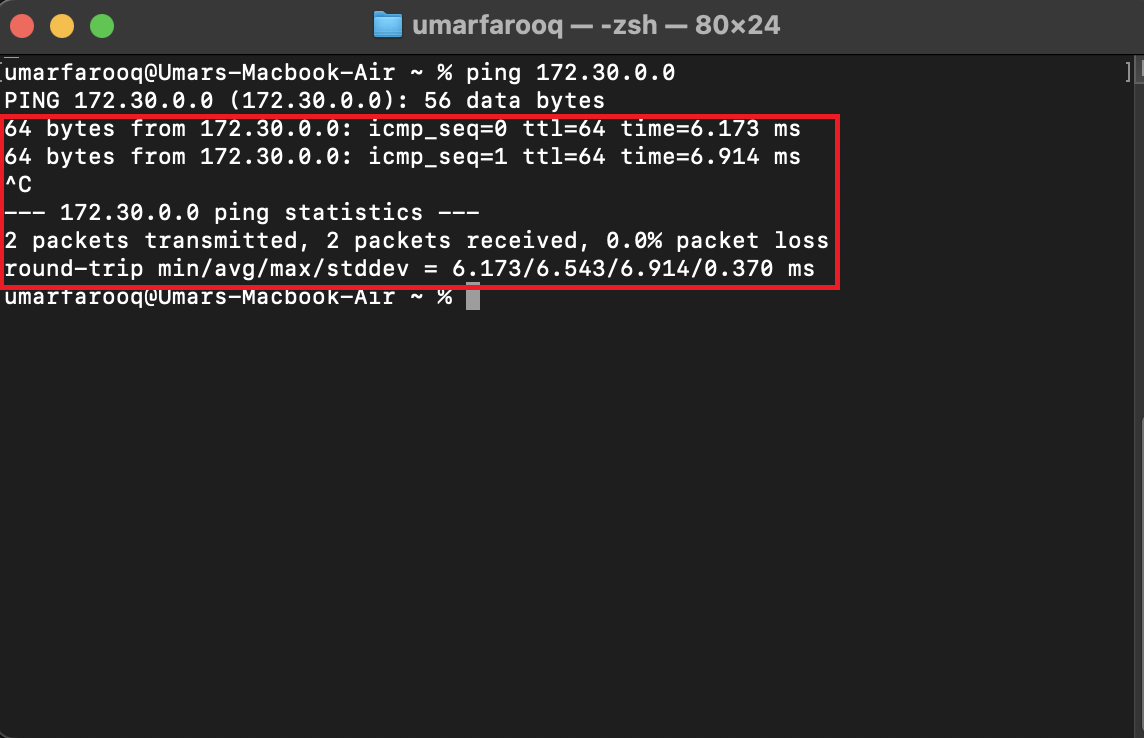
- Open your Terminal, type
'ping 172.30.0.0'to check whether the WireGuard connection is working or not. Now you have configured your PC to WireGuard.
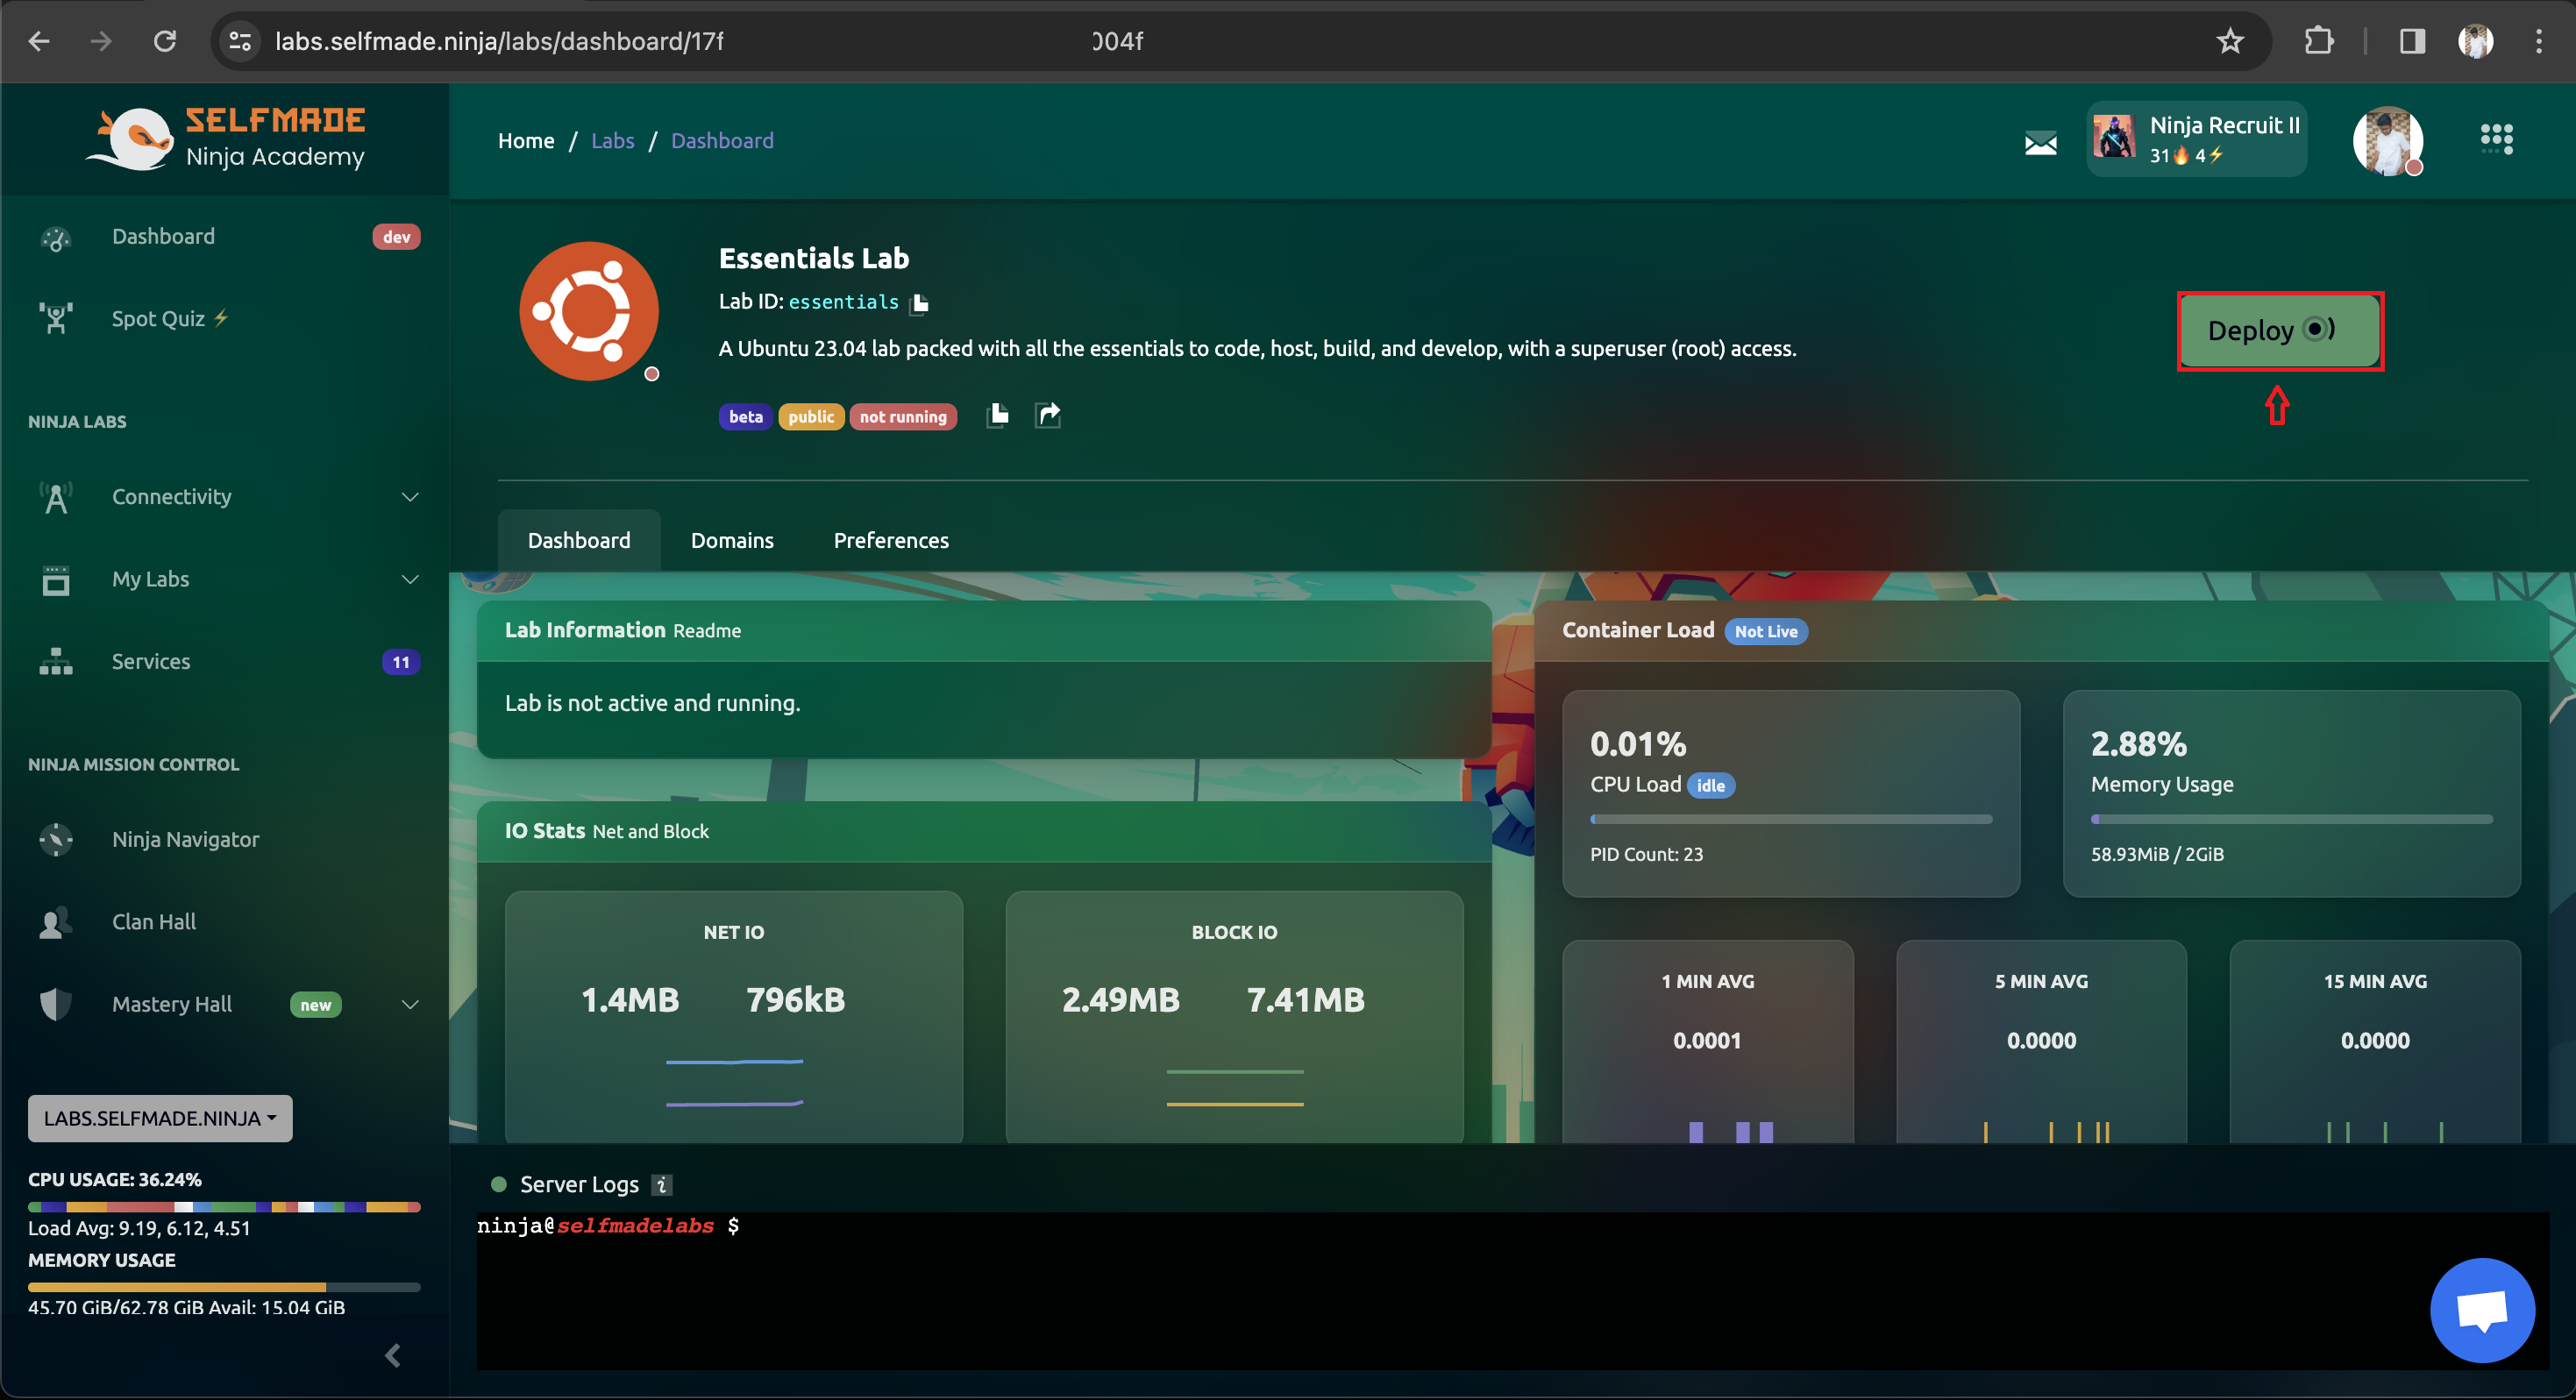
- Now, from your ‘Labs’ page, click ‘deploy’ button to deploy your labs. This action ensures that your lab instance is running and is ready to connect.
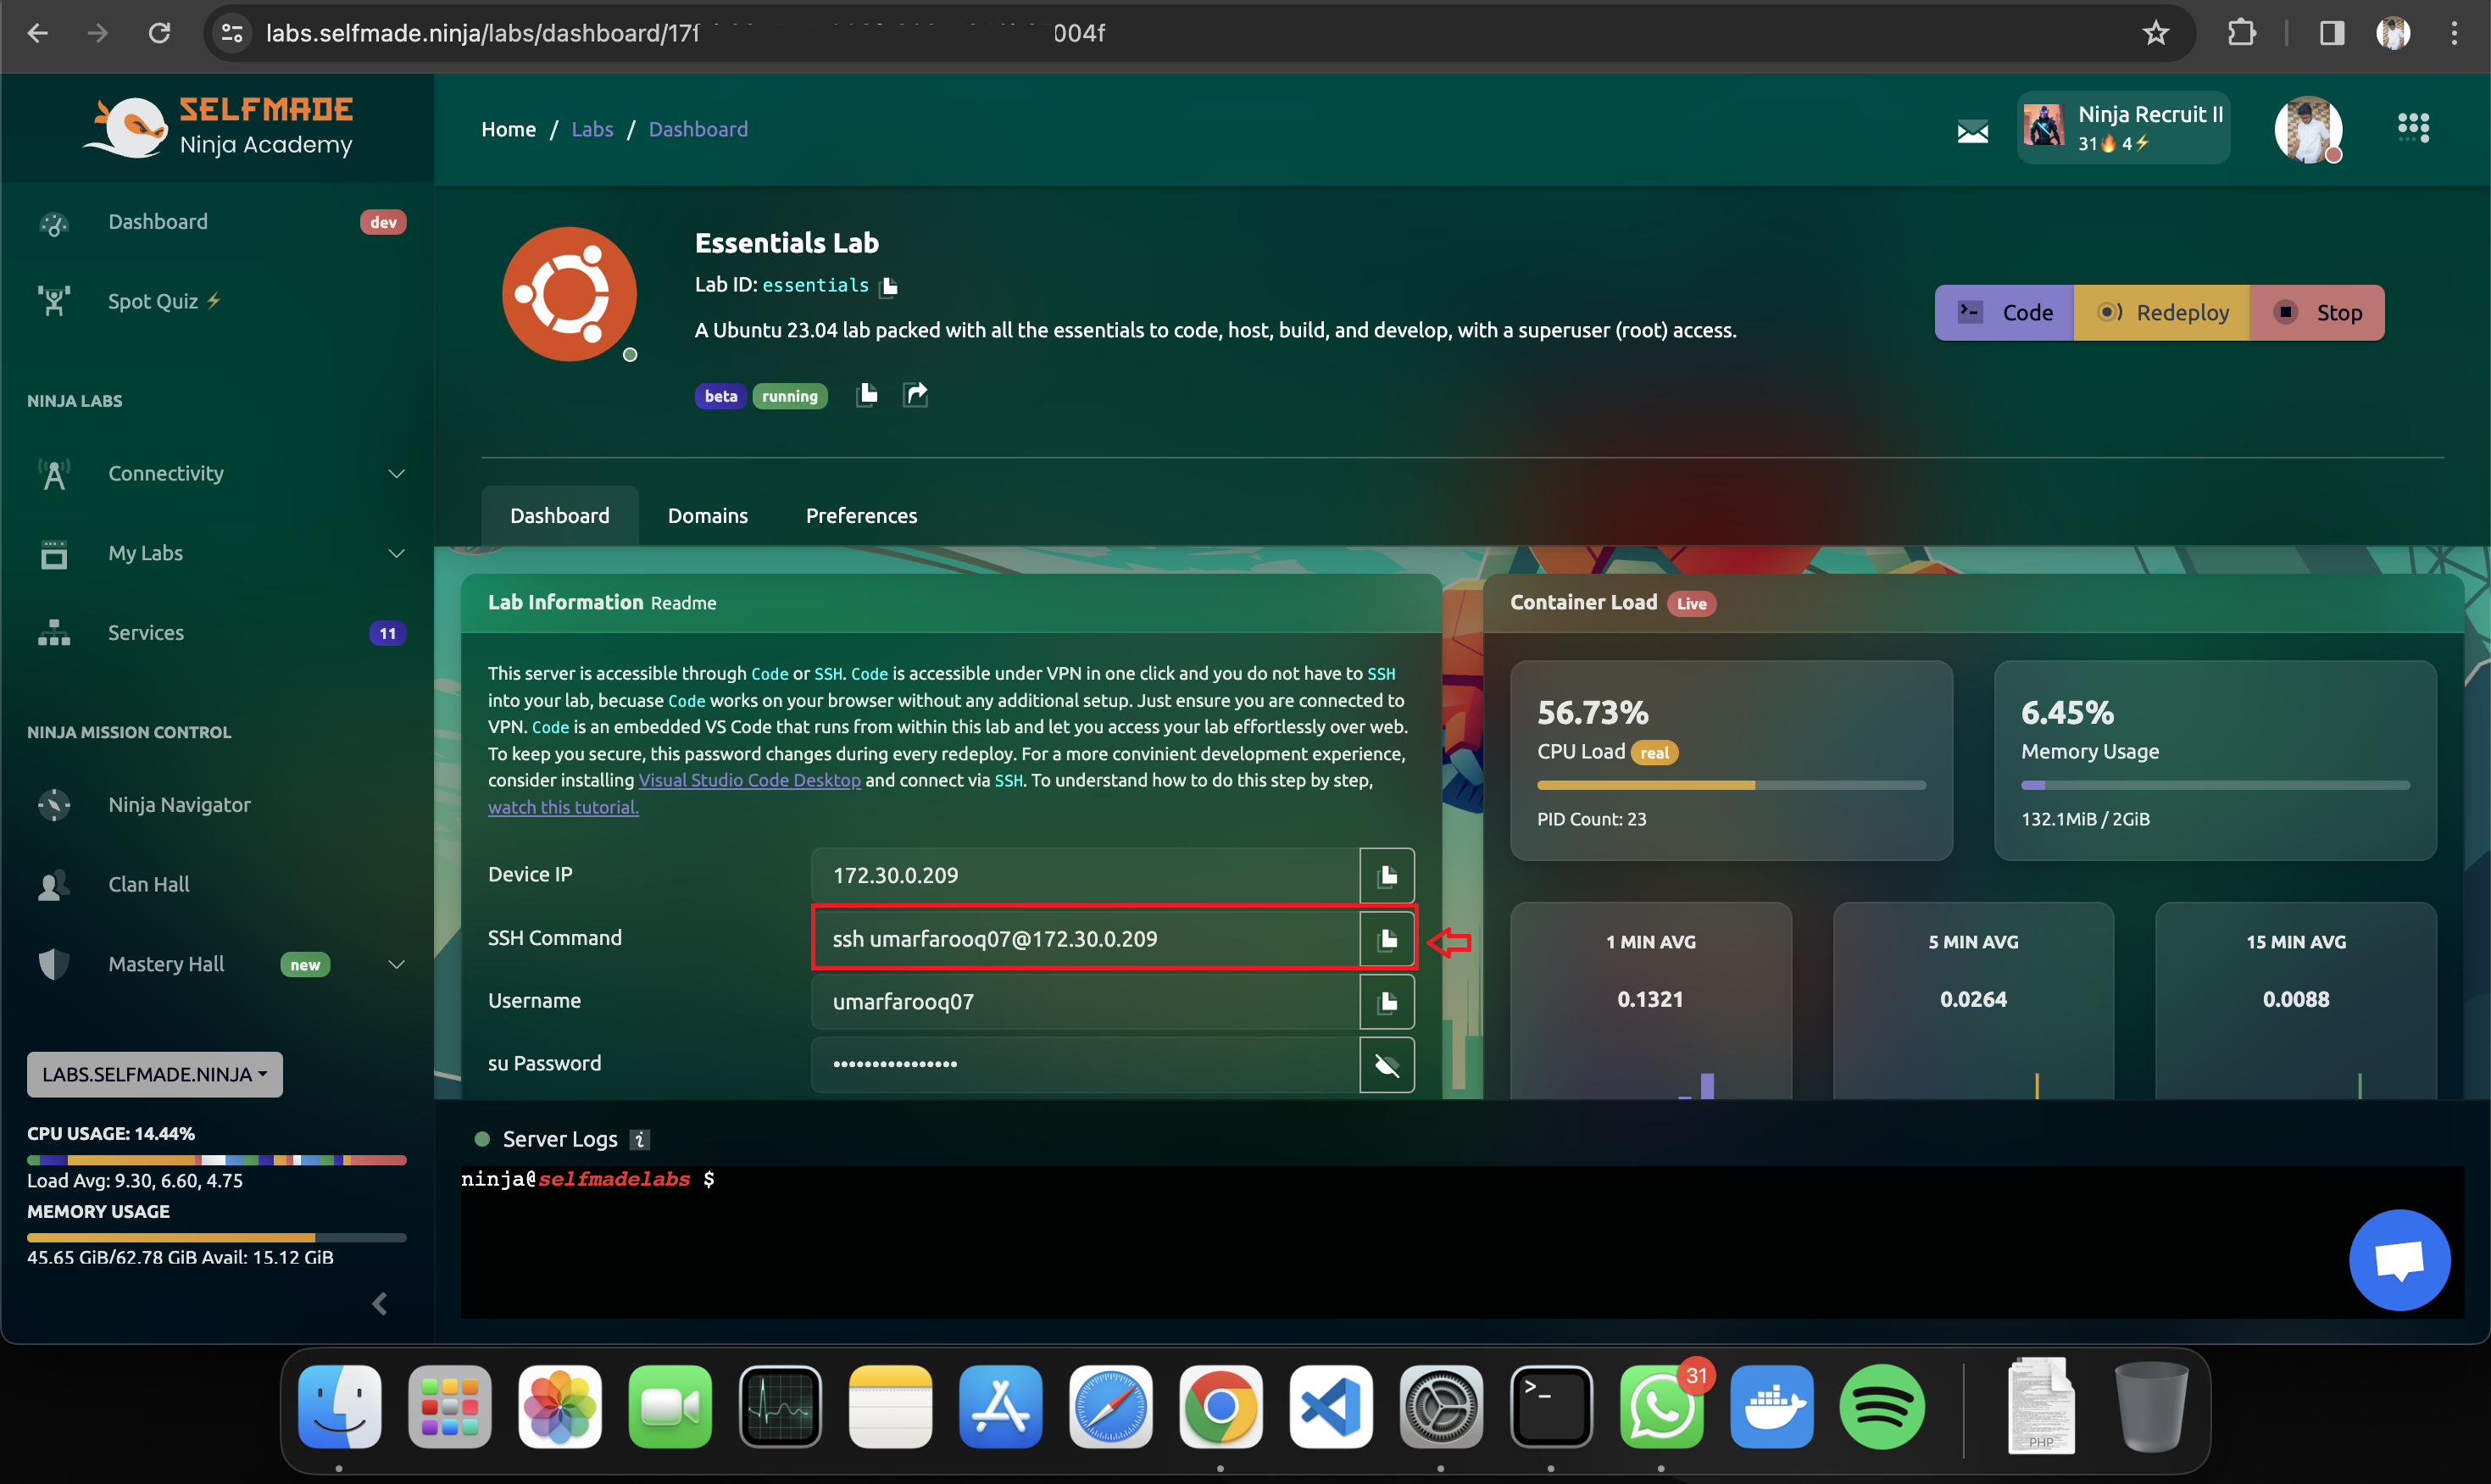
- After the server is deployed, you can copy the SSH command from the field below and run it in the terminal, And your lab instance is connected via your terminal.

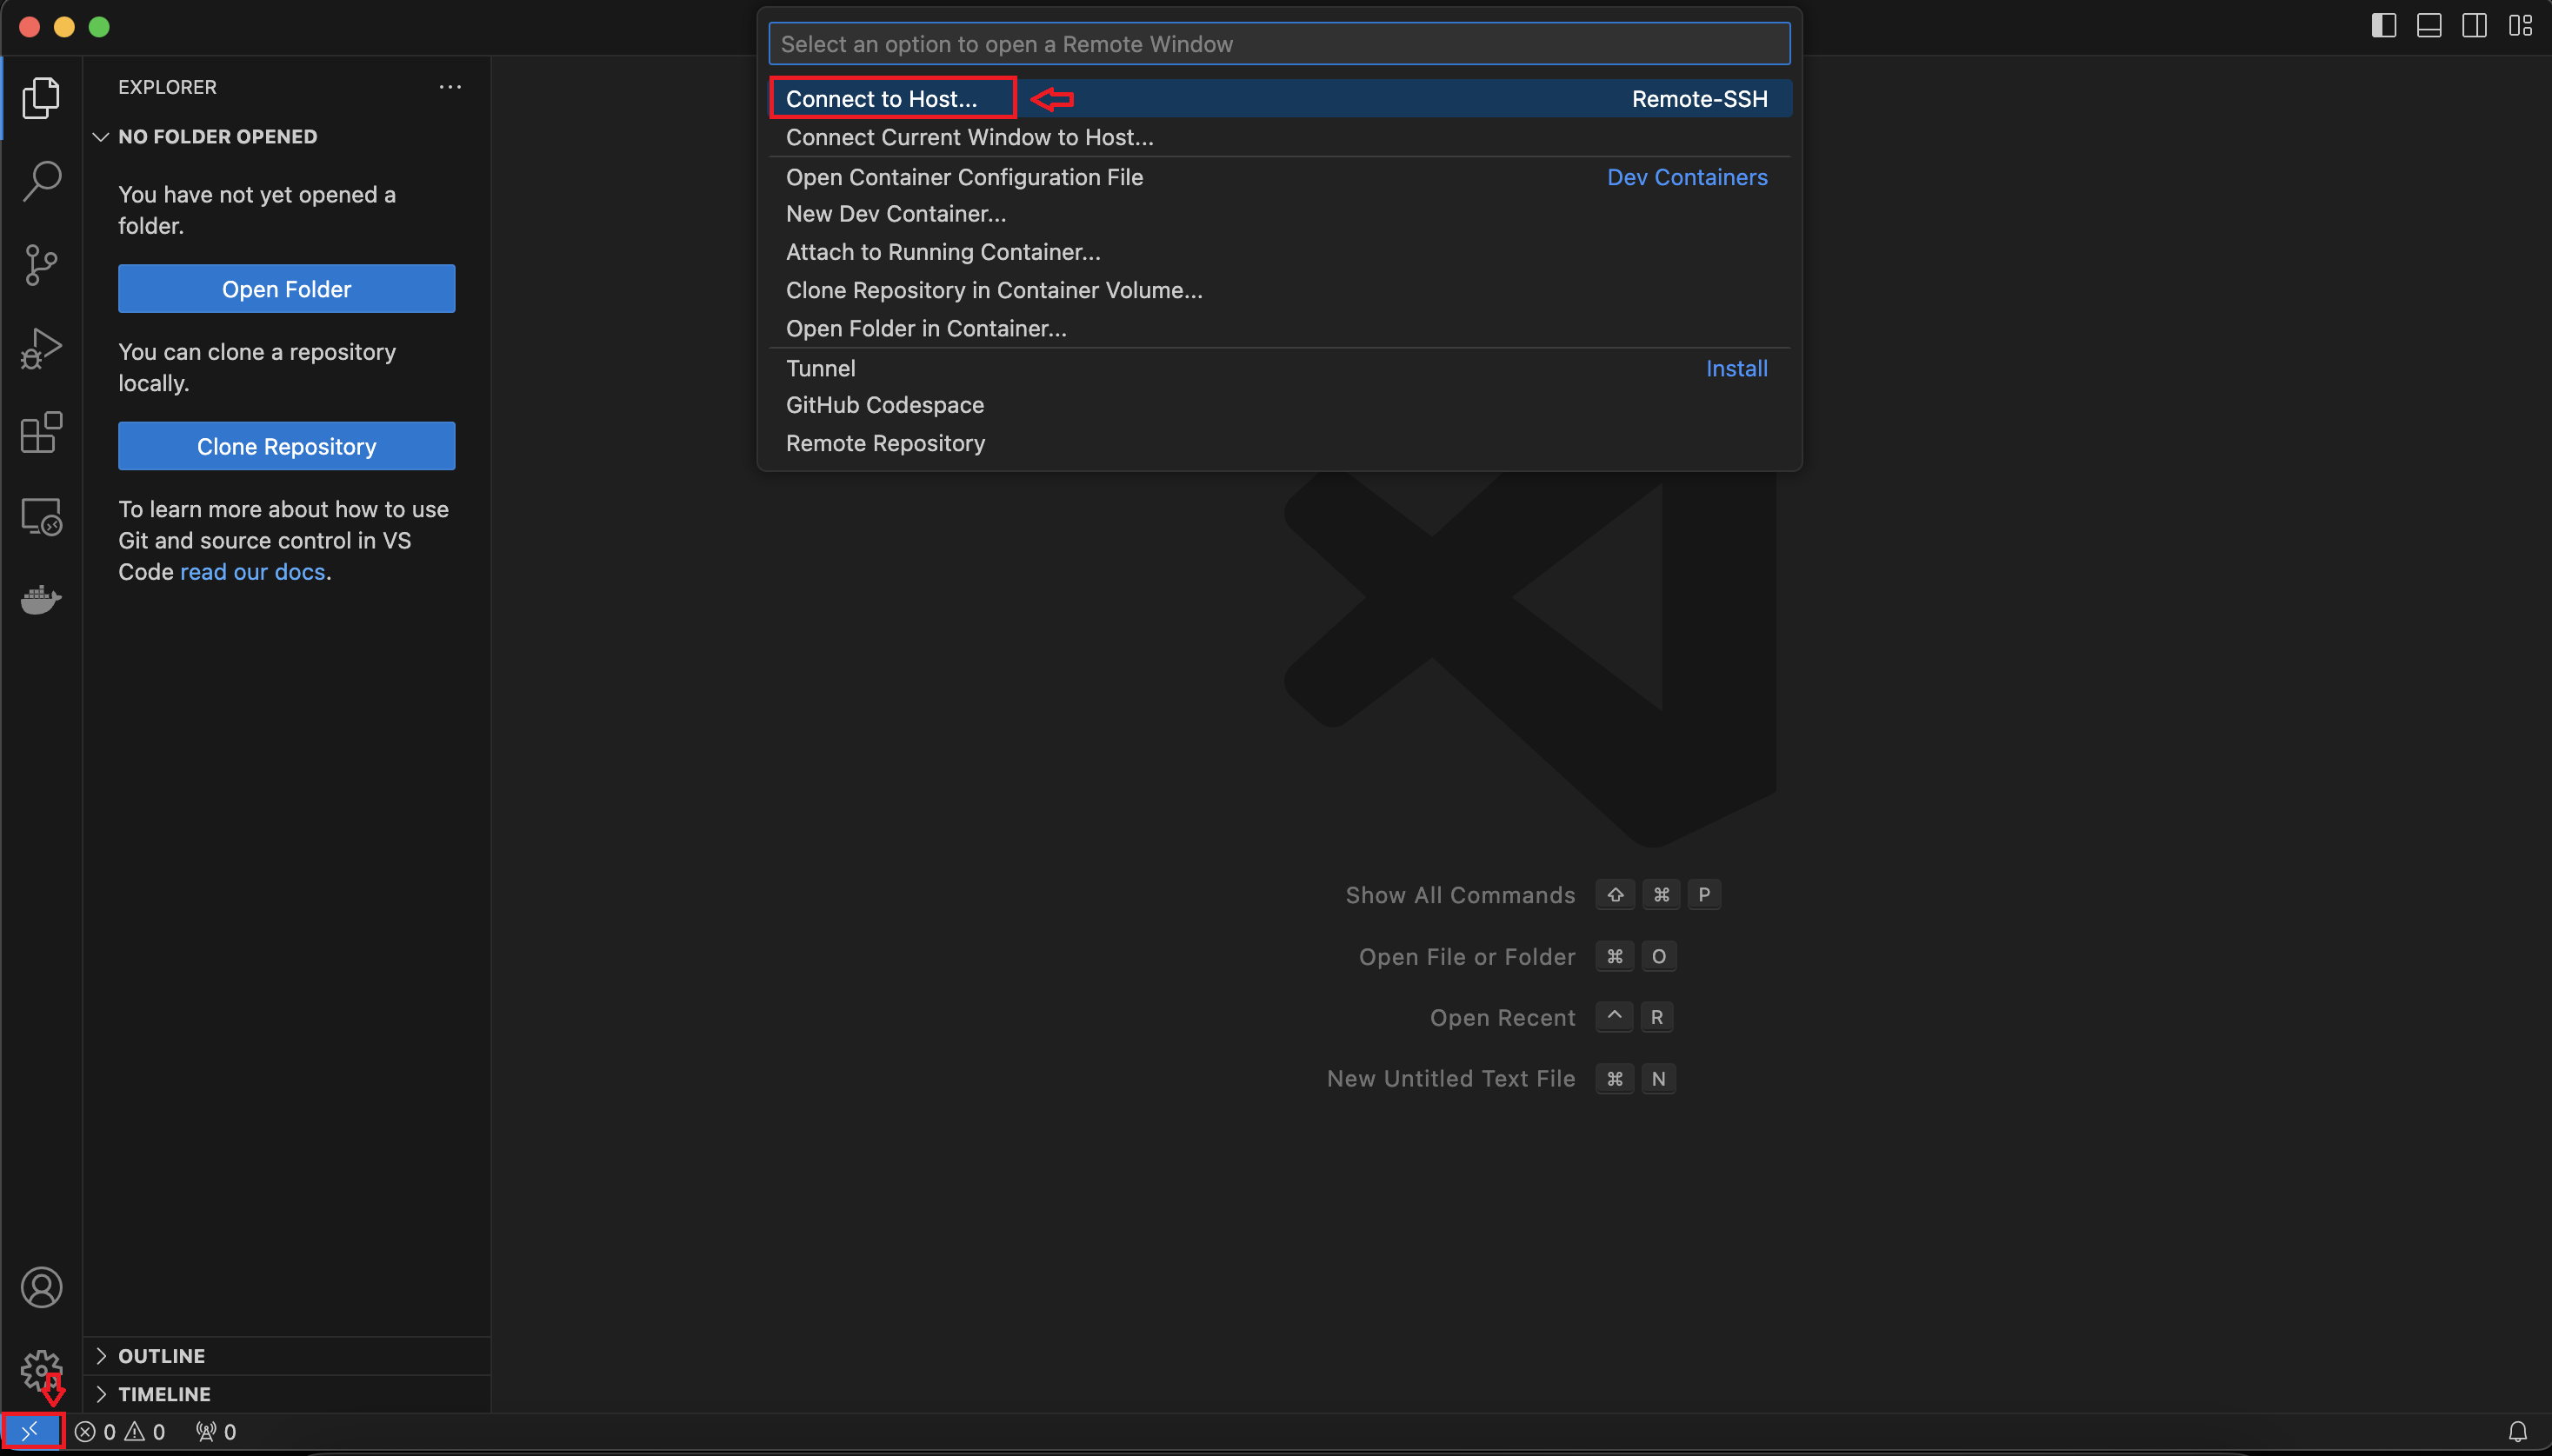
- If you want to connect it via VS Code, make sure Remote-SSH extension is installed (If you don’t have VS Code Installed, Click here to download.)

- Click SSH icon from bottom-left of VS Code, Click ‘Connect to Host’, and click ‘Add new SSH host’. This step helps adding your SSH host to to your VS Code, so that you don’t have to manually copy SSH commands.
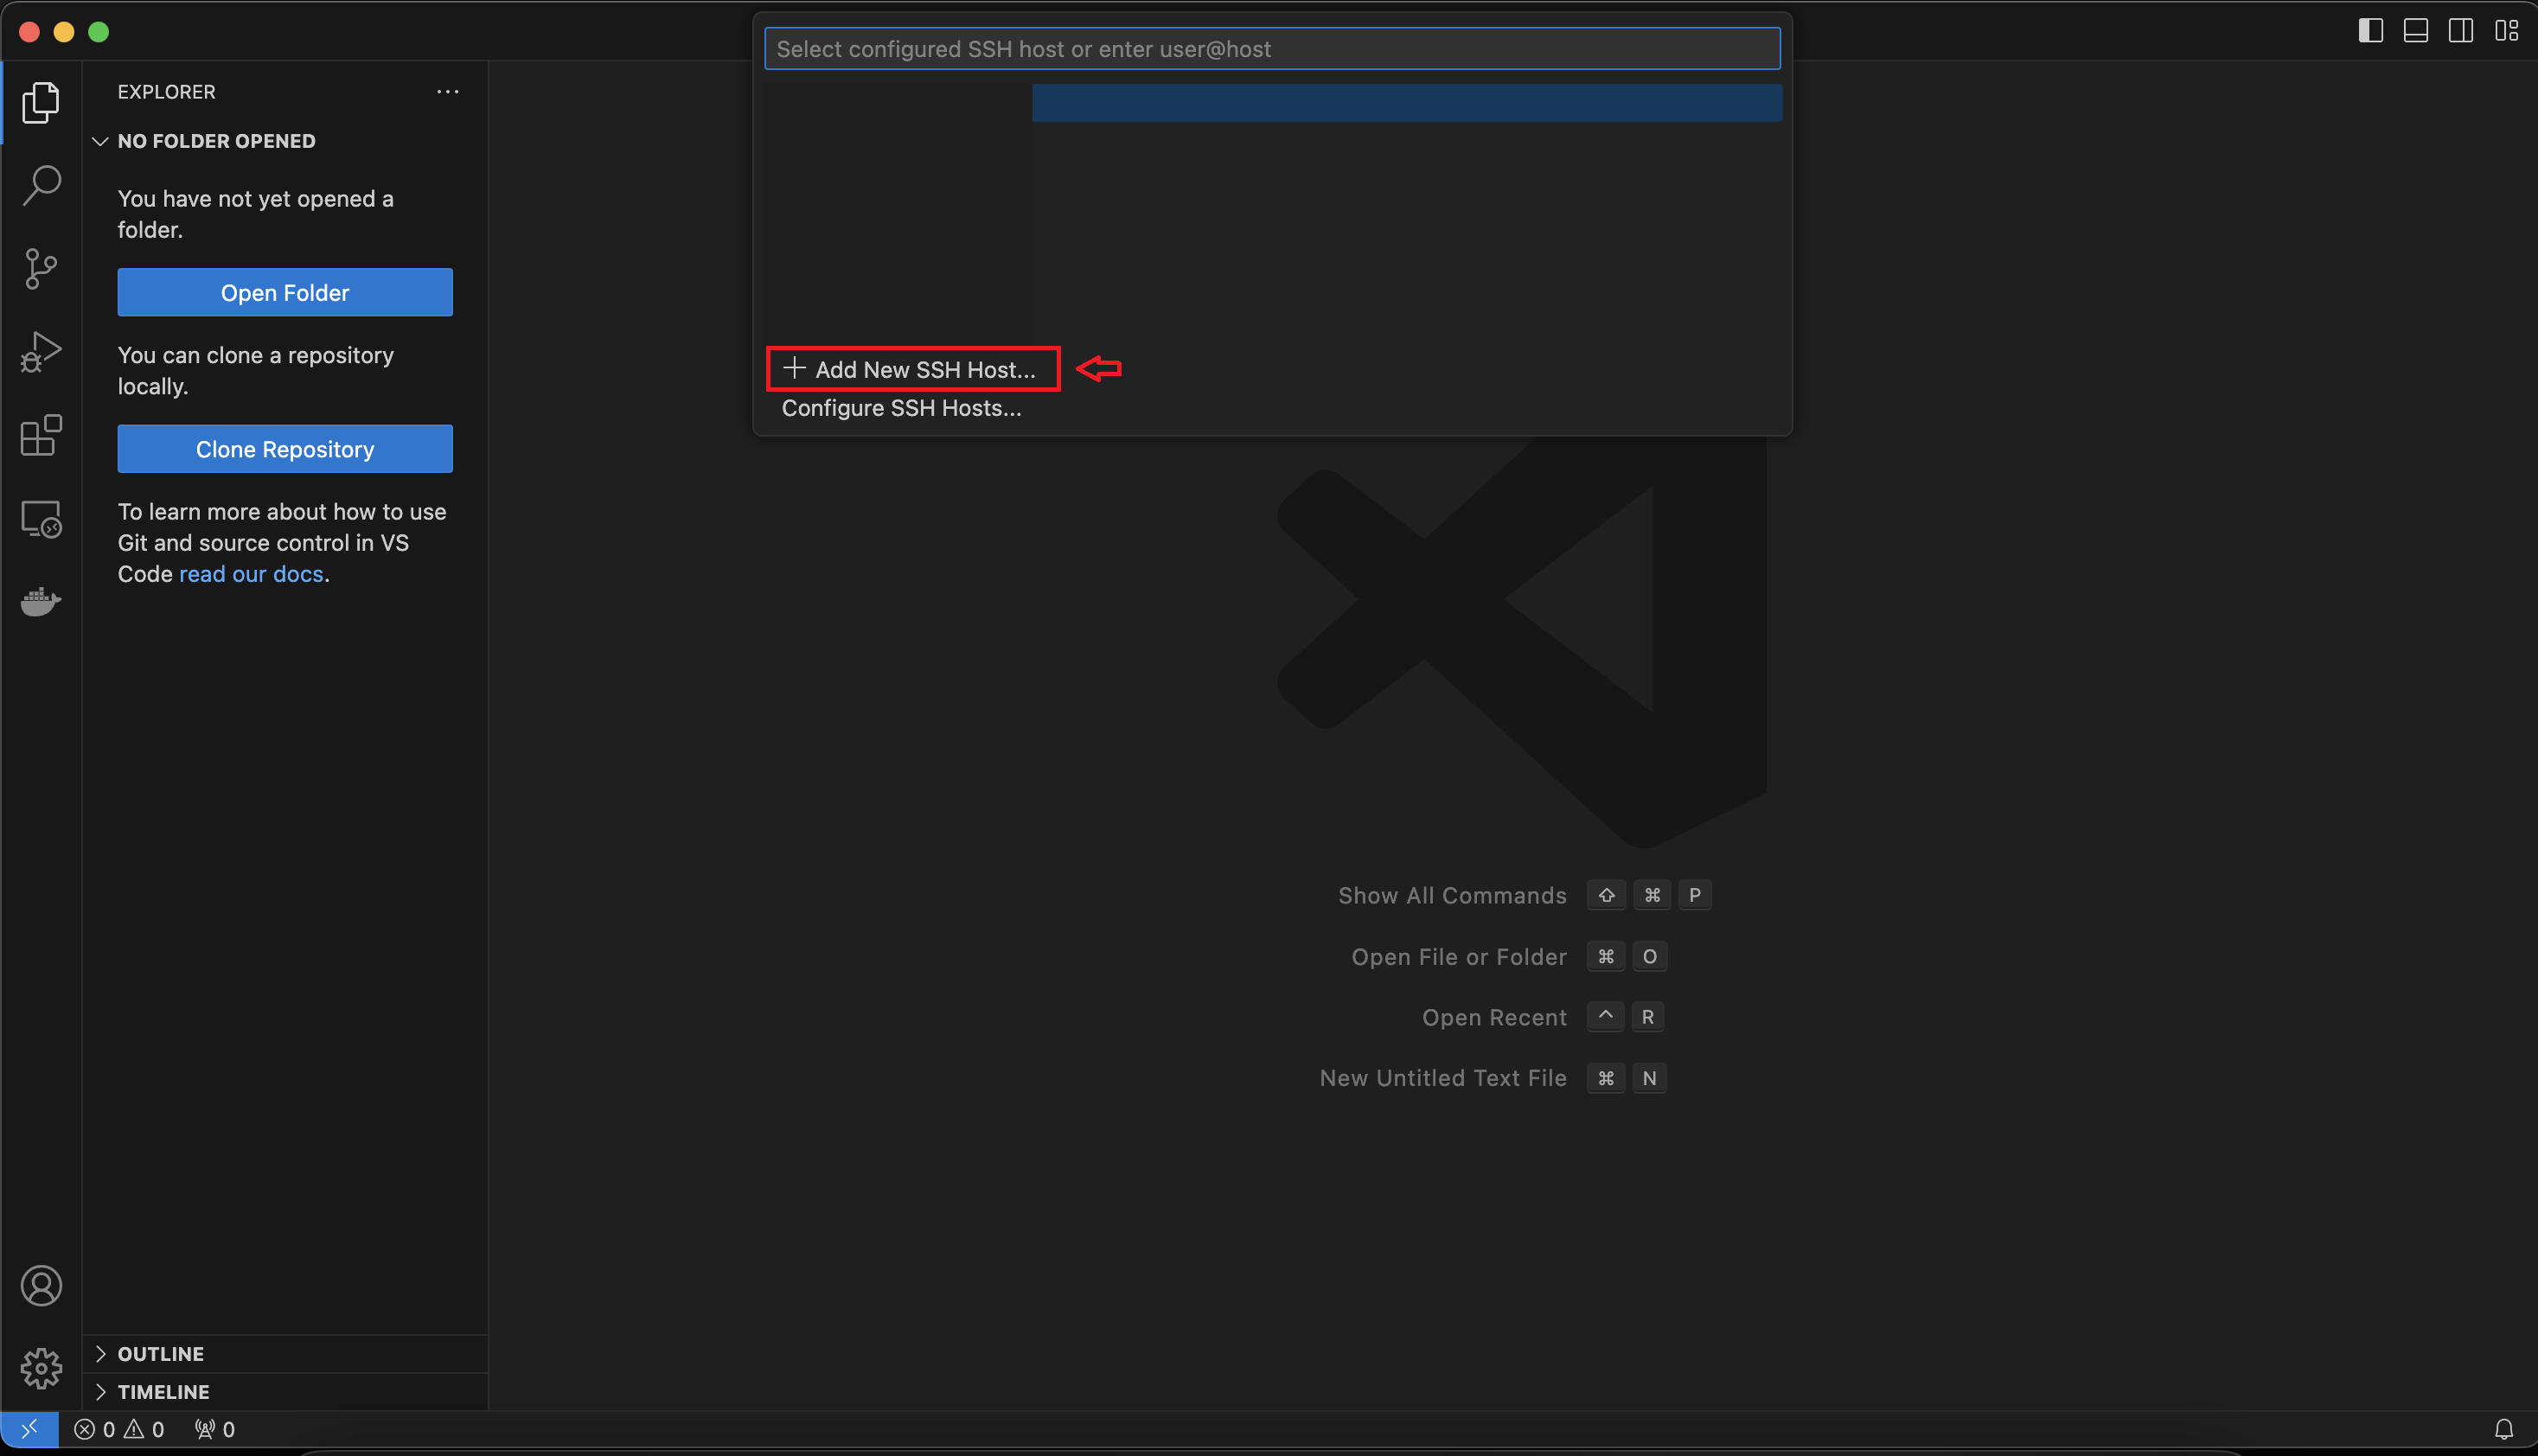
- Then paste the SSH command, and hit enter. then click ‘Connect’ below.

- Your Labs is now connected via VS Code. To open the terminal within the code server environment, simply press Ctrl and the backtick (`) button simultaneously. This action will grant you direct access to the terminal.

Congratulations, You’re Connected!
You’ve successfully connected to Selfmade Ninja Labs, opening doors to unlimited opportunities in coding, project development, and learning. This secure foundation is your entry point to Selfmade Ninja Lab cloud lab training for aspiring IT students, tailored to empower you in the field of IT.