Welcome to our guide on how to connect Selfmade Ninja Labs using SSH and WireGuard on Ubuntu. This step-by-step tutorial is tailored to help you integrate your Ubuntu environment with Selfmade Ninja Labs for seamless remote development and productivity.
Ubuntu, a versatile and robust operating system, is ideal for both development and daily tasks. By learning how to Connect Selfmade Ninja Labs, you can efficiently manage remote servers, deploy applications, and streamline your development process. Whether you’re a beginner or an advanced user, this guide will equip you with the skills to maximize your Ubuntu setup for Selfmade Ninja Lab cloud lab training for aspiring IT students.
SNA Labs provides a variety of powerful learning spaces, including:
- Machine Labs for Linux and development practice
- Challenge Labs for Capture-the-Flag missions
- Database services and other backend tools
- Spot Quiz, Code Arena, Learn AI, and more gamified learning features
Subscription Options
SNA Labs supports both Free and Premium users:Free Plan
- Can create a Git account and log in to the labs
- Can access Machine Labs only through the built-in VS Code Web
- Limited lab features
- Limited CTF challenges
- Cannot add devices to the lab via SSH
Premium Plan
- Full flexibility and access to all lab features
- Can connect machine labs from their local VS Code
- Can add devices to the lab via SSH
- Access to a wide range of CTF challenges and projects
Connect to Selfmade Ninja Labs
Create Git Account
-
Before you jump into the labs, you’ll need a Git account. If you don’t already have one, just visit git.selfmade.ninja
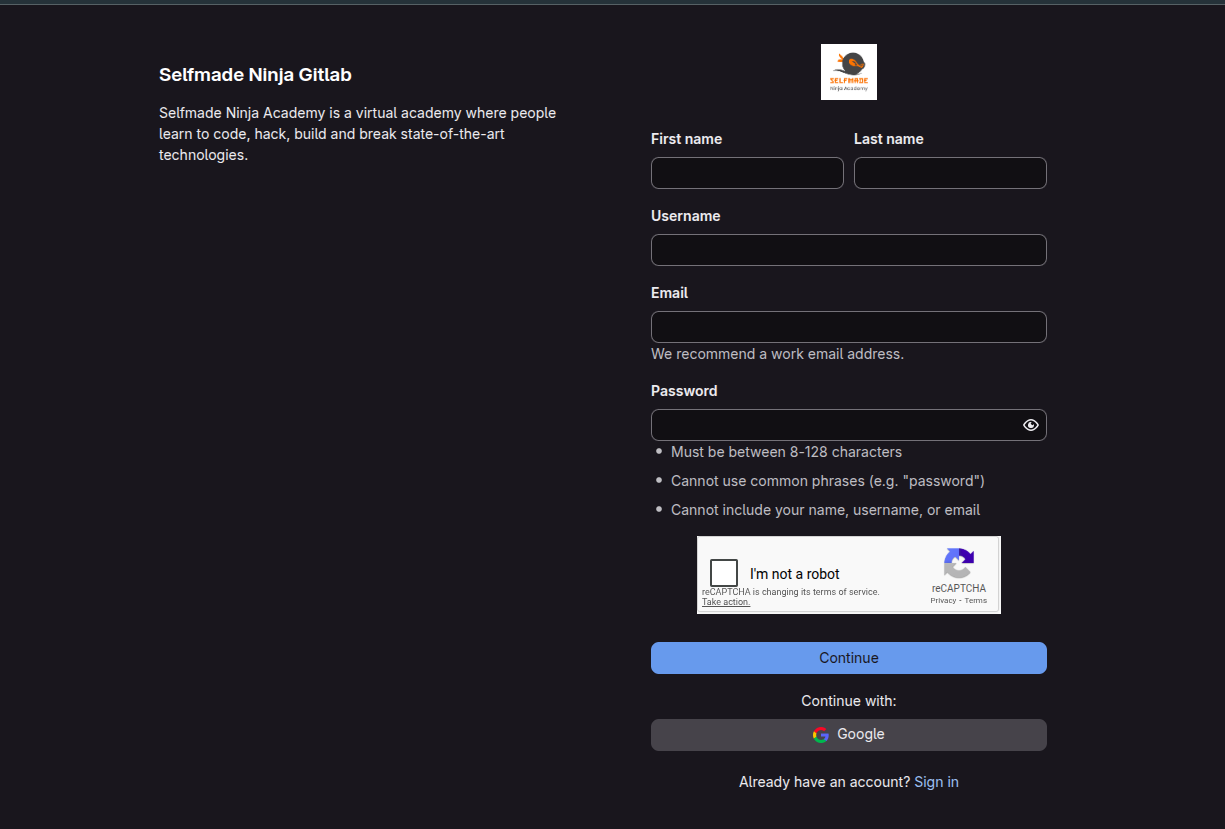
- You’ll see the sign-up page shown above. Just enter your details and click Sign Up.
- After that, you’ll receive a confirmation email at the address you provided.
- Open that email and use the link inside to log in with your username and password for the first time.
- And that’s it — your Selfmade Ninja Git account is now ready to use!
Lab Access for All Users
-
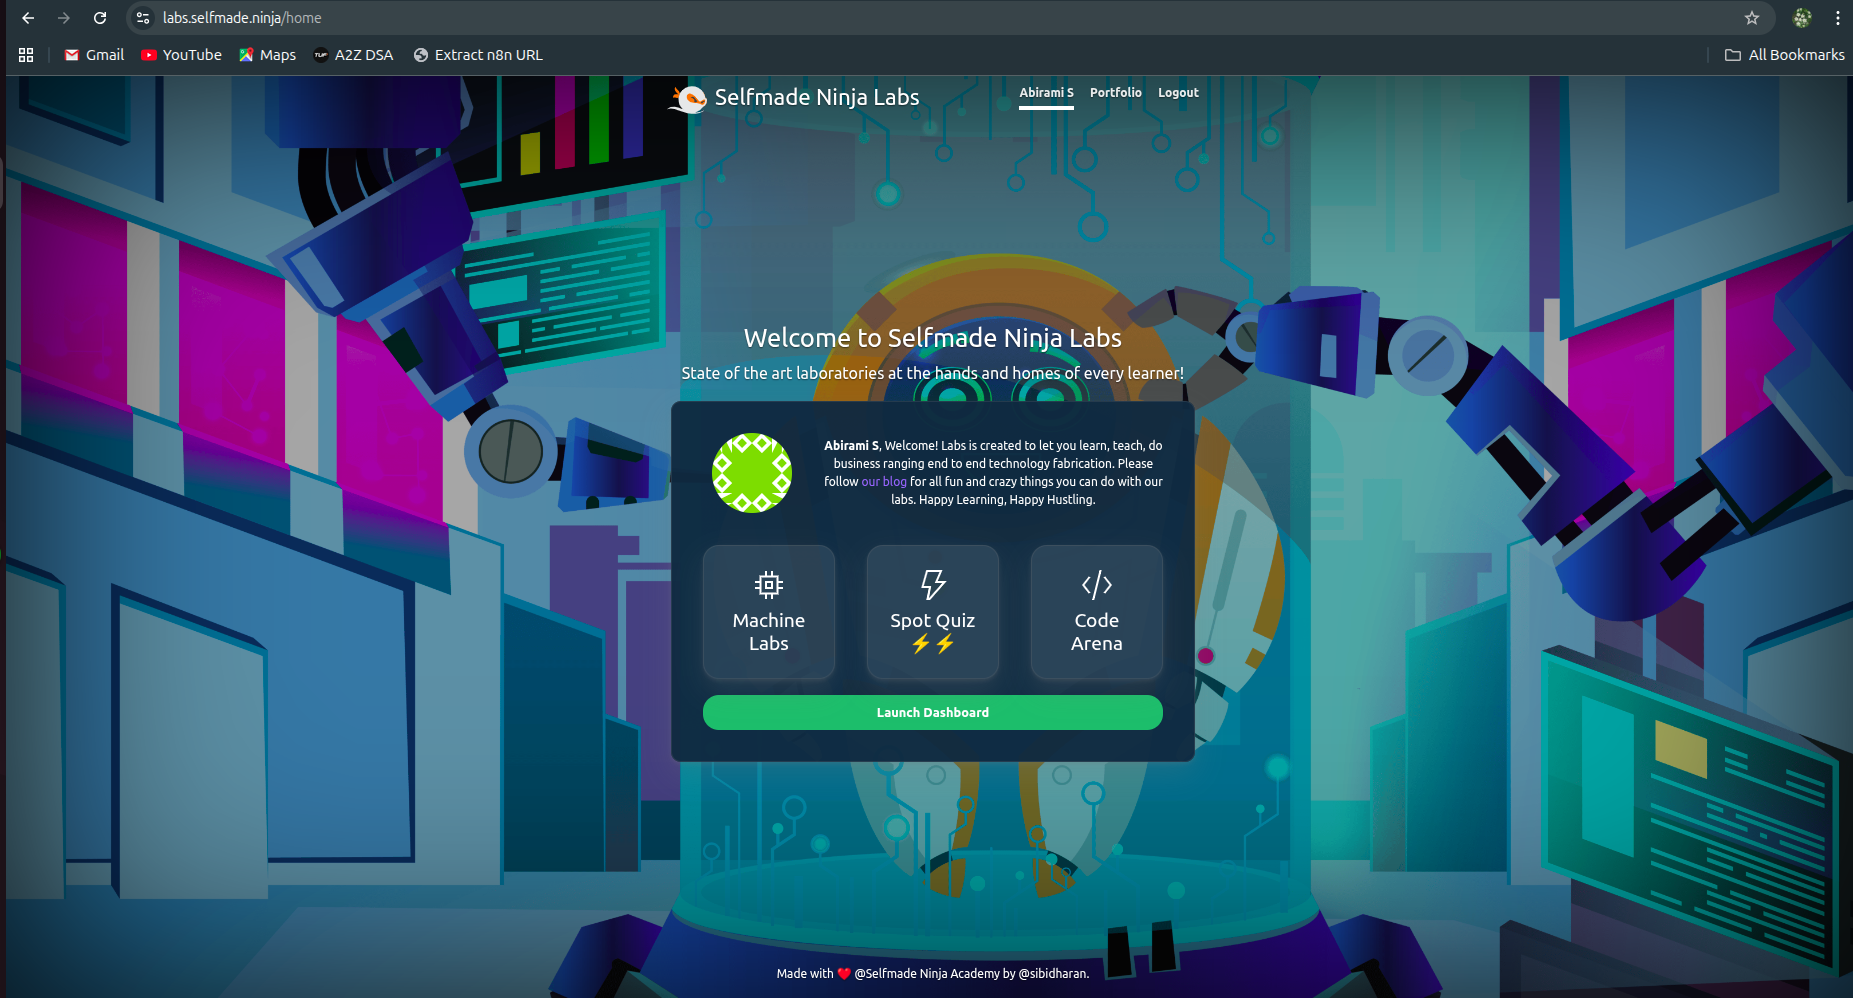
After you log in, you’ll land on the Labs home page.
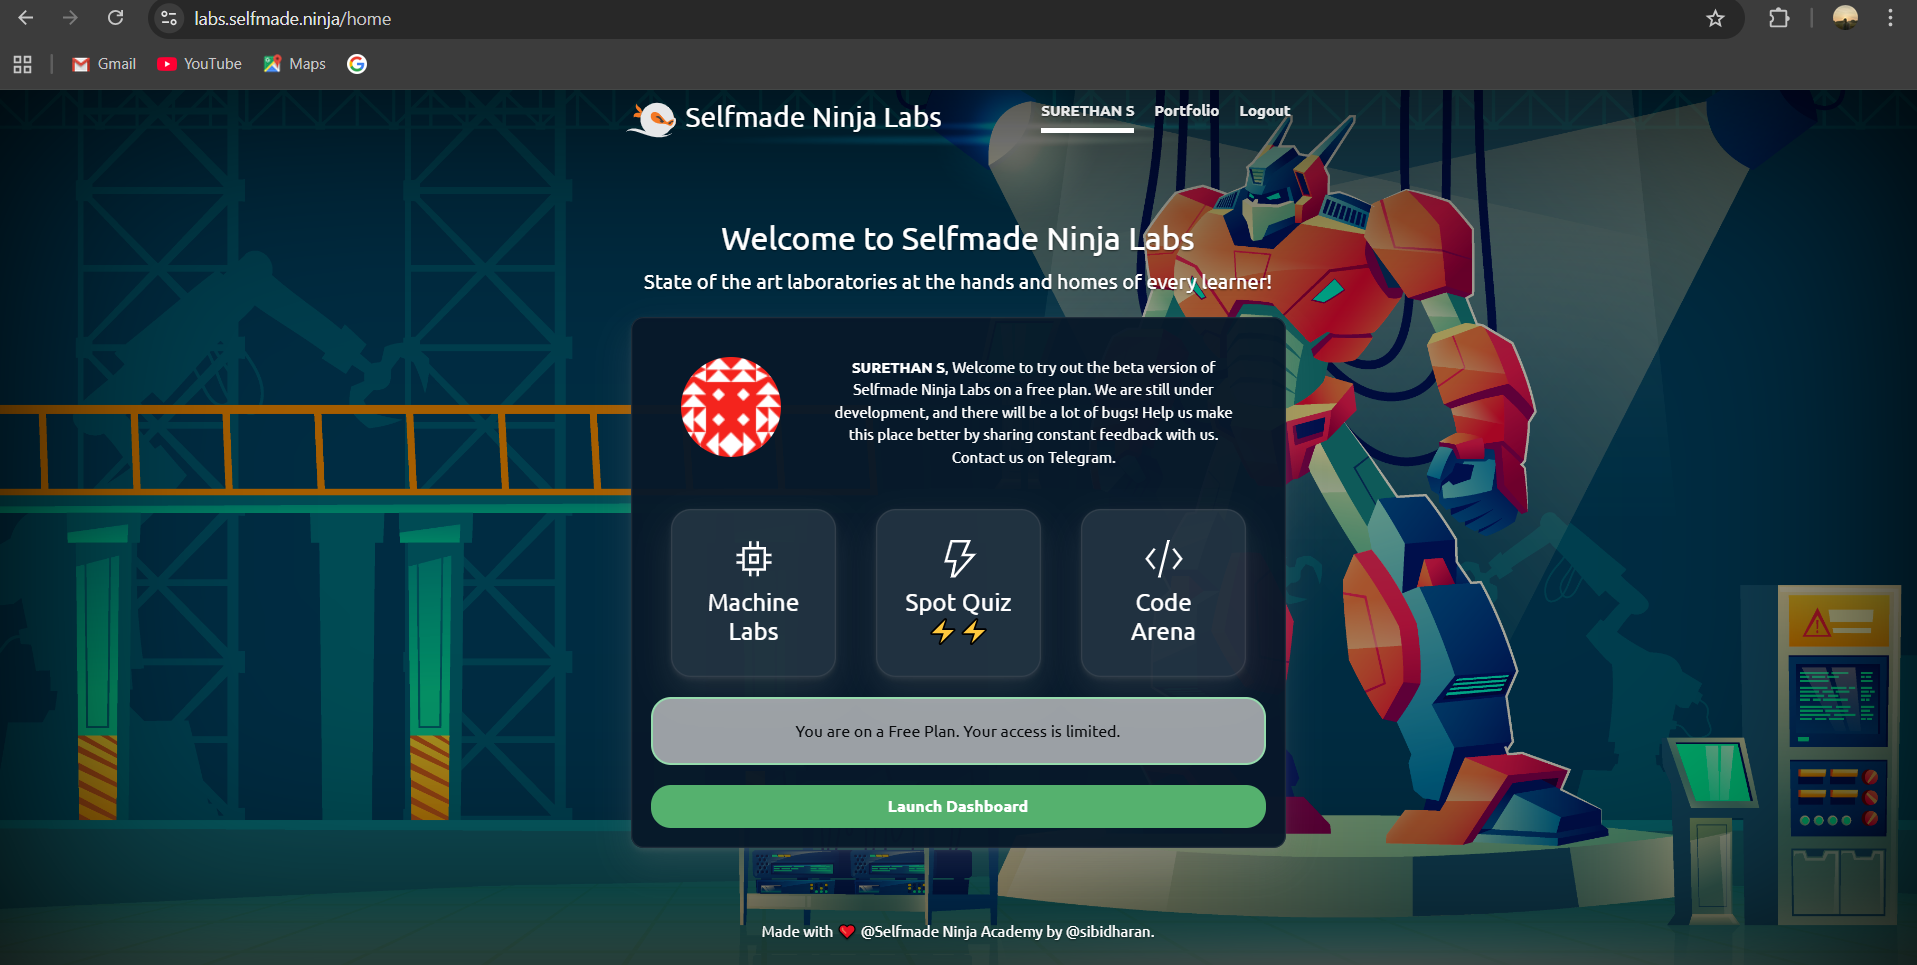
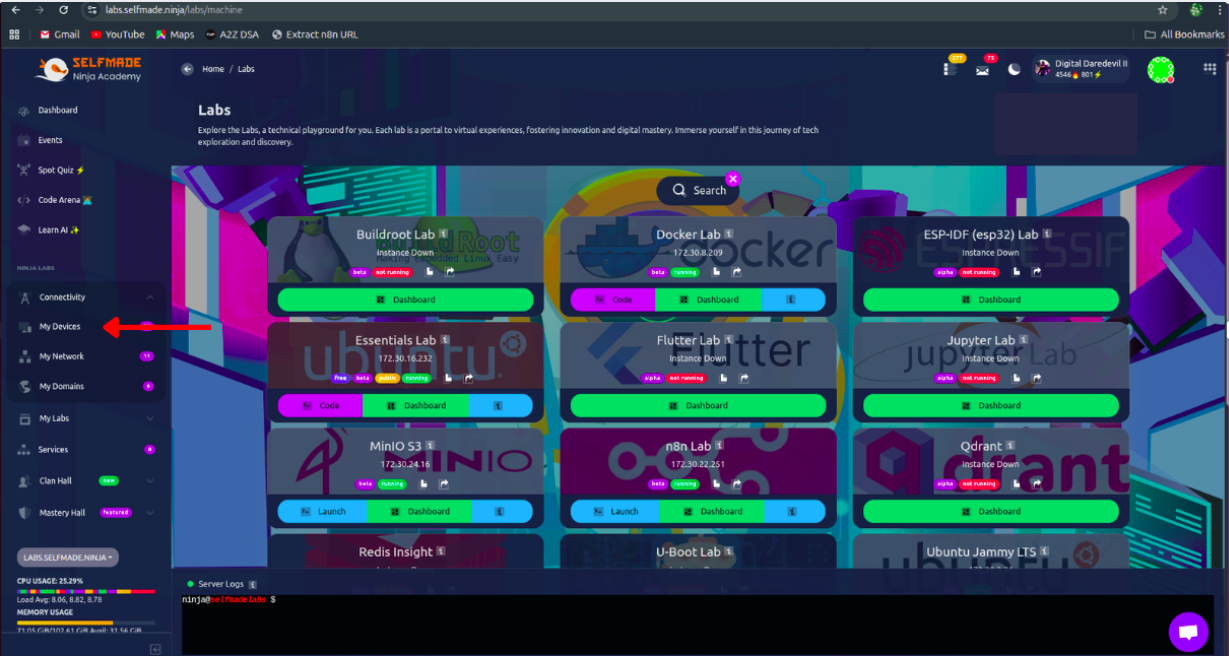
- Click Machine Labs
-
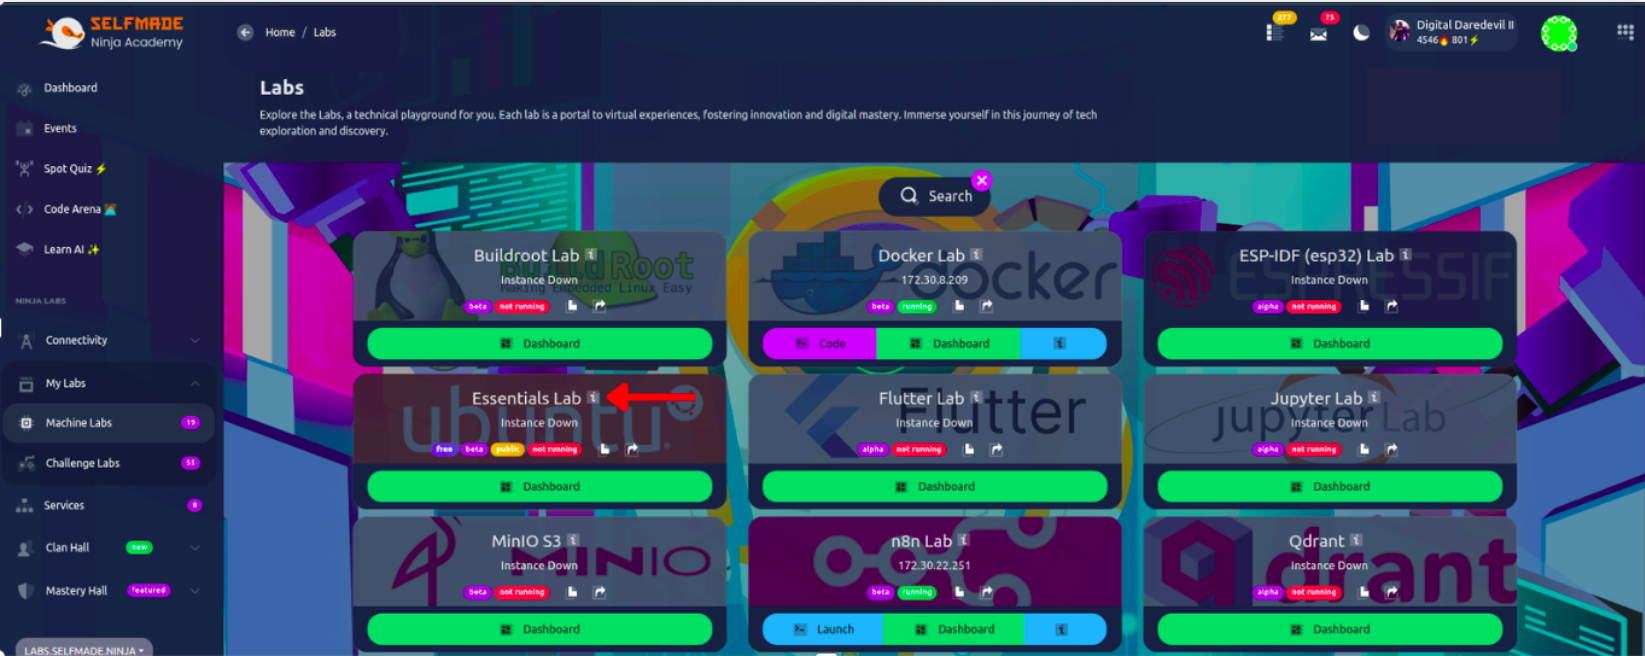
You’ll see the Essentials Lab listed there, Click Dashboard to open its control panel.
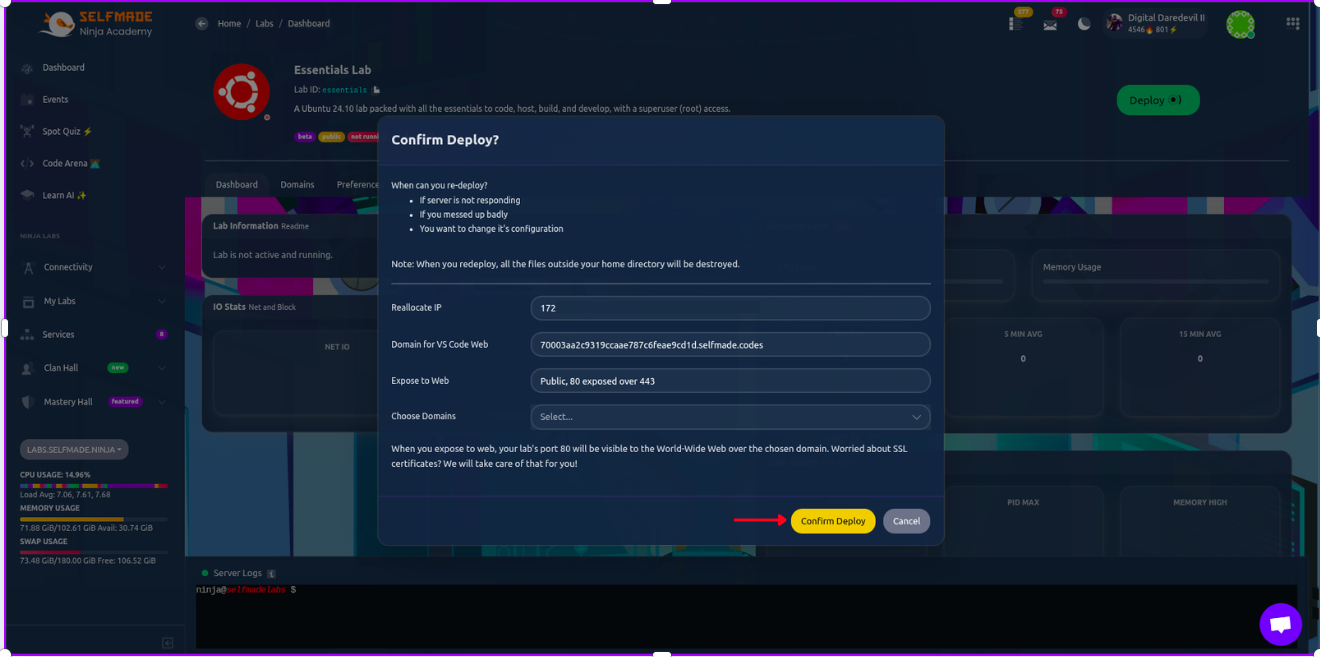
- In the top-right corner, you’ll see a Deploy button. Click it.

- A dialog box will appear showing details like the IP address and the VS Code Web domain. Just hit Confirm Deploy.
- Give it a few seconds, and your Essentials Lab will start up and move into a running state. Now it’s ready for you to use.
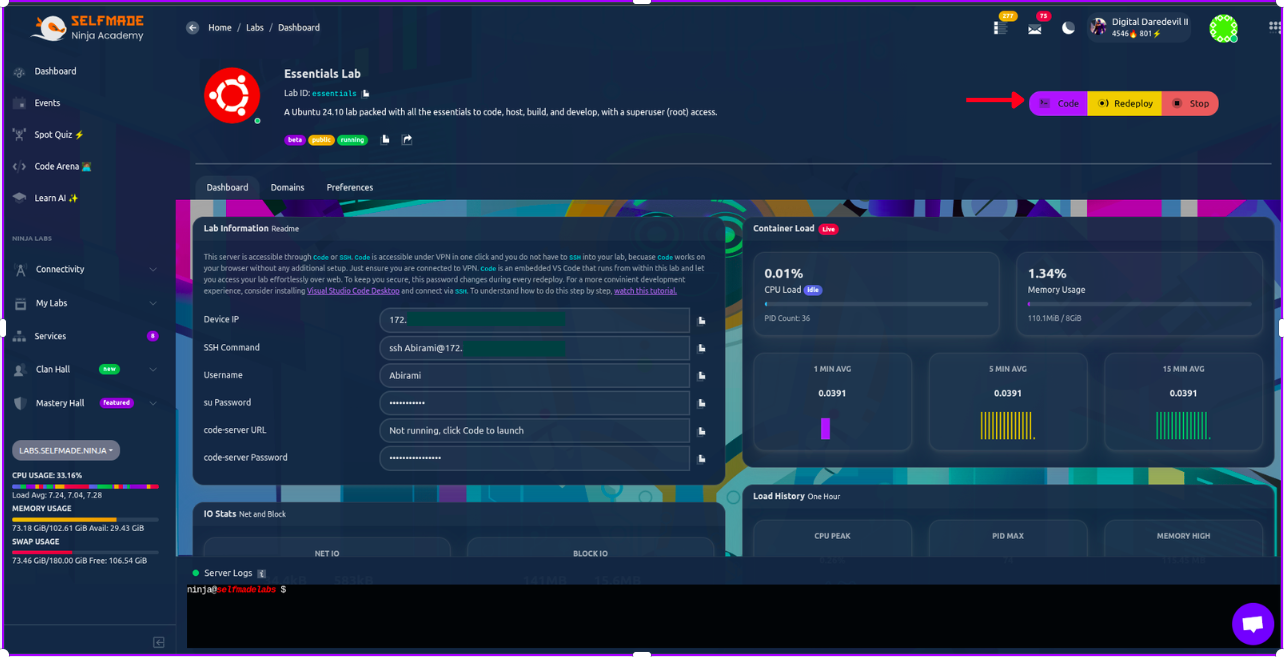
- Click Code in the top-right corner.
- A dialog will appear — copy the Code Server Password.
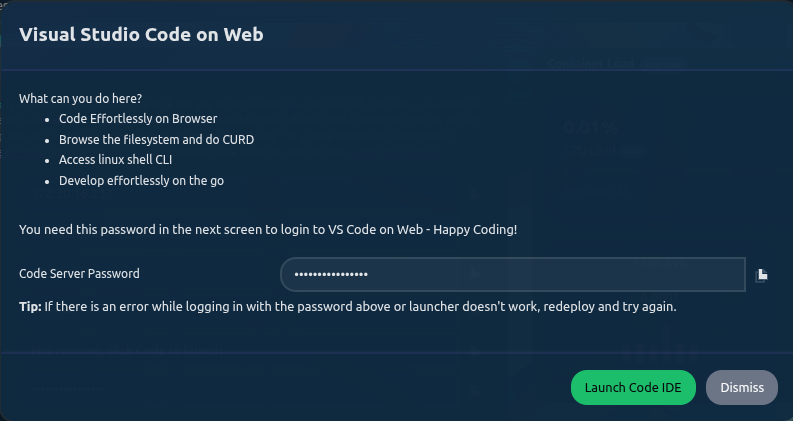
- Click Launch Code IDE.

- A new browser tab opens asking for a password — paste the one you copied and submit.
- You’re now connected to the Essentials Lab through VS Code Web.
- You can customize the theme if you like, and start coding right away.
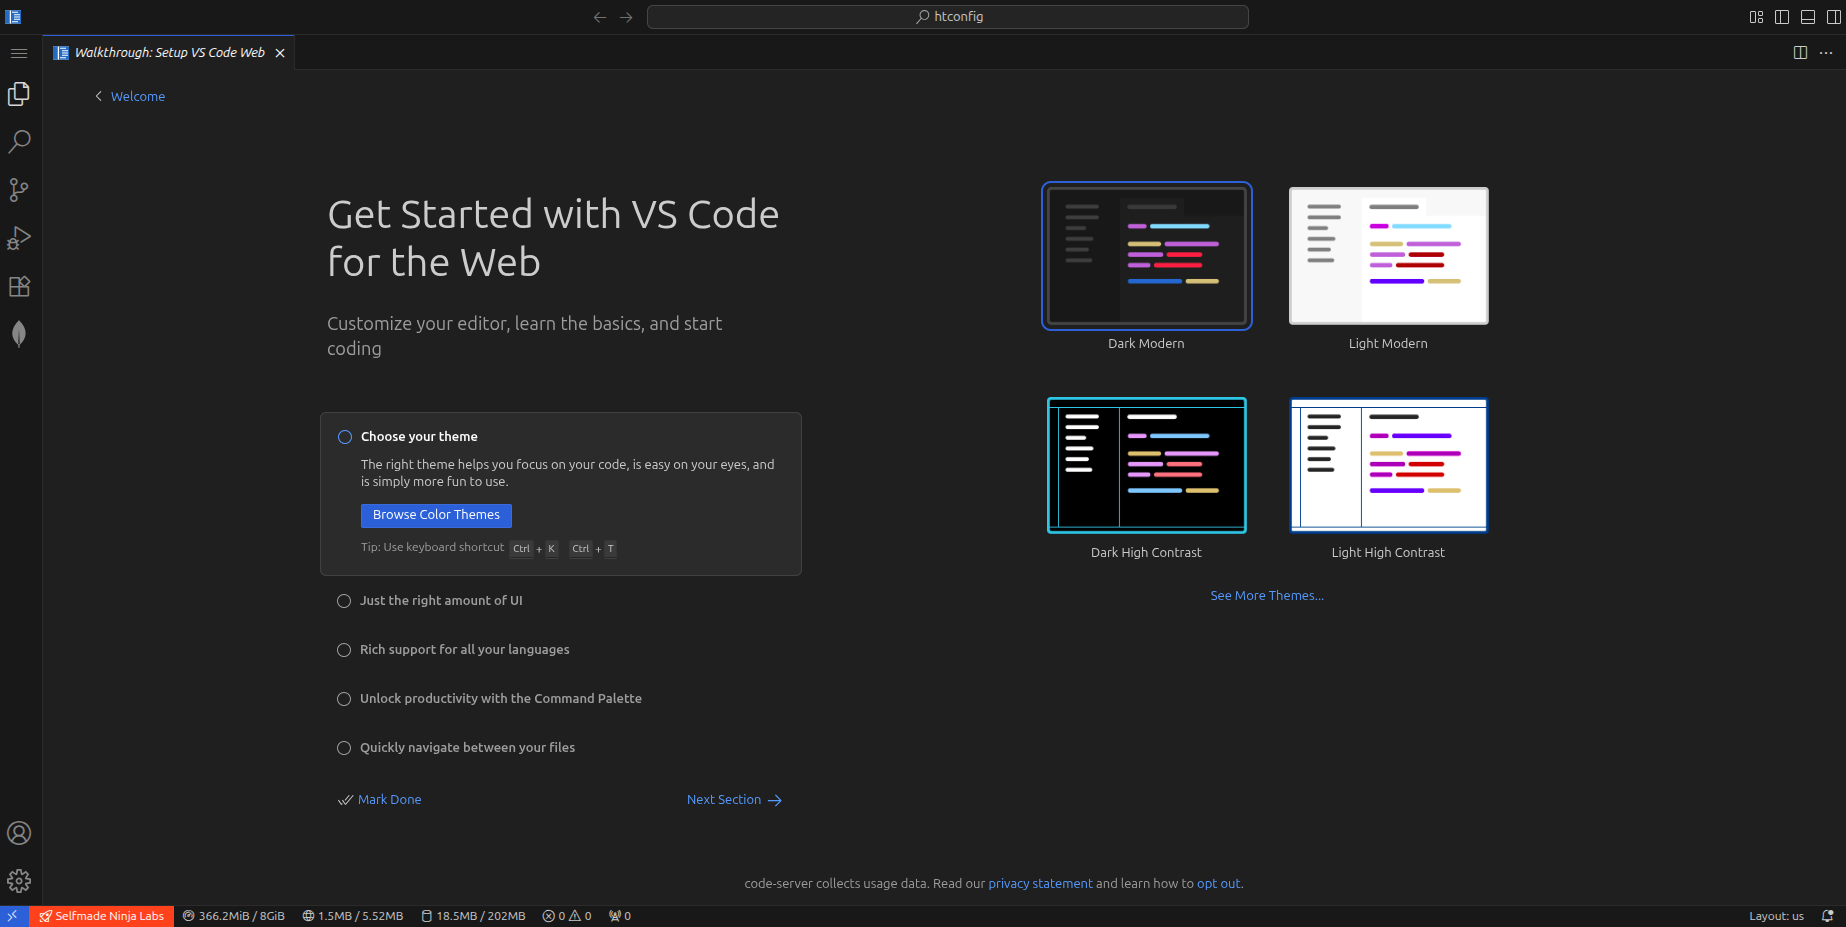 That’s it! you have connected with the essentials lab.
Lab Access for Premium Users
Premium users have two options for working in the Essentials Lab:- VS Code Web (we already covered this)
- VS Code installed on your local machine
To use your local VS Code, you must set up SSH-based access. For that, you need to:
- Generate an SSH key
- Add it to your Selfmade Ninja Git account
- Connect to the lab through WireGuard VPN
Only when the VPN is active can your system access the lab over SSH. So let’s proceed with the steps required to connect your local VS Code directly to the lab.
Generate SSH key on your system
Now let’s get your system ready to connect to the lab. To do that, you need to create an SSH key on your Ubuntu machine.
- Open your terminal and run any one of the following commands to generate a key
- For example, for ED25519:
ssh-keygen -t ed25519 -C "key-name" - For 2048-bit RSA:
ssh-keygen -t rsa -b 2048 -C "key-name" -
Once the key is generated you will see something like this. you’ll be ready to add it to your Git account.
You can add passphrase if needed
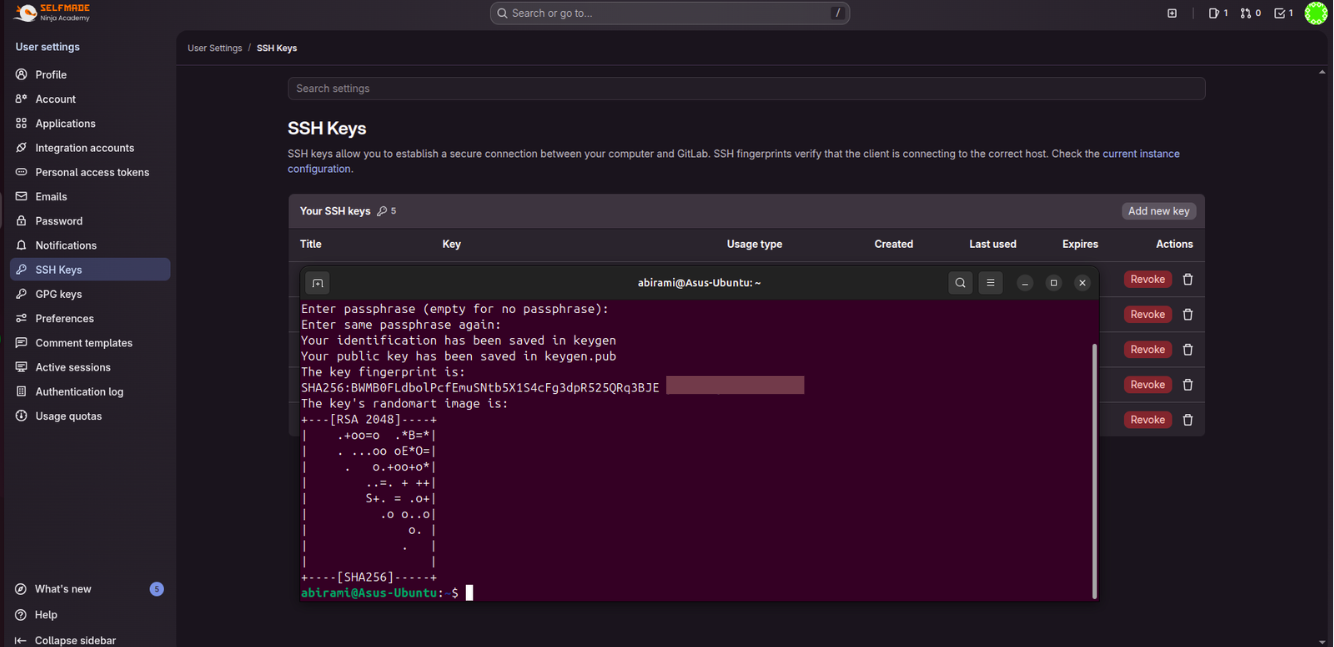
View Your Generated SSH Key
After creating your SSH key, you can view it directly from the terminal.
Run this command to display your public key (this is the one you should copy and add to your Git account):
cat ~/.ssh/id_ed25519.pubIf you generated an RSA key, use this instead:
cat ~/.ssh/id_rsa.pubYou’ll see a long string of characters — that’s your public key. Just copy it and paste it into the SSH Keys section of your Git account.
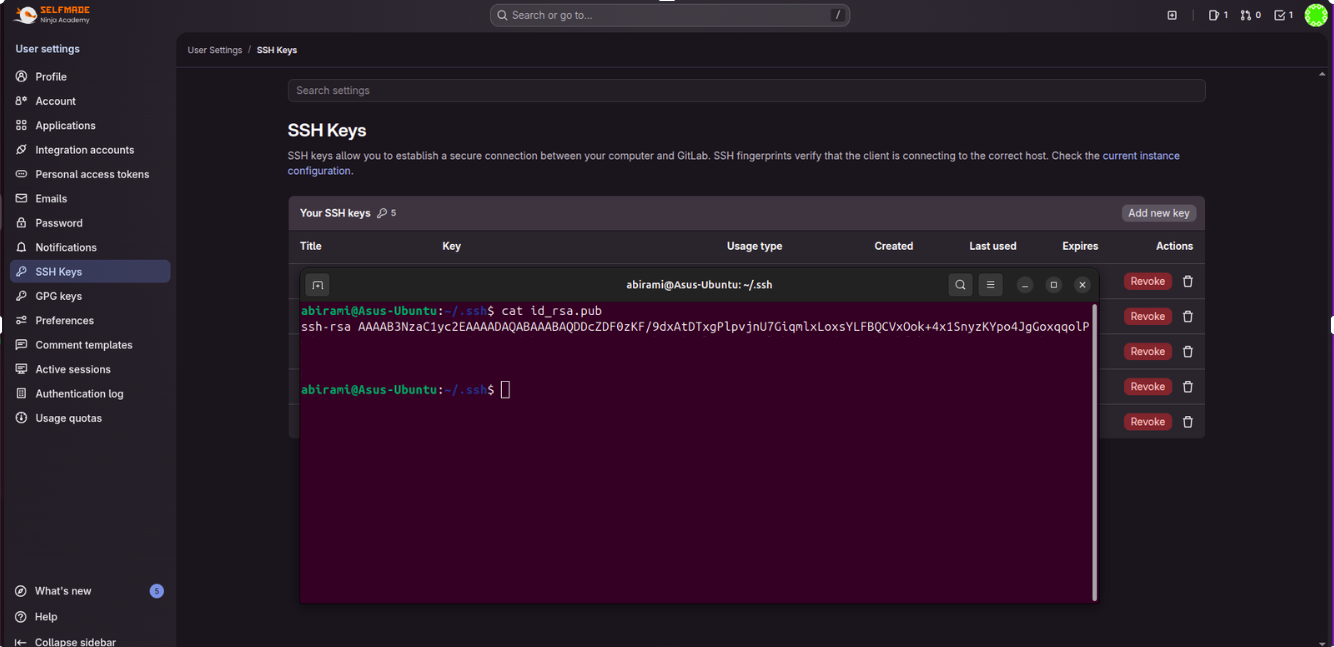
Copy this ssh key to add it in your git account.
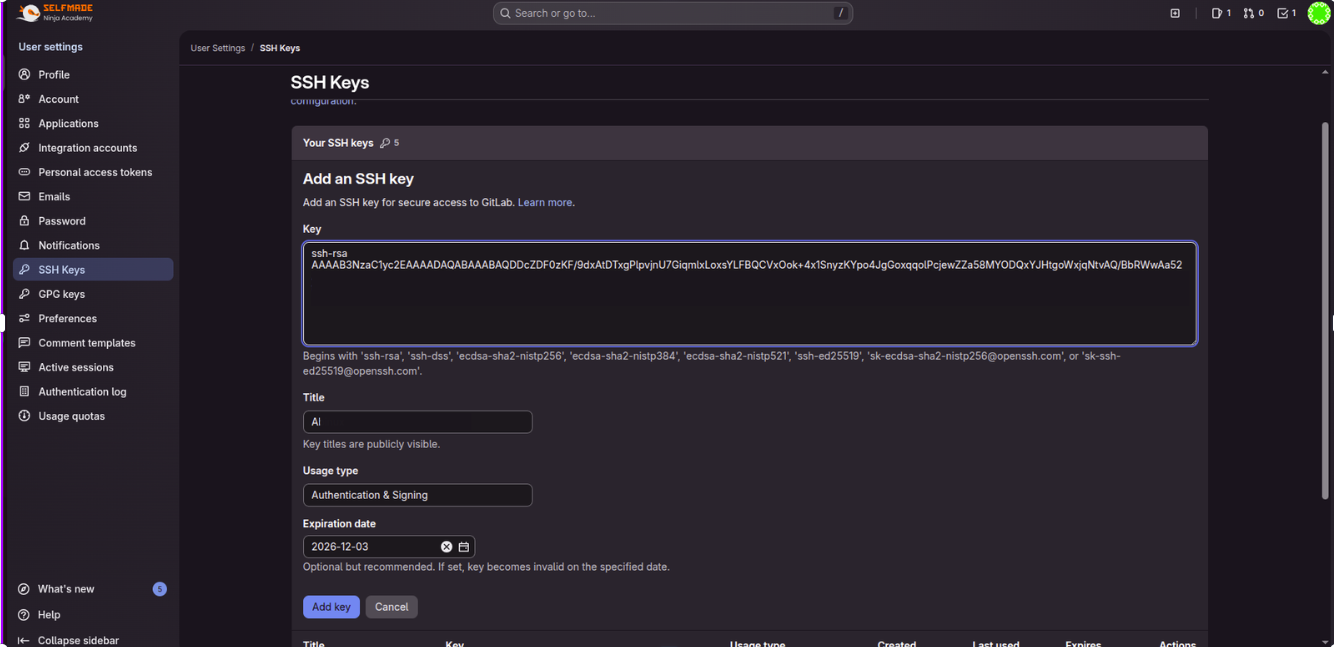
Add SSH key to your git account
Once you’re logged in to the Git account you created earlier, look at the top-right corner of the page. Click on your profile icon, and from the menu that appears, select Preference

- In the sidebar, open SSH Keys.
- Click Add SSH Key.
- Paste the public key you copied from the terminal into the text box provided.
- Give it a name (any label that helps you identify the device).
- After giving all the details click Add key.
- Now your ssh key is added successfully.
Wireguard Installation
To connect with the SNA labs, you’ll also need WireGuard installed on your system. Follow these steps to set it up on Ubuntu:
Update your system packages
Open your terminal and run:sudo apt updateInstall WireGuard
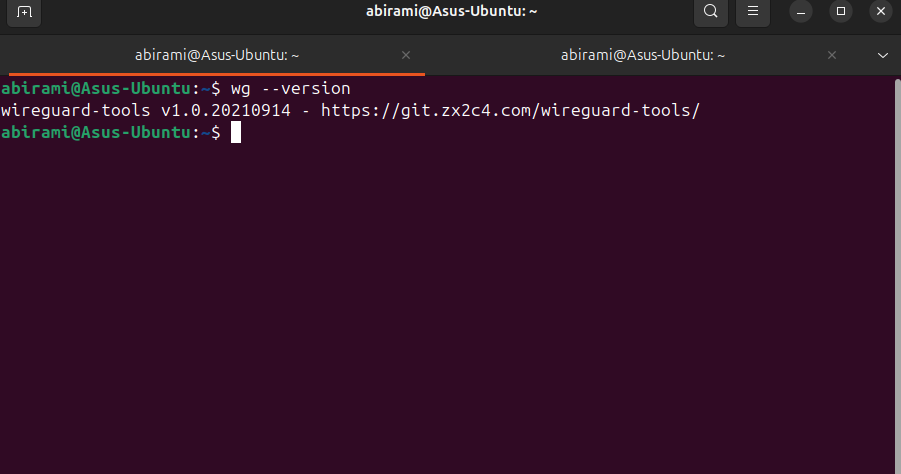
After the update completes, install WireGuard with:sudo apt install wireguardVerify the installation Check whether WireGuard installed correctly using:
wg --version- WireGuard is now installed and ready for configuration.
- You don’t need to worry about generating WireGuard keys yourself, the Labs system handles that for you automatically.
- Just relax and move on to the next step.
If you see the version number, you’re all set.
Now for the Most Exciting Part — Connecting Your Device to the Labs
- Once you’ve set everything up, it’s time to actually connect your device to the SNA Labs environment.
- Start by logging in to: SNA Labs
- From here, you’ll begin linking your system with the lab network so you can start working on real, hands-on projects.
- If you’re already logged in to your Selfmade Ninja Git account, you’ll be taken straight to the Labs home page without needing to sign in again.
- If not, just log in using the same Git account credentials you created earlier. Once you’re in, you’re ready for the final setup steps.
- Once you login to labs, you will see this page, go to machine labs
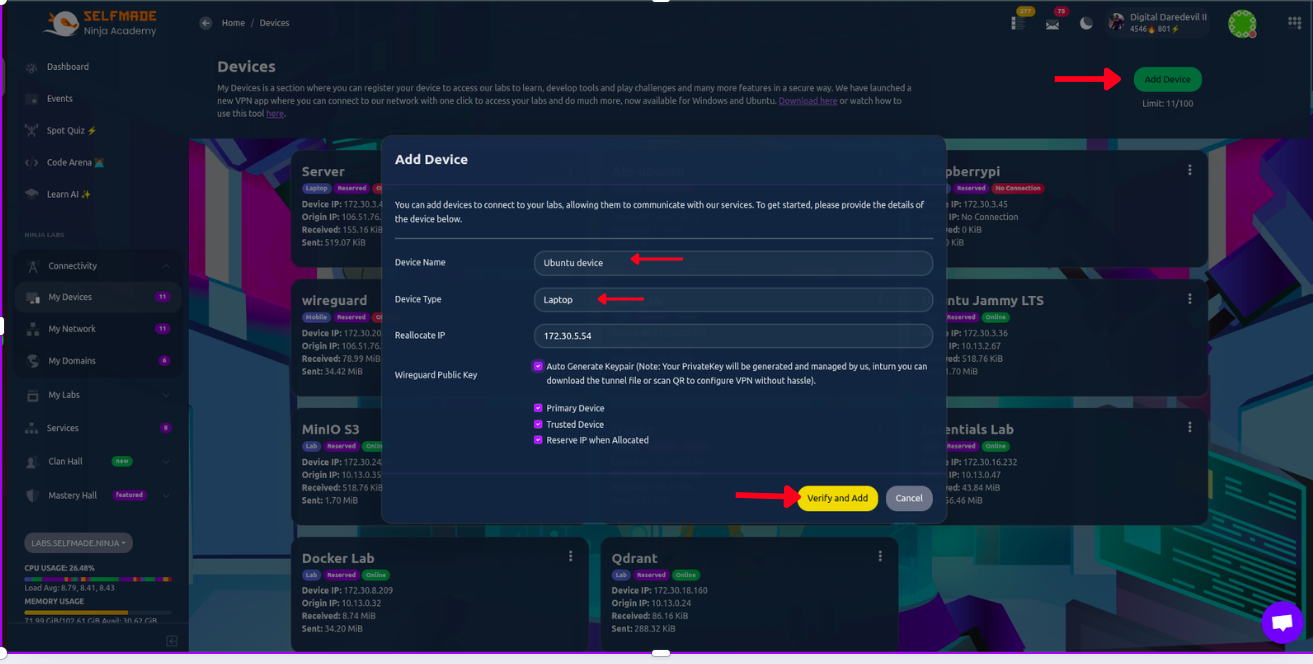
- From the sidebar click connectivity from there click devices.
- Once the Devices page opens, click on the Add Device button.
- A dialog box will appear. Enter your Device Name, choose the Device Type, and make sure to select all the checkboxes related to WireGuard.
- After that, you’re ready to move to the next step.
- You’ll now see your Ubuntu device listed on the Devices page.
- Click the three dots in the top-right corner of that device entry. From the menu that appears, select Show Configuration.
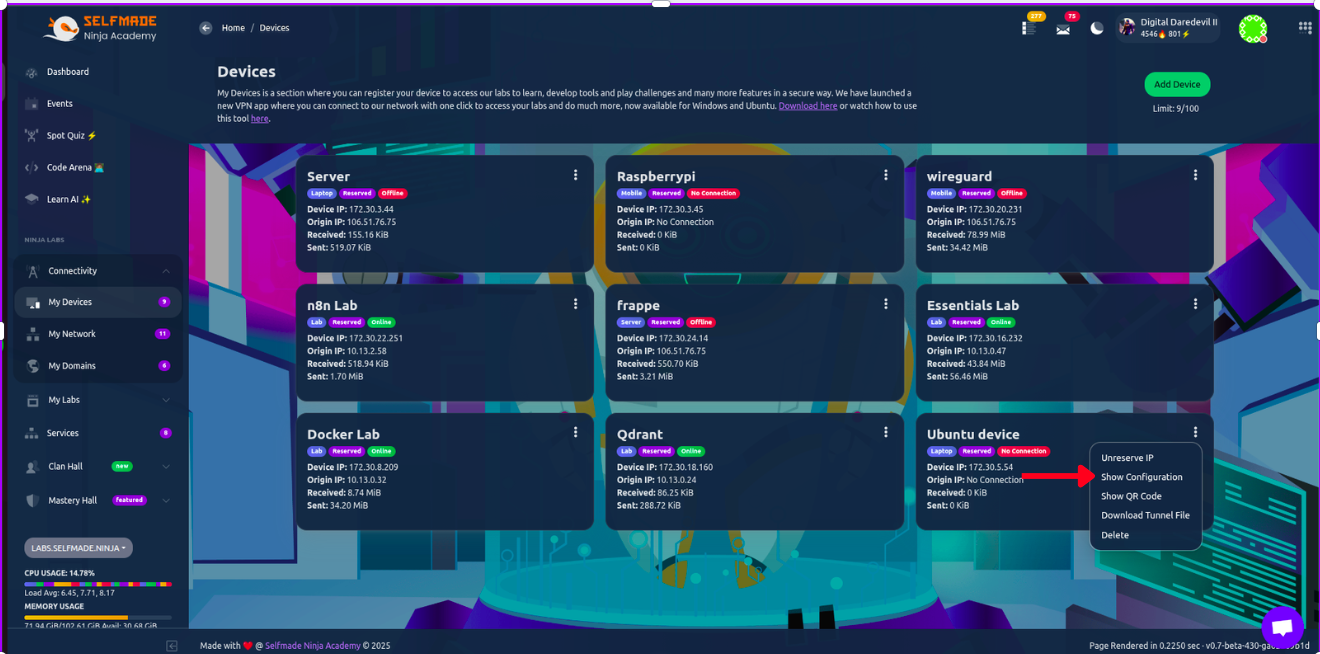
- Now you can see ‘Copy Wireguard Config’ option in the show Configuration page.

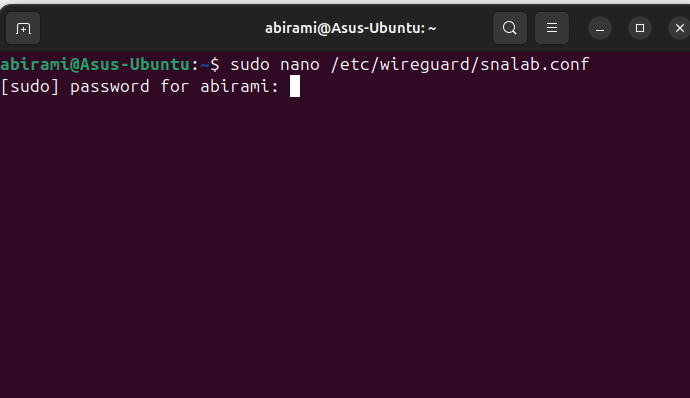
- After copying the configuration, open your terminal and run:
sudo nano /etc/wireguard/snalab.conf - Paste the config you copied into this file, then save and exit. Your WireGuard setup is now almost ready to use.
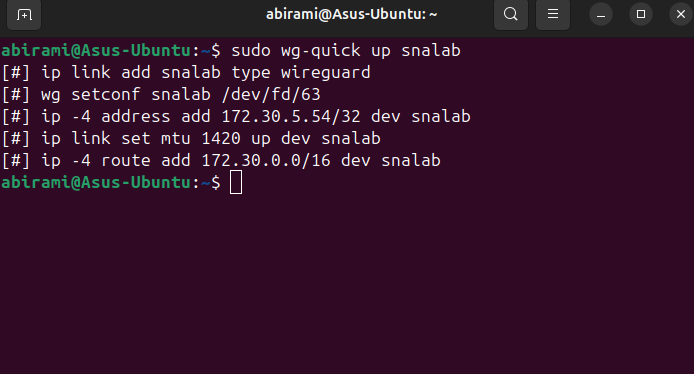
- Great job — you’ve completed all the setup steps! The final thing to do is turn on WireGuard.
Run this command in your terminal:sudo wg-quick up snalab - That’s it. Your device is now securely connected to the lab through WireGuard. You’re ready to start exploring and building inside the SNA Labs environment.
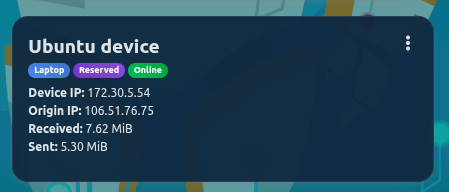
- After running the command, go back to the Labs page and refresh it.
- You should now see an Online tag next to your device — that means your connection is active and everything is working correctly.
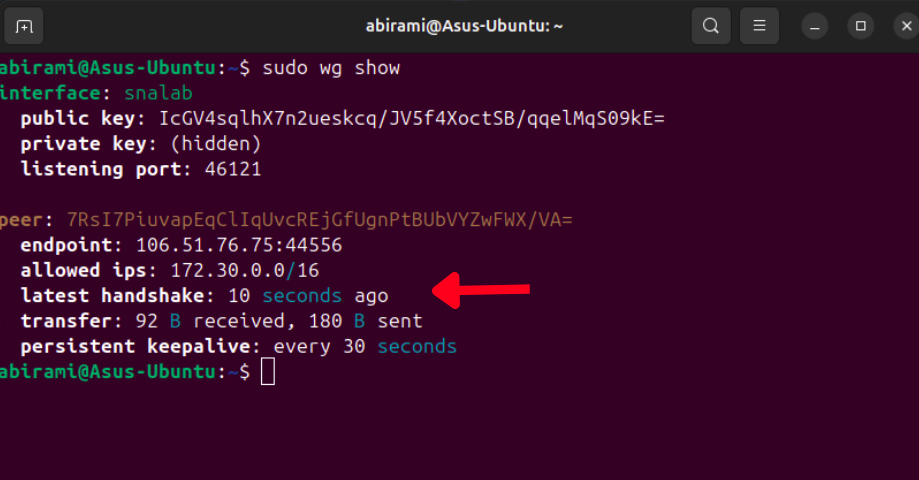
- If you want to confirm that WireGuard is actively transferring data, run:
sudo wg show - This will display the connection details, including the amount of data sent and received between your device and the lab network.
Connect with Essentials labs
- When you first open the Essentials Lab, it won’t be running yet.
- Click on the Dashboard button for the Essentials Lab — this takes you to its control panel.
- In the top-right corner, you’ll see a Deploy button. Click it.
- A dialog box will appear showing details like the IP address and the VS Code Web domain. Just hit Confirm Deploy.
-
Give it a few seconds, and your Essentials Lab will start up and move into a running state. Now it’s ready for you to use.
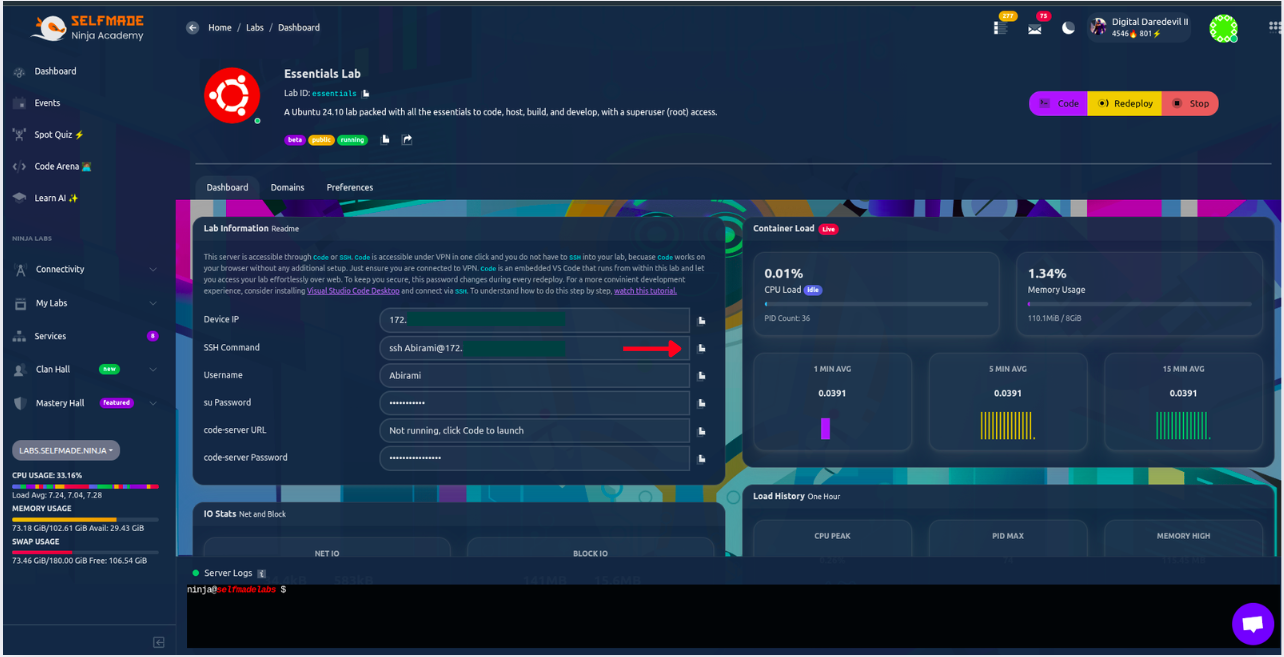
- Once the deployment is complete, you’ll see this control panel for your lab.
VS Code local setup:
Now let’s connect the Essentials Lab to your local VS Code on your desktop.
- In the lab control panel, copy the SSH command shown there.
- Open VS Code on your system.
-
Click Open Remote Window (bottom-left corner).

- From the menu at the top, select Connect to Host → Add New SSH Host.
- Paste the SSH command you copied from the lab.

- VS Code will show a path and ask for confirmation — press Enter to accept the default.
- You’ll see a notification in the bottom-right saying “Host added!”.
- Click “Open Remote Window” again and select “Connect to Host”.
- You’ll now see the newly added host (the Lab IP).
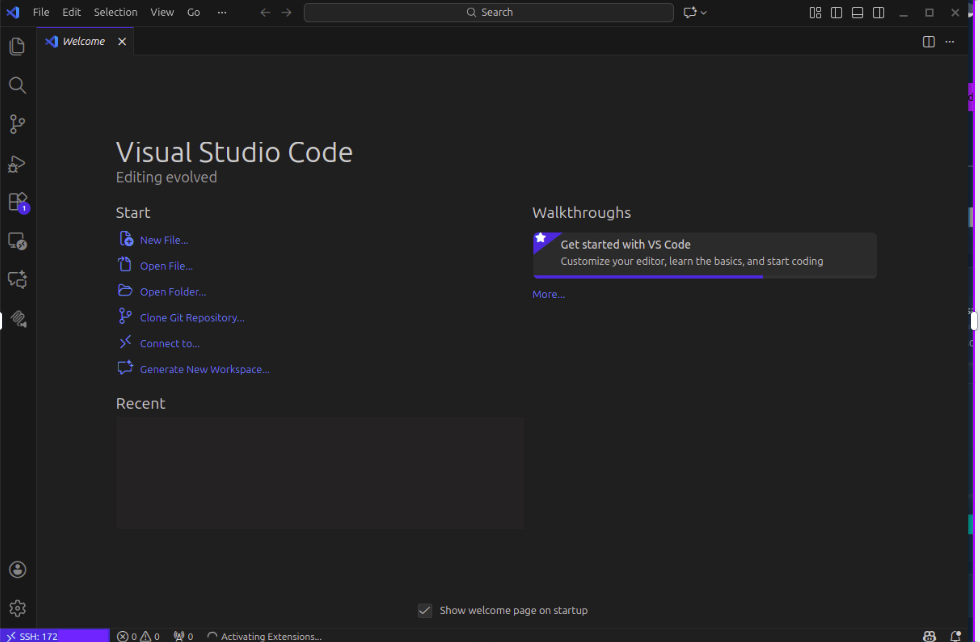
- Click it, and a new VS Code window will open — connected directly to your Essentials Lab.
- Your local VS Code is now fully linked with the lab environment.
Conclusion
Congratulations! You’ve successfully connected to Selfmade Ninja Lab cloud lab training for aspiring IT students using SSH and WireGuard and configured Visual Studio Code for remote development. By following these steps, you now have a robust environment to manage remote servers, deploy applications, and enhance your learning experience.
Whether you’re developing complex applications or exploring new functionalities, Ubuntu combined with SNA Labs will serve as your reliable platform. Feel free to revisit this guide whenever needed, and continue leveraging the power of Selfmade Ninja Labs to streamline your workflow.
Happy coding!