Hey there!
Ready to jump into the awesome world of websites without breaking the bank? You're in the right place! I'm excited to walk you through a super easy, totally free way to get your own website up and running. We're talking free domain names, free hosting, and a bunch of fun along the way.
Whether you're looking to start a blog, showcase a project, or just play around with a website, this guide's got your back. Let's make your website dream a reality, one simple step at a time!
Before we dive in, let's make sure you've got a few things ready to go. It's like prepping for a fun adventure!
Prerequisites
- SNA Labs account (If you don't have an account, create one by clicking here)
Before proceeding with the steps outlined in this guide for Hosting a Website to SNA Labs, it's essential to configure SNA VPN connection into your PC. For detailed instructions on establishing a secure VPN connection tailored to your specific operating system, please refer to the respective blog post:
Windows Users: Click here
Linux Users: Click here
Mac Users: Click here
Awesome! So, here's what you'll need to get started:
- Any Laptop Will Do: Seriously, no need for a high-end machine. Whatever laptop you've got will be just fine.
- Decent Internet Connection: Make sure you've got a steady internet connection – it's the bridge to your online journey.
Great, now that you've got your essentials ready, it's time to dive into the exciting part - creating your dream website! We're going to make it easy, fun, and best of all, free. Your awesome website is just a few steps away! 🌟🖥✨
Alright, it's time to kickstart your website journey! First things first, grab your laptop and open up your favorite web browser. Then, head over to labs.selfmade.ninja by typing it into your address bar. When the website pops up (just like in the image I'll show you below)
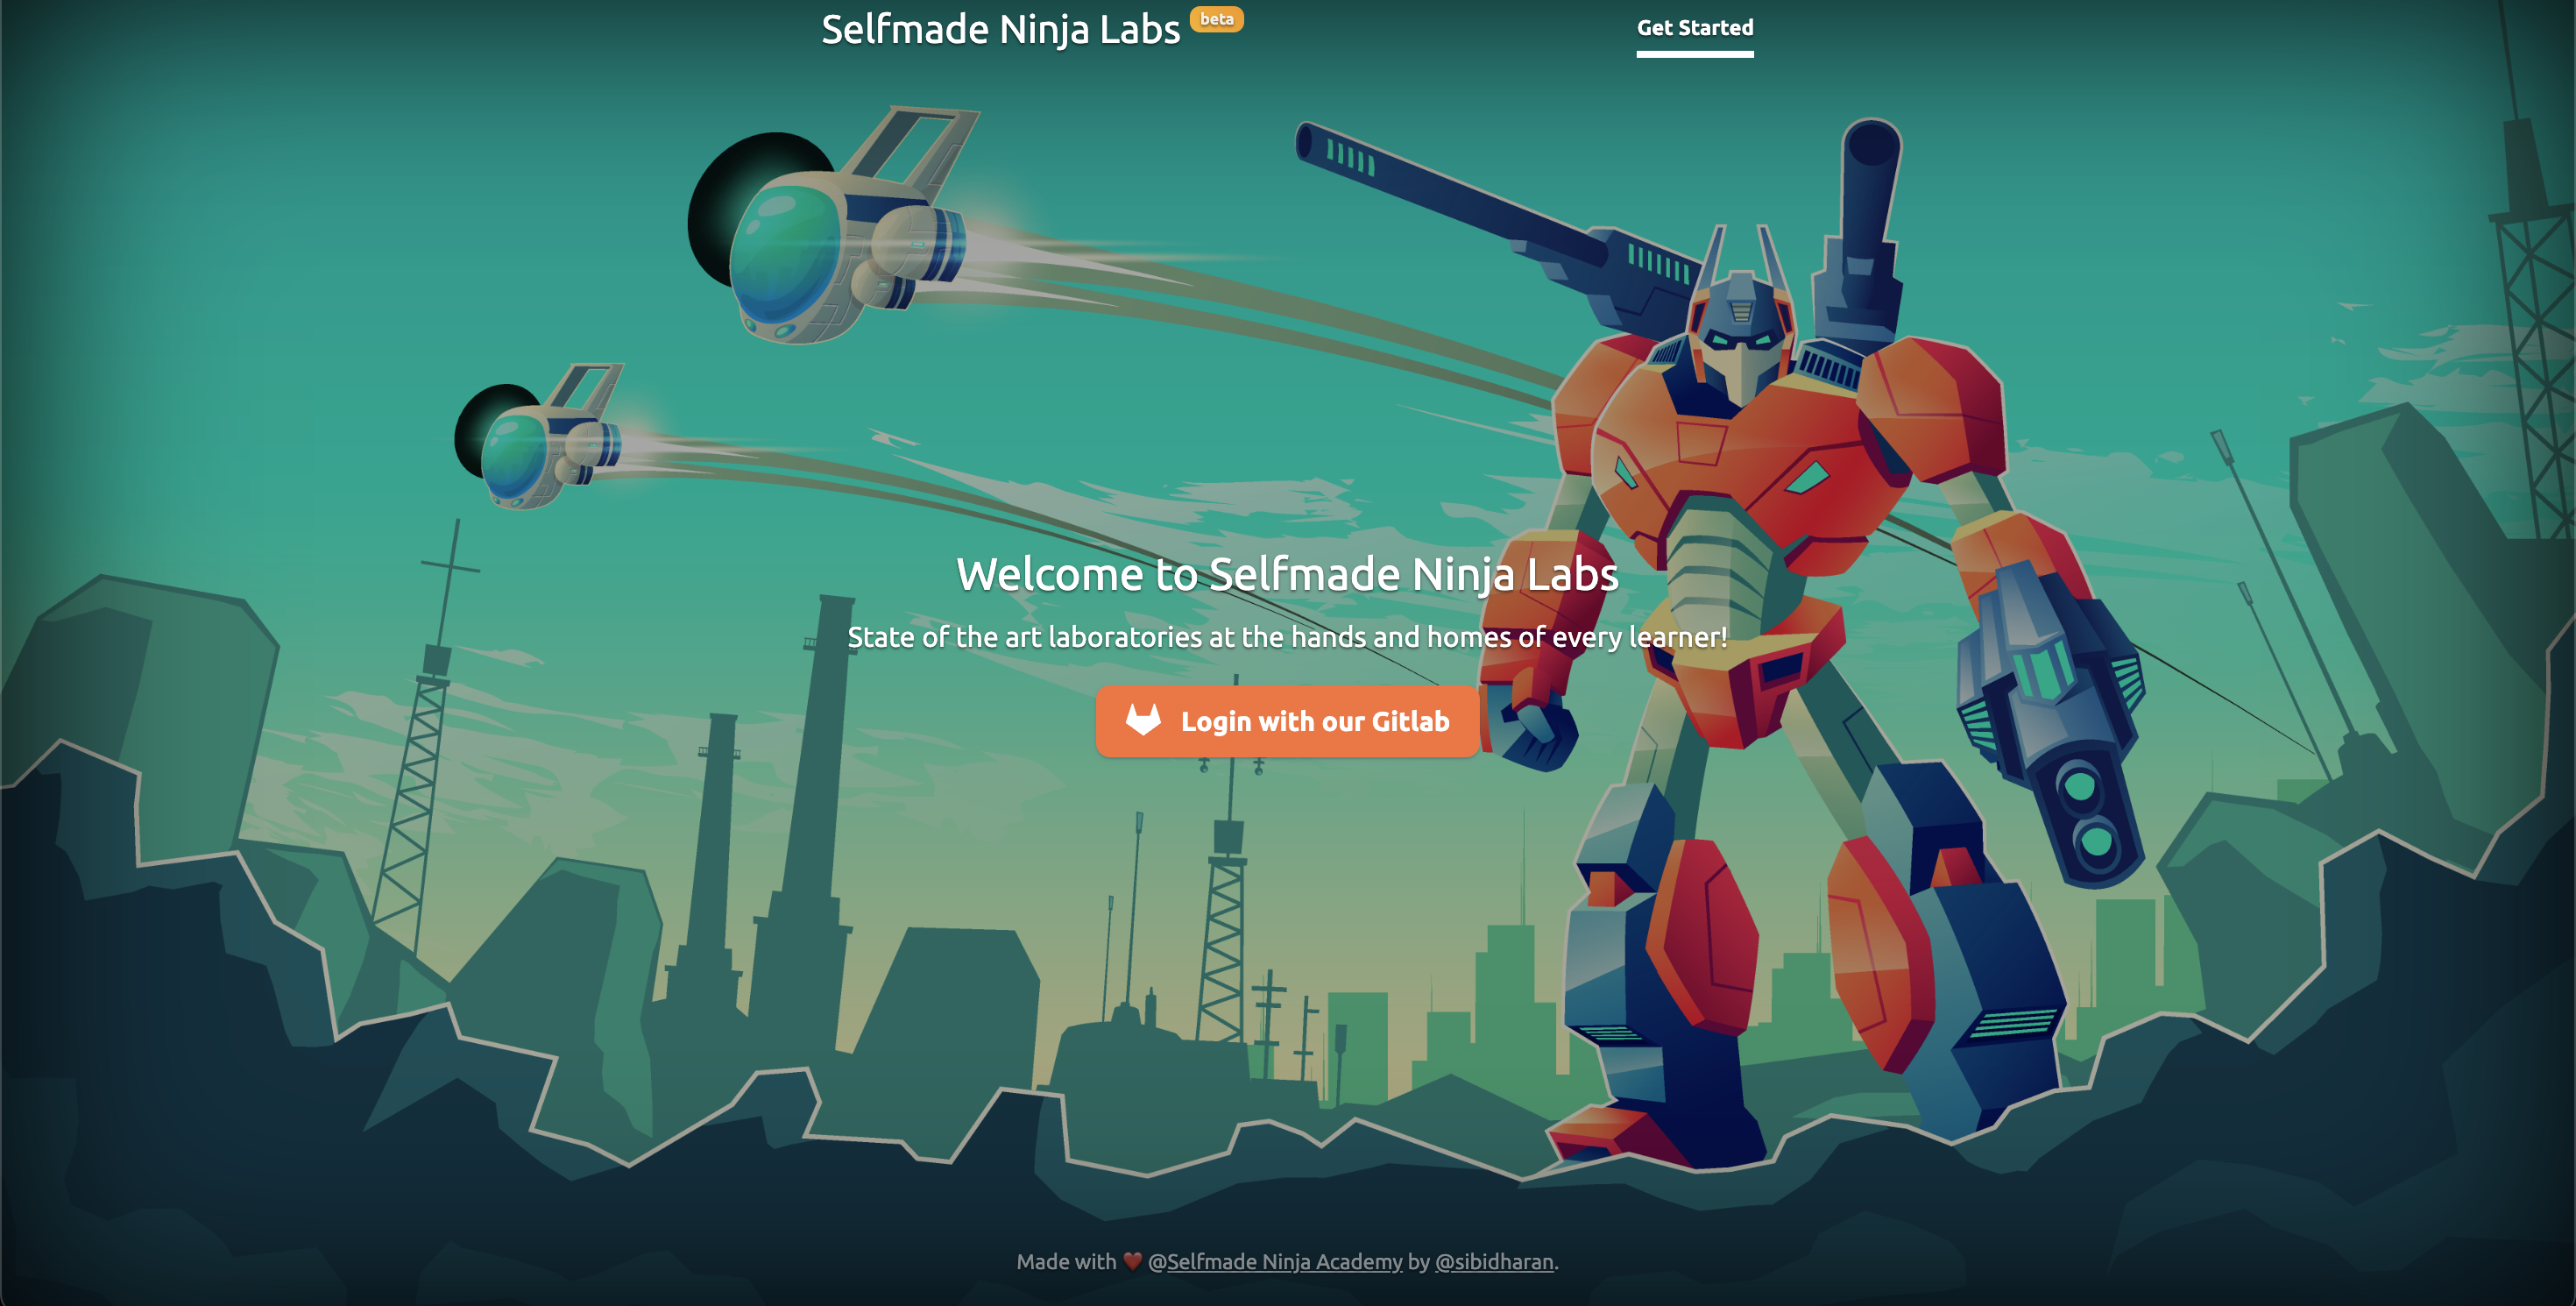
Look for the 'Login with GitLab' button. If you don't have a GitLab account, no worries at all! You can easily use your Google account to log in. Or, if you prefer, you can create a new account by clicking the 'Register now' button, as seen in the below image.

The best part? This whole process is completely free. That's right, you won’t be asked for a single rupee, and they don't require credit card information like some other hosting services. So, let's get you set up and ready to dive into the exciting world of website hosting!
Once you've created an account and logged in, you'll be greeted by the dashboard, which looks something like the image I'm about to show you.
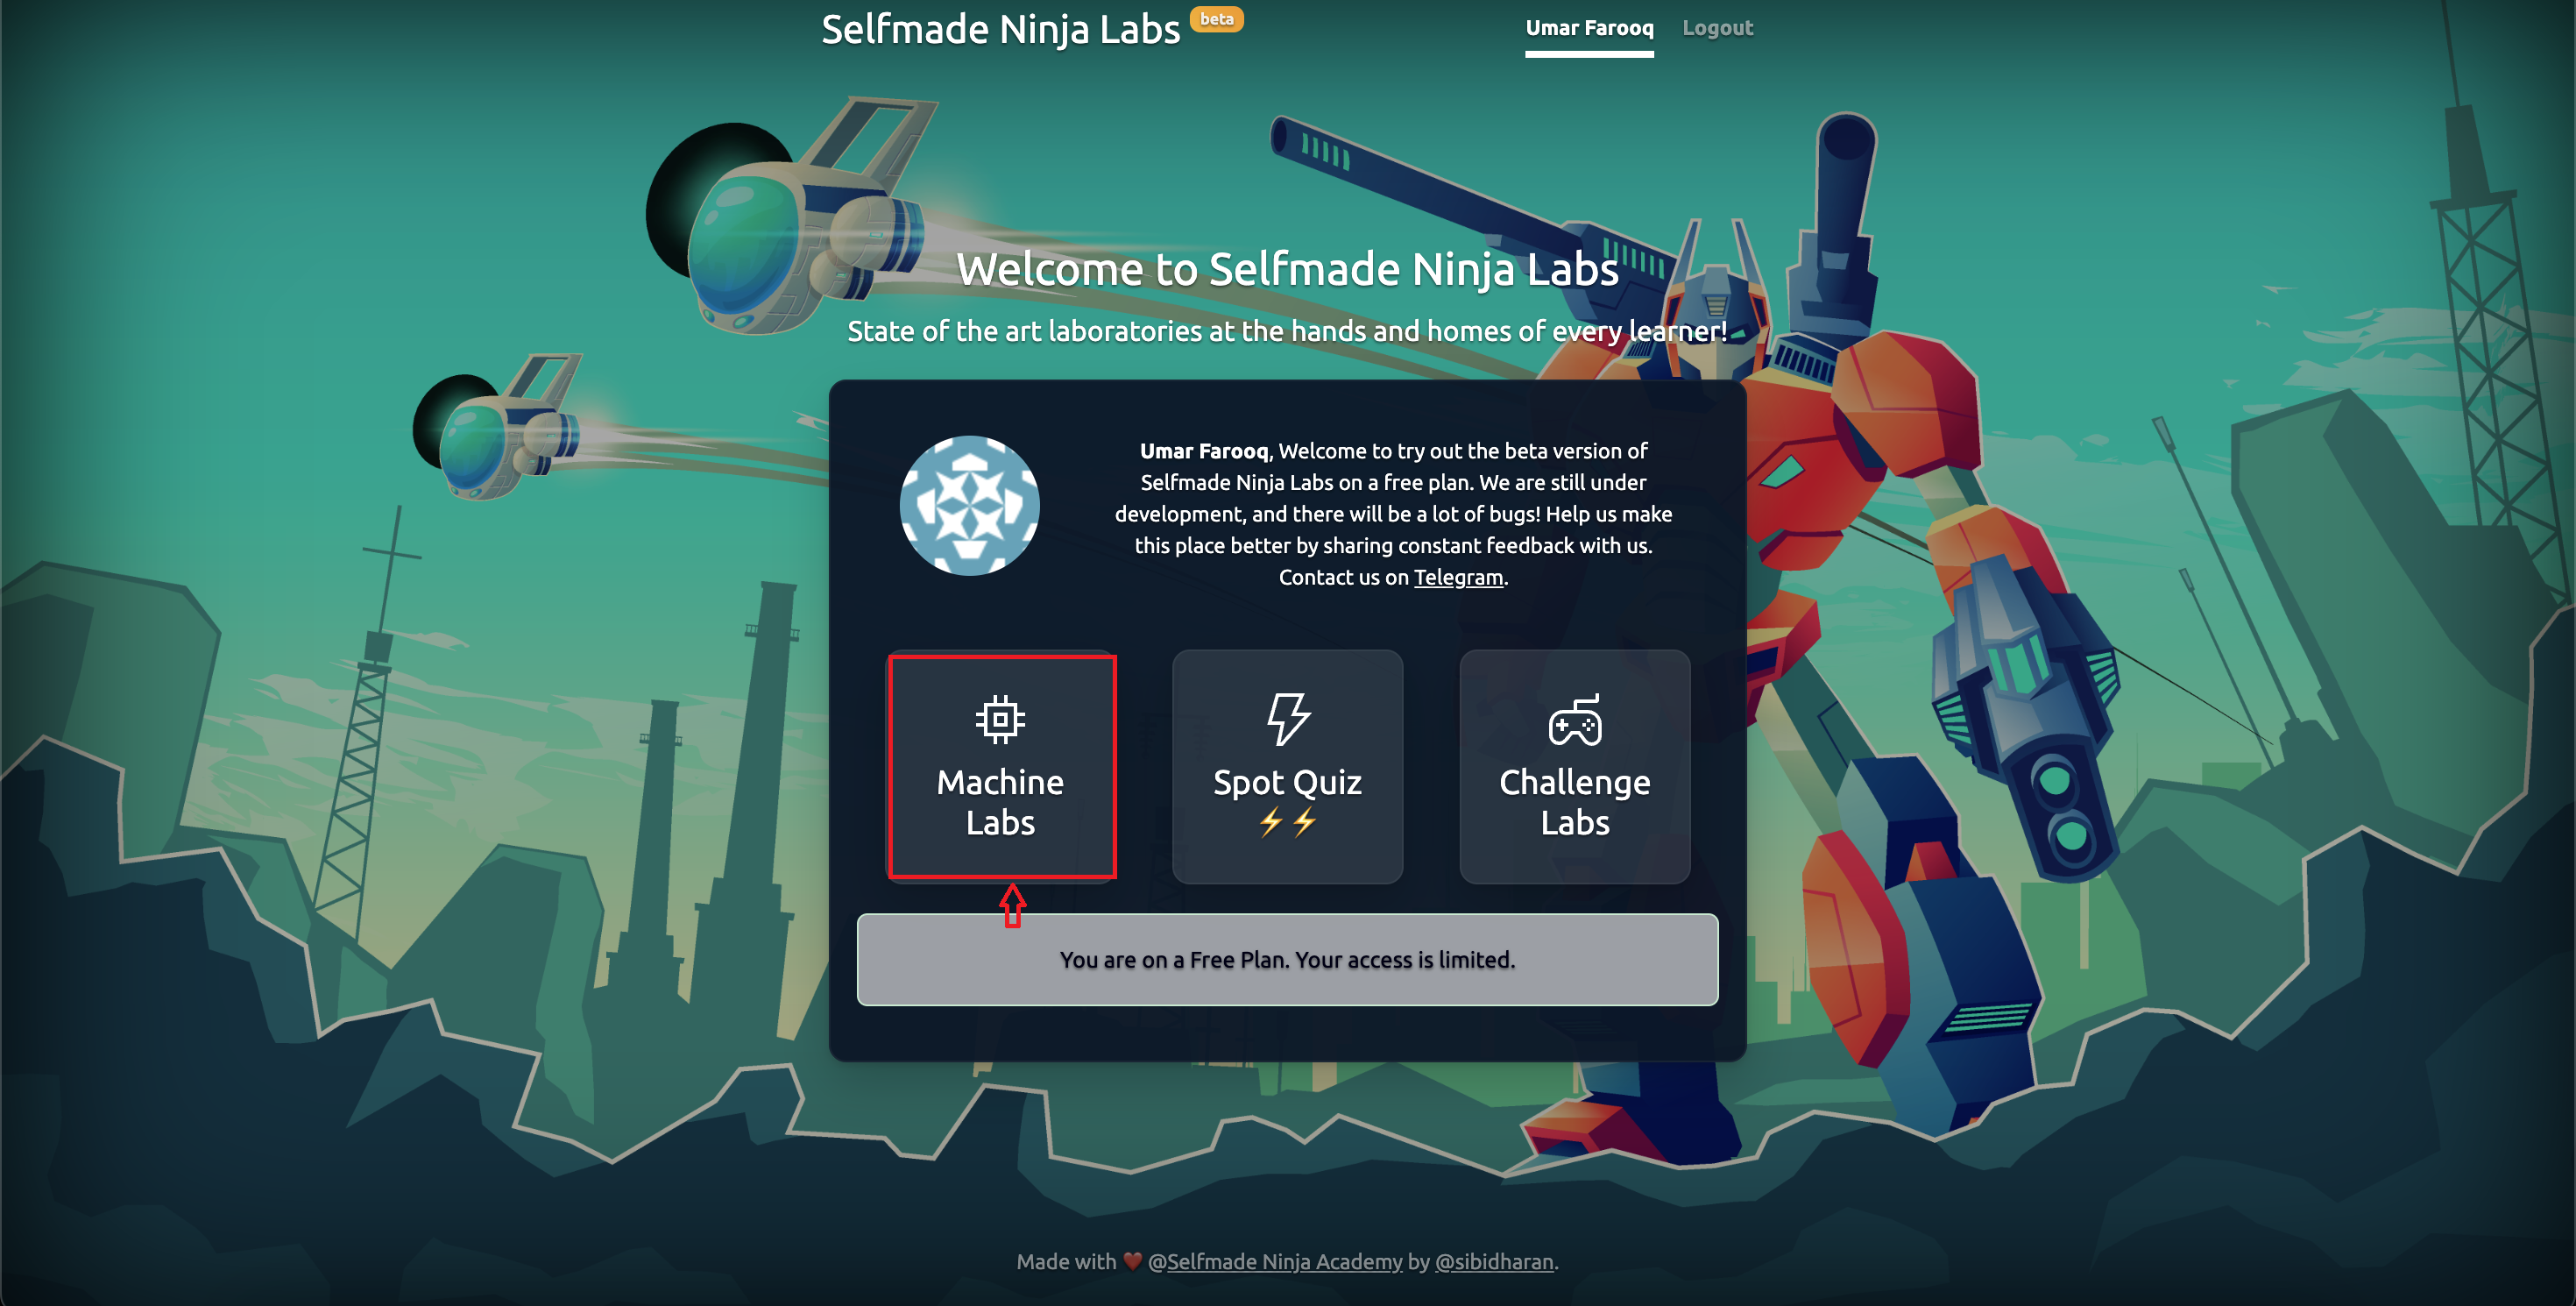
If you see a message saying, "You are on a Free plan. Your access is limited," don't let it worry you. Sure, they offer a variety of access levels in their full labs access, and all the SNA students who are enrolled in a course get full lab access without any limitations. But here's the good news: even if you don’t have full lab access, using this free plan, as I mentioned earlier, still lets you secure one domain and host your website absolutely free. So, whether you're a full access student or using the free plan, you're all set to start your website journey! 🌐💻✨
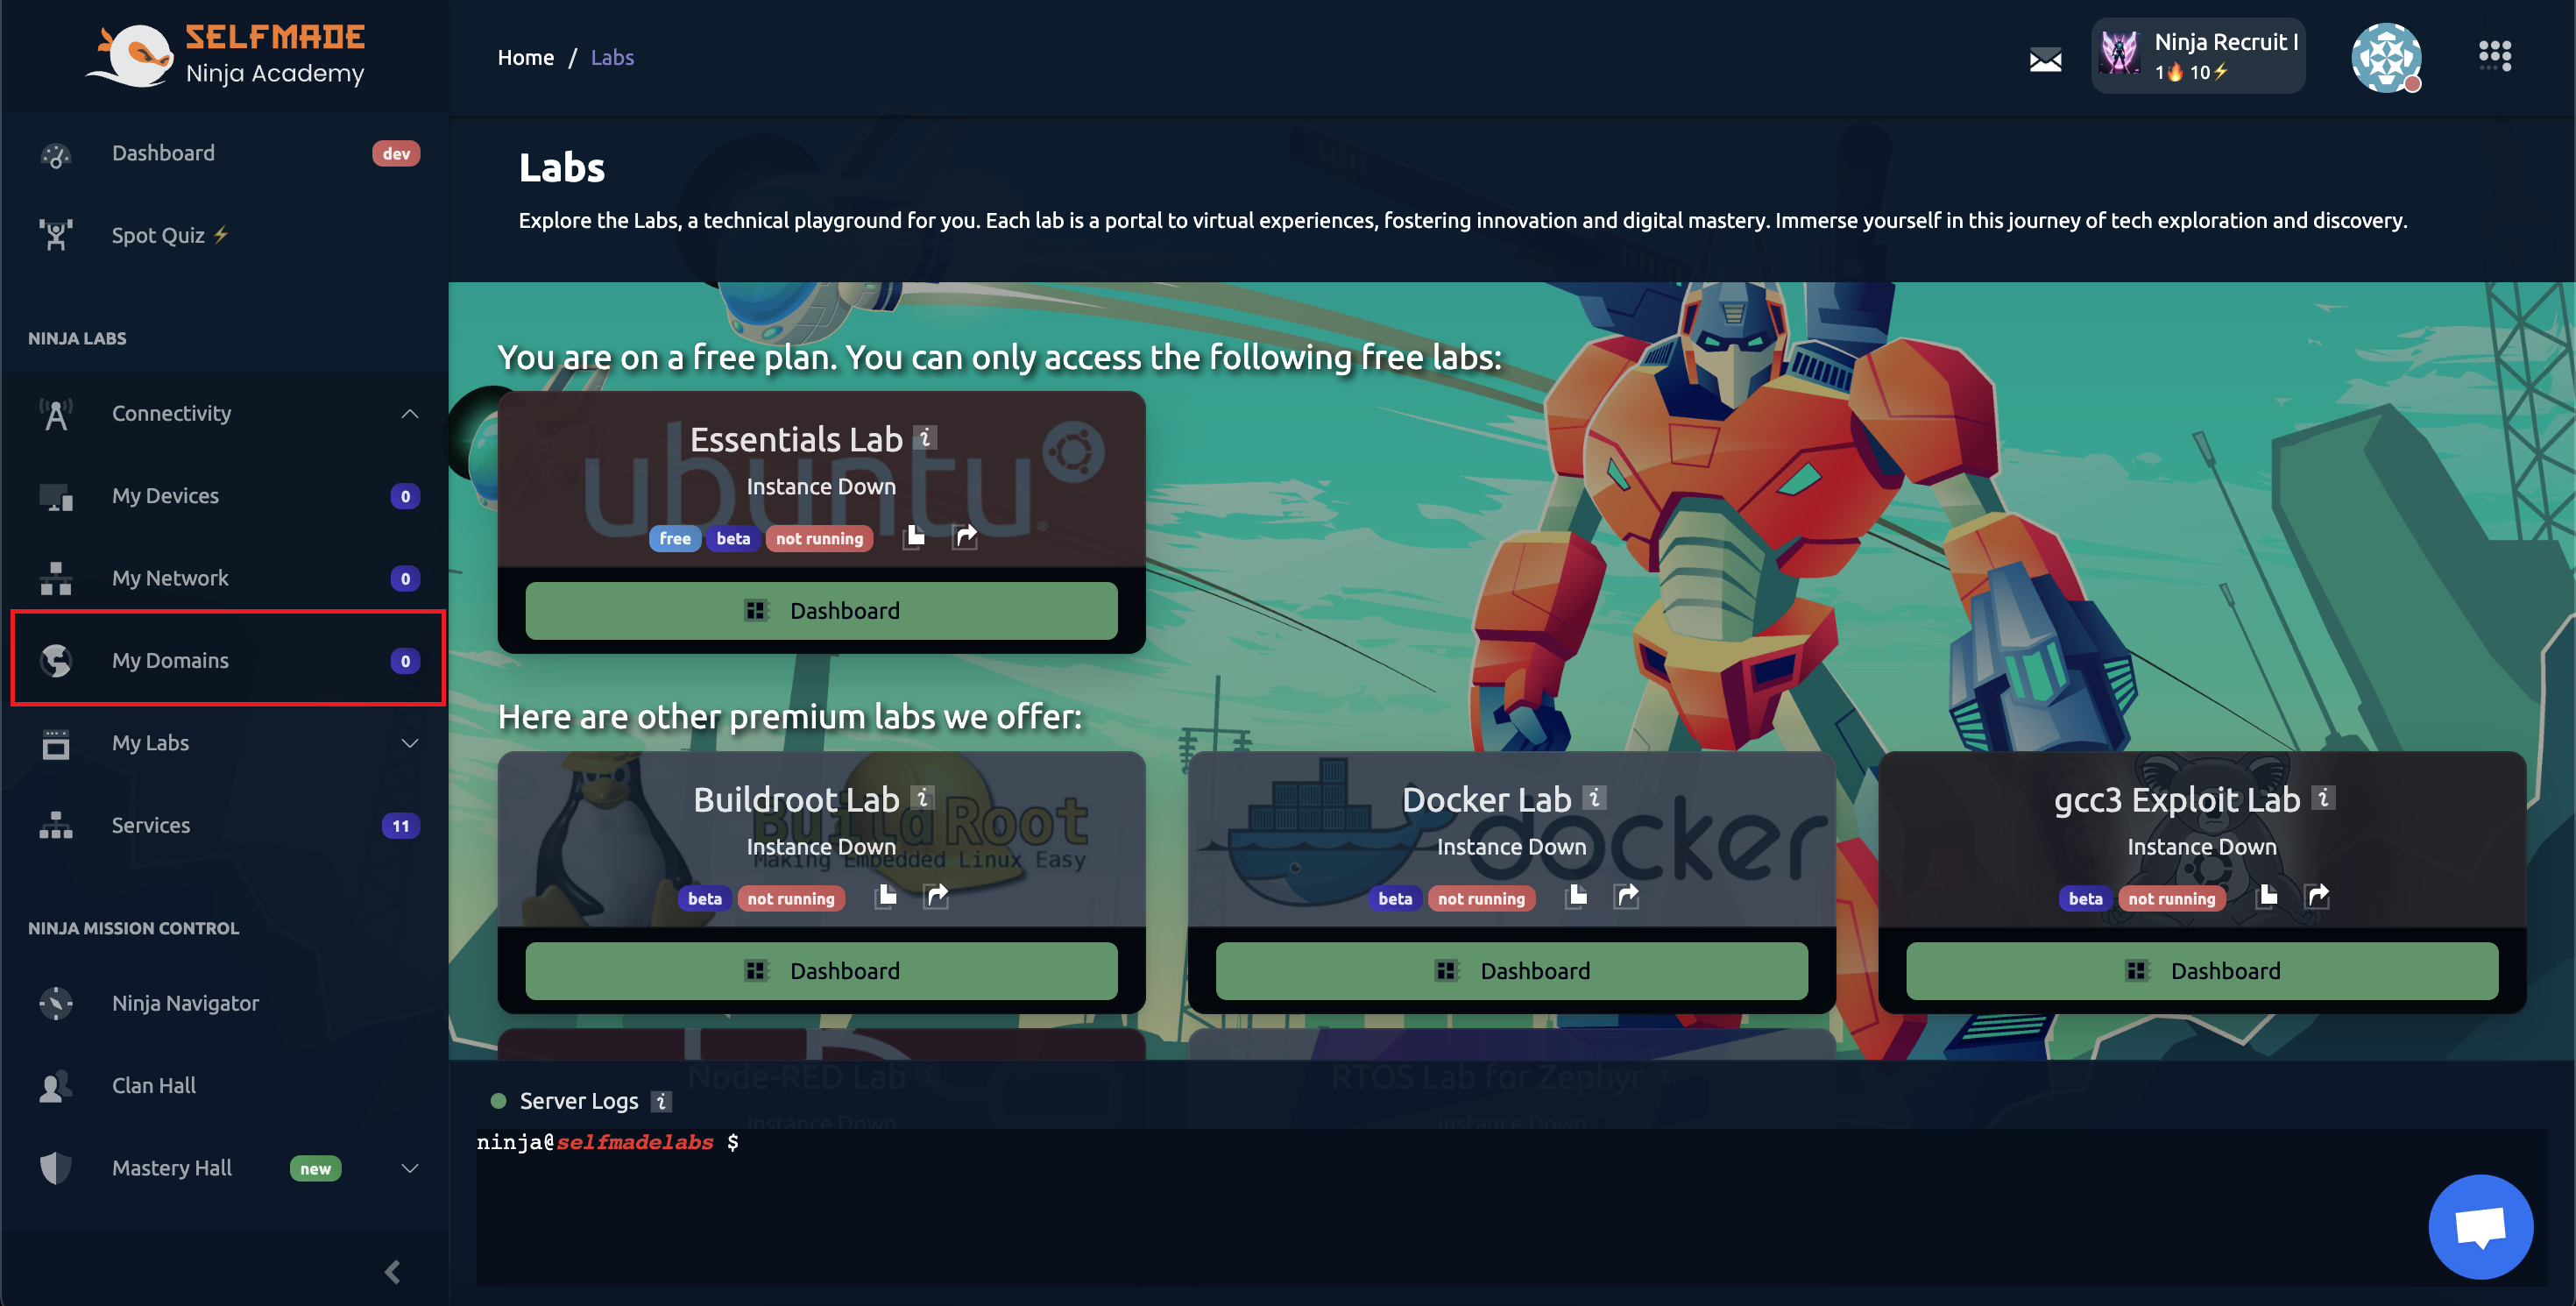
Before we jump into redeeming your free domain, let's quickly explore the three key options available on your dashboard. This will give you a clearer idea of what Selfmade Ninja Lab offers and how you can make the most of it. Remember, this platform is all about learning and practicing everything from coding to hacking, right from your basic laptop, through your browser.
-
Machine Lab: Think of this as your personal computer, available 24/7 on our cloud. It's powerful enough for both developing and hacking. This means even if your own laptop or computer is on the lower end of specs, we've got you covered. I'll delve deeper into this in an upcoming blog post.
-
Spot Quiz: Now, this is a really cool feature. It helps you test your aptitude in various topics. These quizzes are structured in a gamified manner. So, as you answer questions correctly, you earn 'Zolts', a kind of currency on the platform. These Zolts can be used to unlock extra features, like getting an additional domain, and much more. I'll also dedicate a separate blog post to discuss how to redeem these Zolts and other useful perks you can gain from just using your knowledge.
-
Challenge Lab: This is where you can learn hacking in a fun, game-like environment. It's a practical and engaging way to enhance your hacking skills.
Note: And yes, I’ll be explaining all these three options in more detail in upcoming blog posts, so stay tuned for that! 🌟💡👩💻👨💻
Great! Let’s get hands-on and start building our website. First, head to the 'Connectivity' navbar and find the 'My Domain' section. This is where you’ll name your website. Click on 'My Domain', and you'll be redirected to a new page, which you can see in the following image.
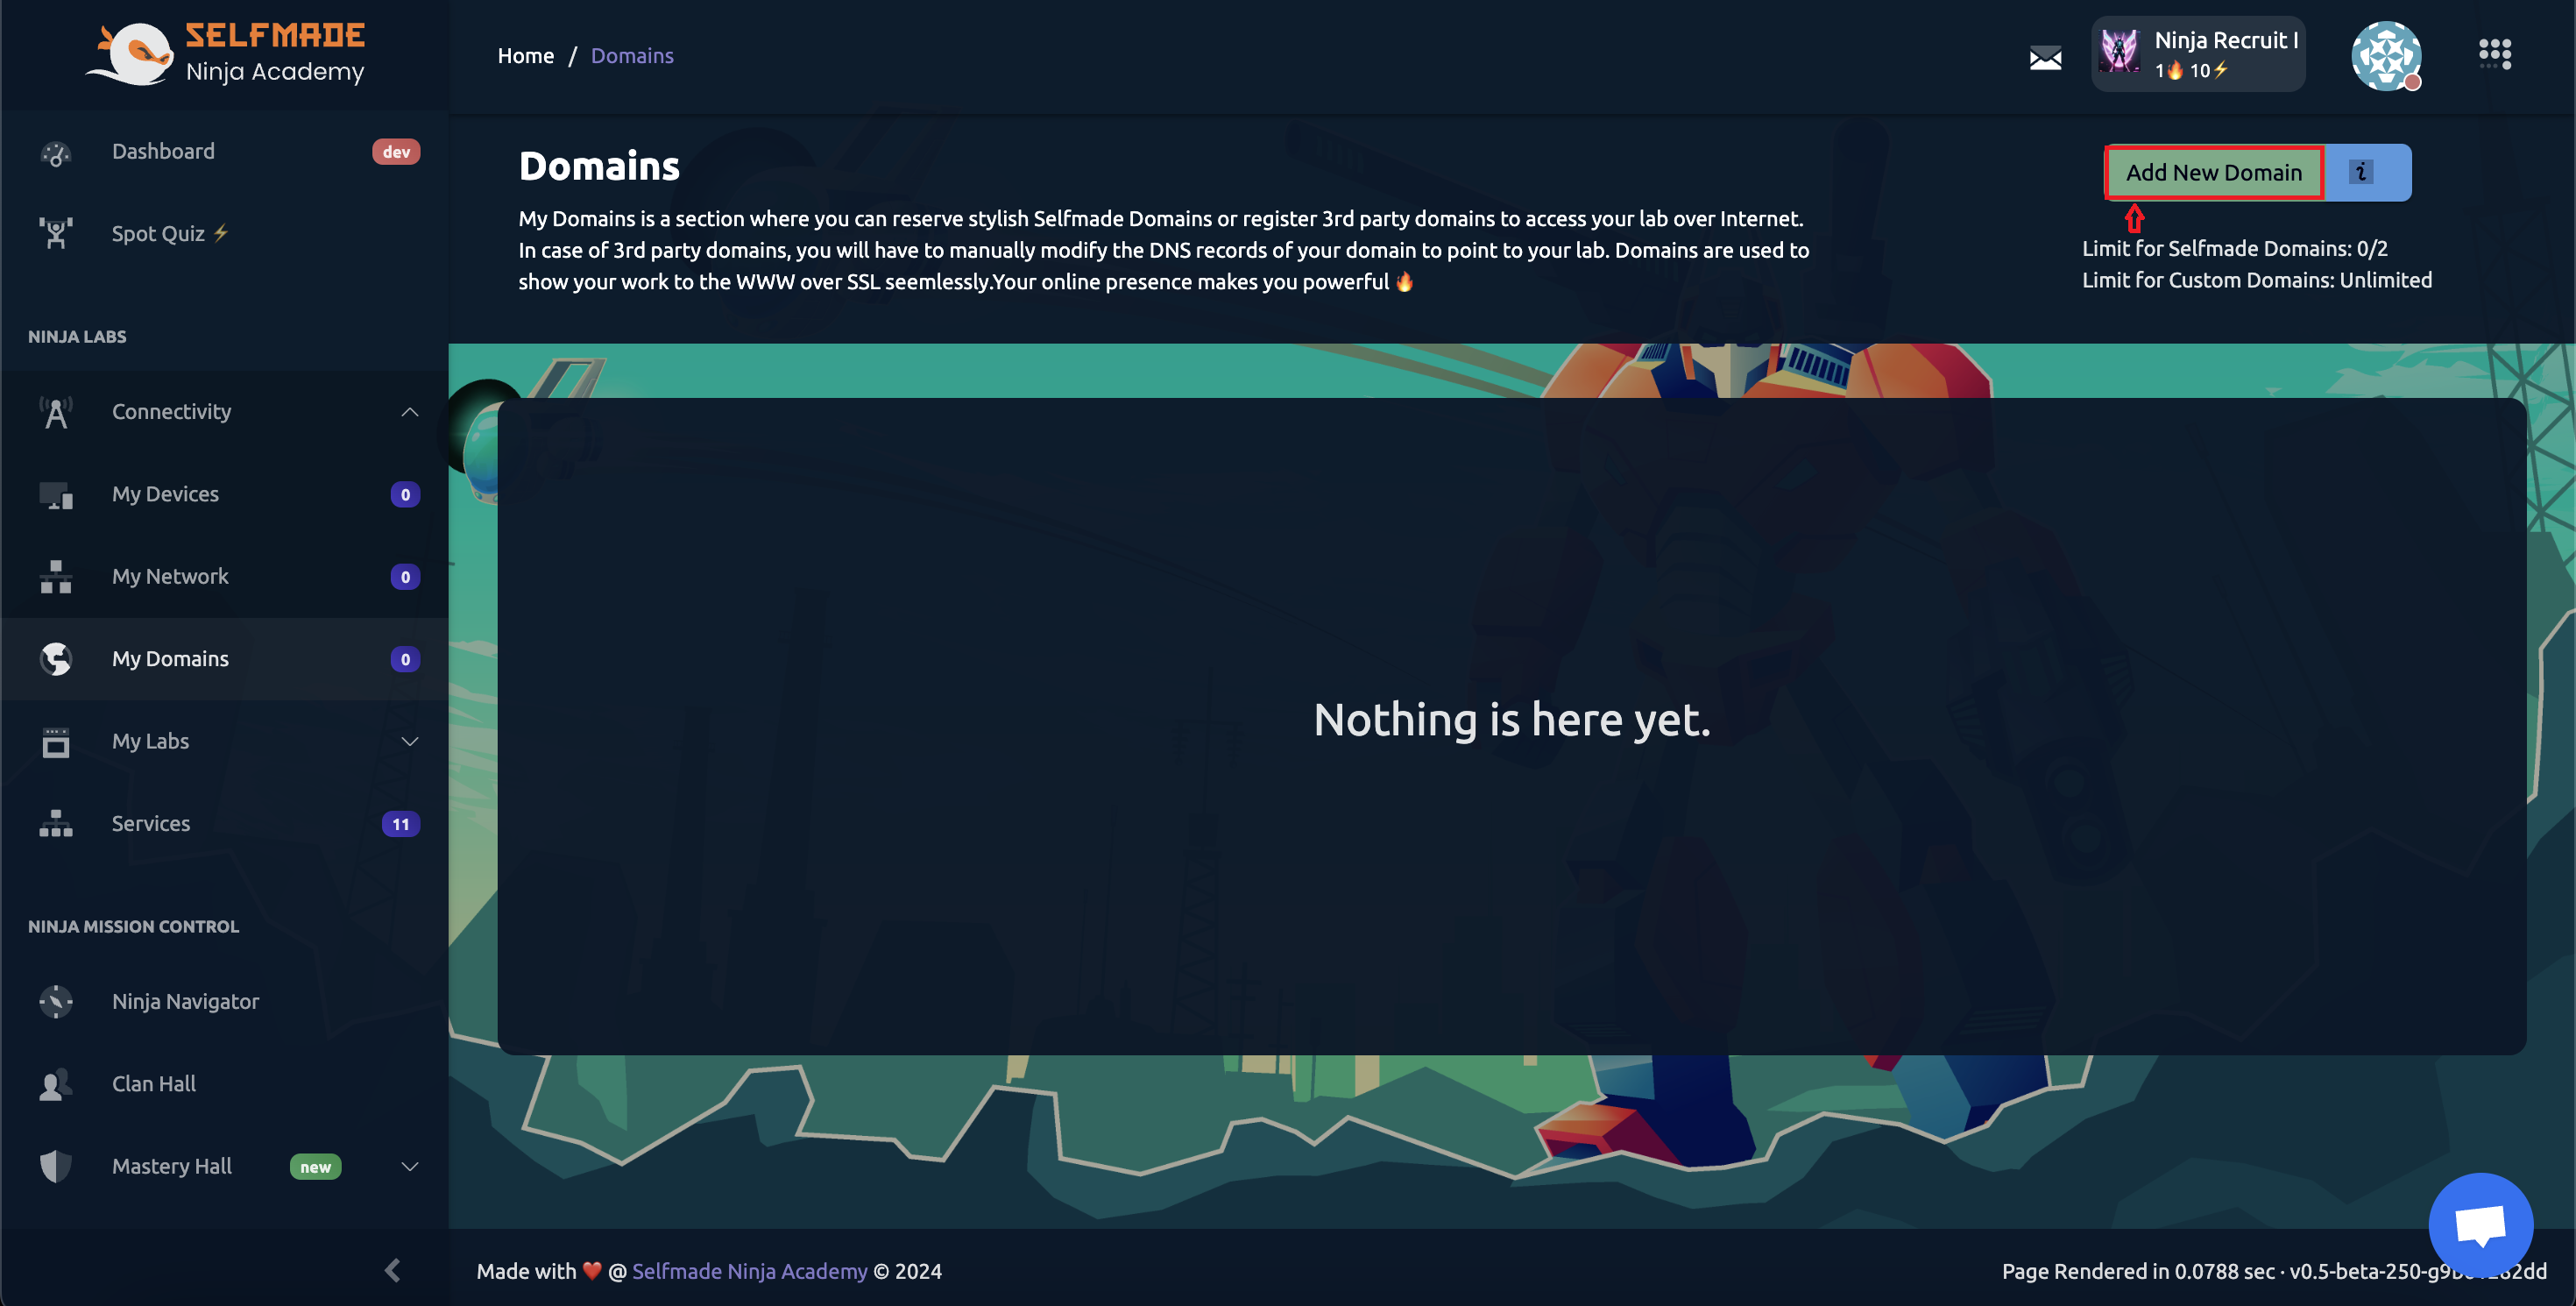
Here, you have two options: Add New Domain and How to use domain. Click Add New Domain, and a dialog box will appear, prompting you to enter your domain name. For example, I chose helloworld, making my domain helloworld.selfmade.fun. You can select from a list of subdomains or use your own.

After entering your domain name, hit 'Verify and Add' to check its availability. Luckily, my chosen domain was free, so I could use it right away.
Congratulations on adding your domain! If you’ve made it this far without any issues, you're on the right track. Be proud of your progress – you're turning theory into reality! 🎉💻🌐👍
With your domain now ready, it's time to move on to setting up your hosting server. Start by navigating to the 'My Labs' section and select 'Machine Labs'. This action takes you to a new page, resembling the one in the upcoming image.

In the dashboard, you'll notice that the free version offers access to one lab, which is an Ubuntu latest machine. Premium versions have more options, like Docker and other powerful labs, which I'll cover in detail in future blog posts.
Now, head into the dashboard by clicking the 'Dashboard' button and then press 'Deploy'. A dialog box will pop up, as shown in the next image. Here, you need to be careful. Make sure to select 'Expose to Web to Public' and set the exposure to '80 over 443'. This step is crucial for setting up your server to be accessible over the internet. Don't forget to select your domain from the options. Once everything is set as indicated, hit 'Confirm Deploy'.
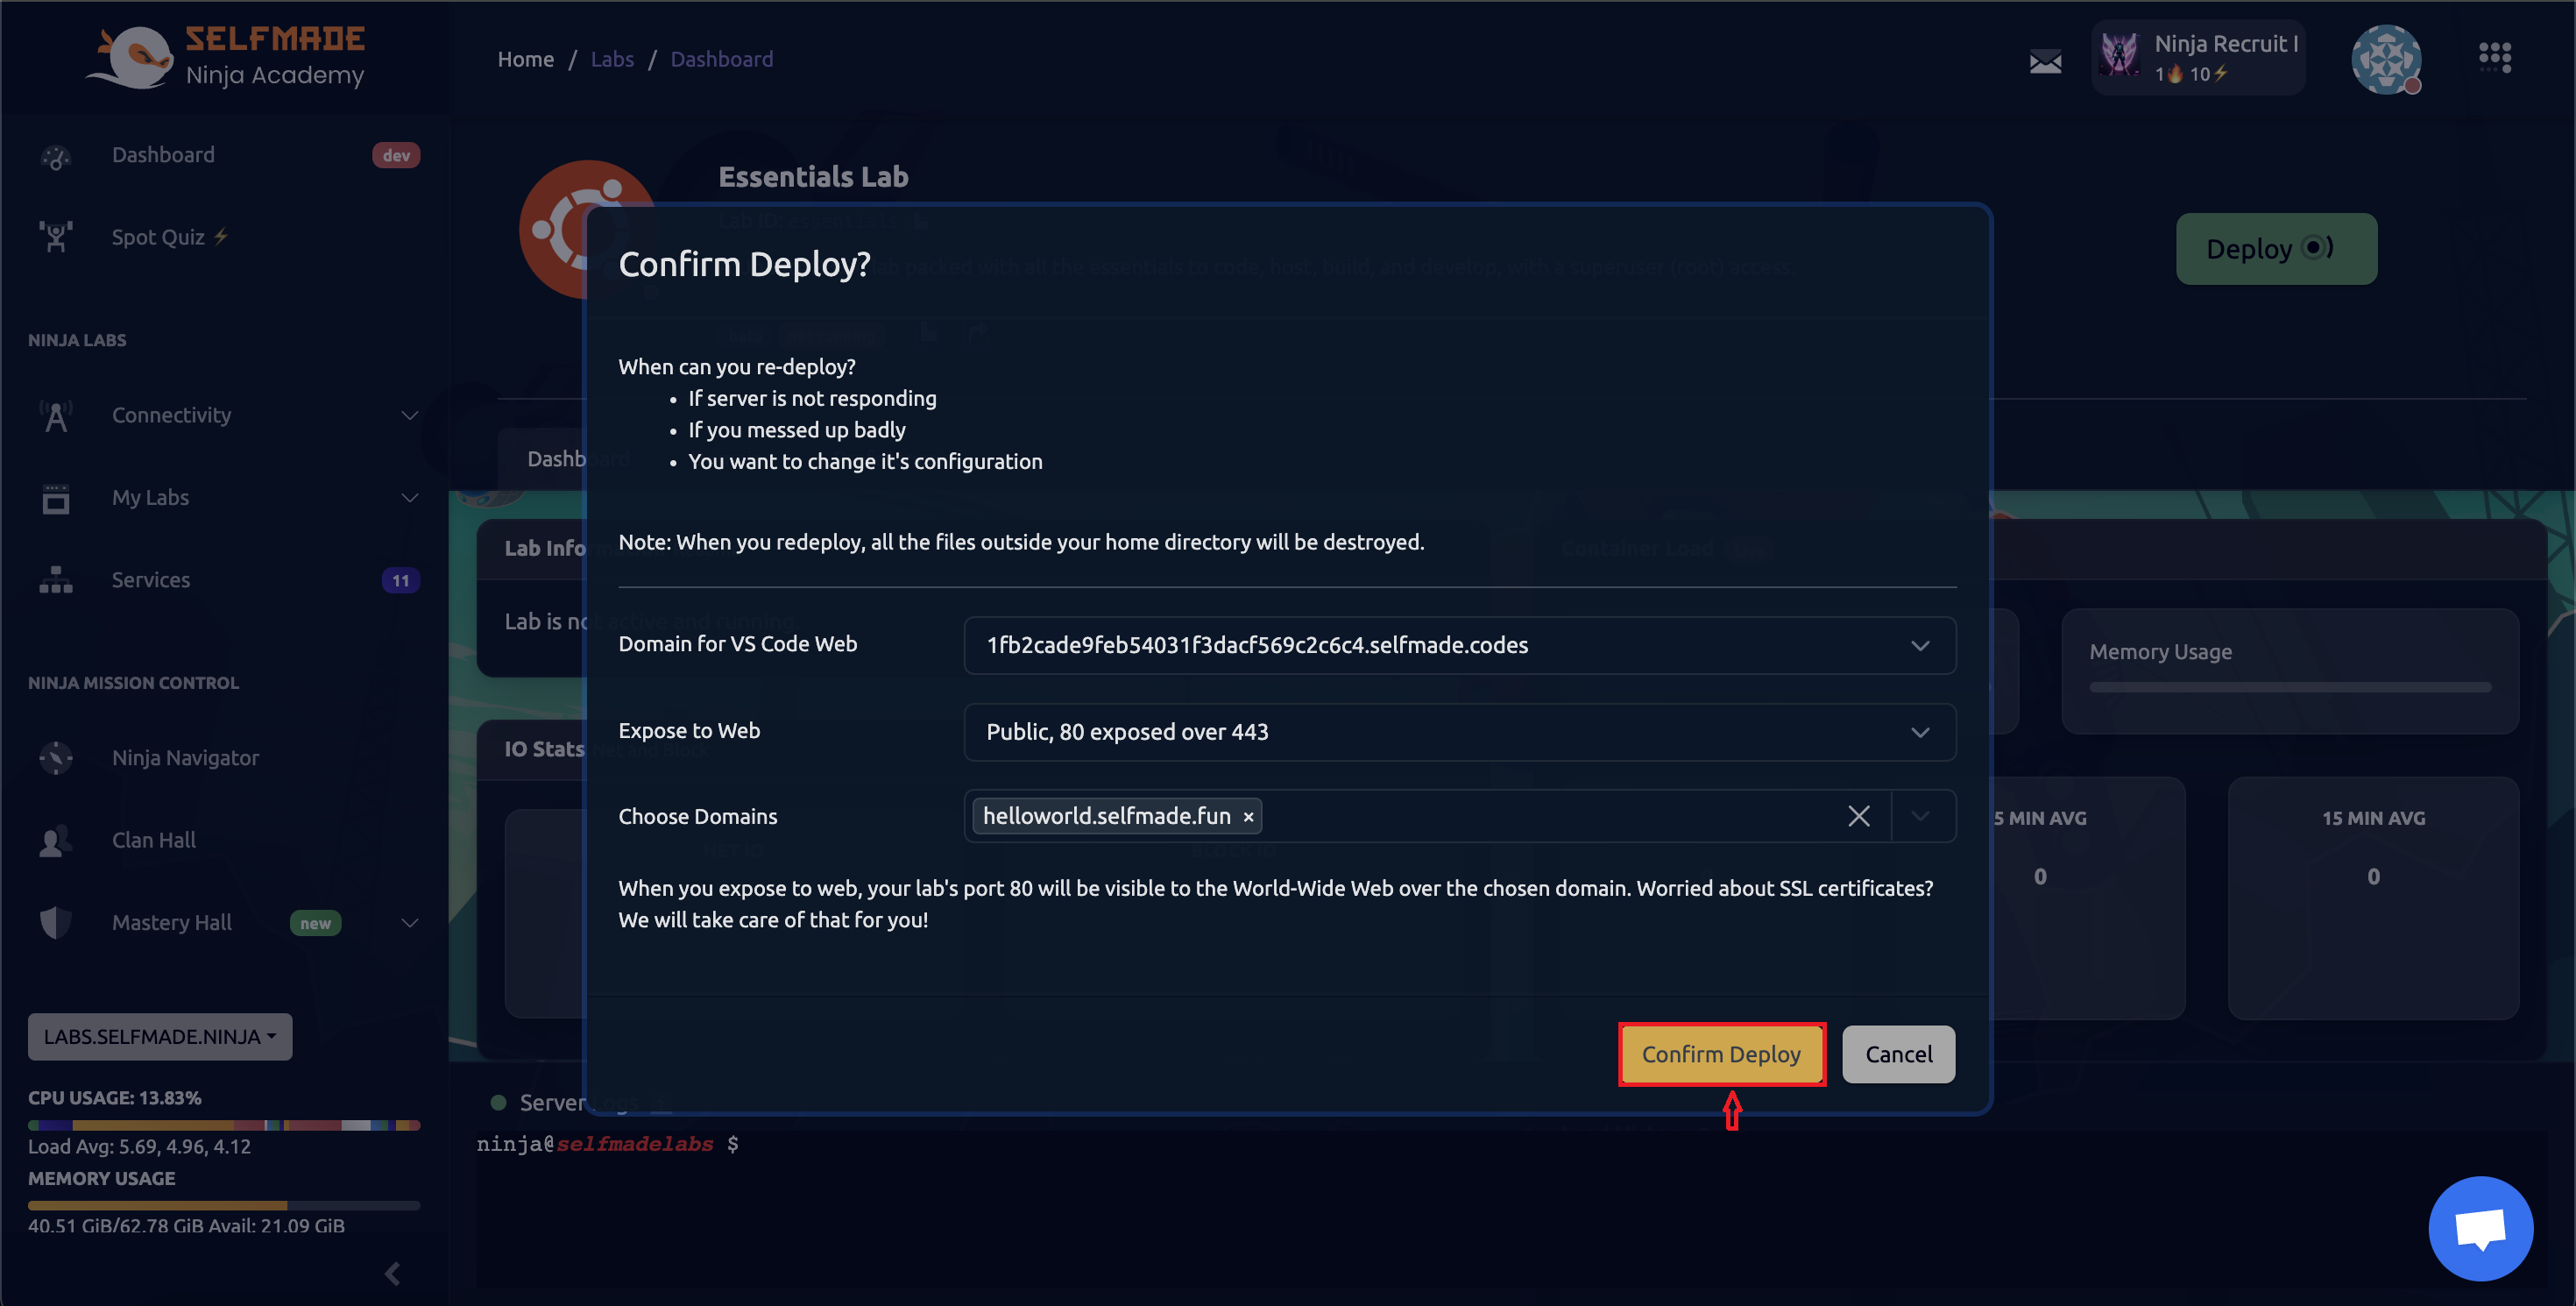
This process might take a minute, so it’s a great time to relax. Just like that, with a few simple steps, you're on your way to having your server up and running on the internet. It's pretty amazing to see your website coming to life right before your eyes! 🌐🖥✨🥤
Once the deployment process finishes, you'll be greeted by a dashboard brimming with options, as shown in the upcoming image. Let's break down what each of these options does:
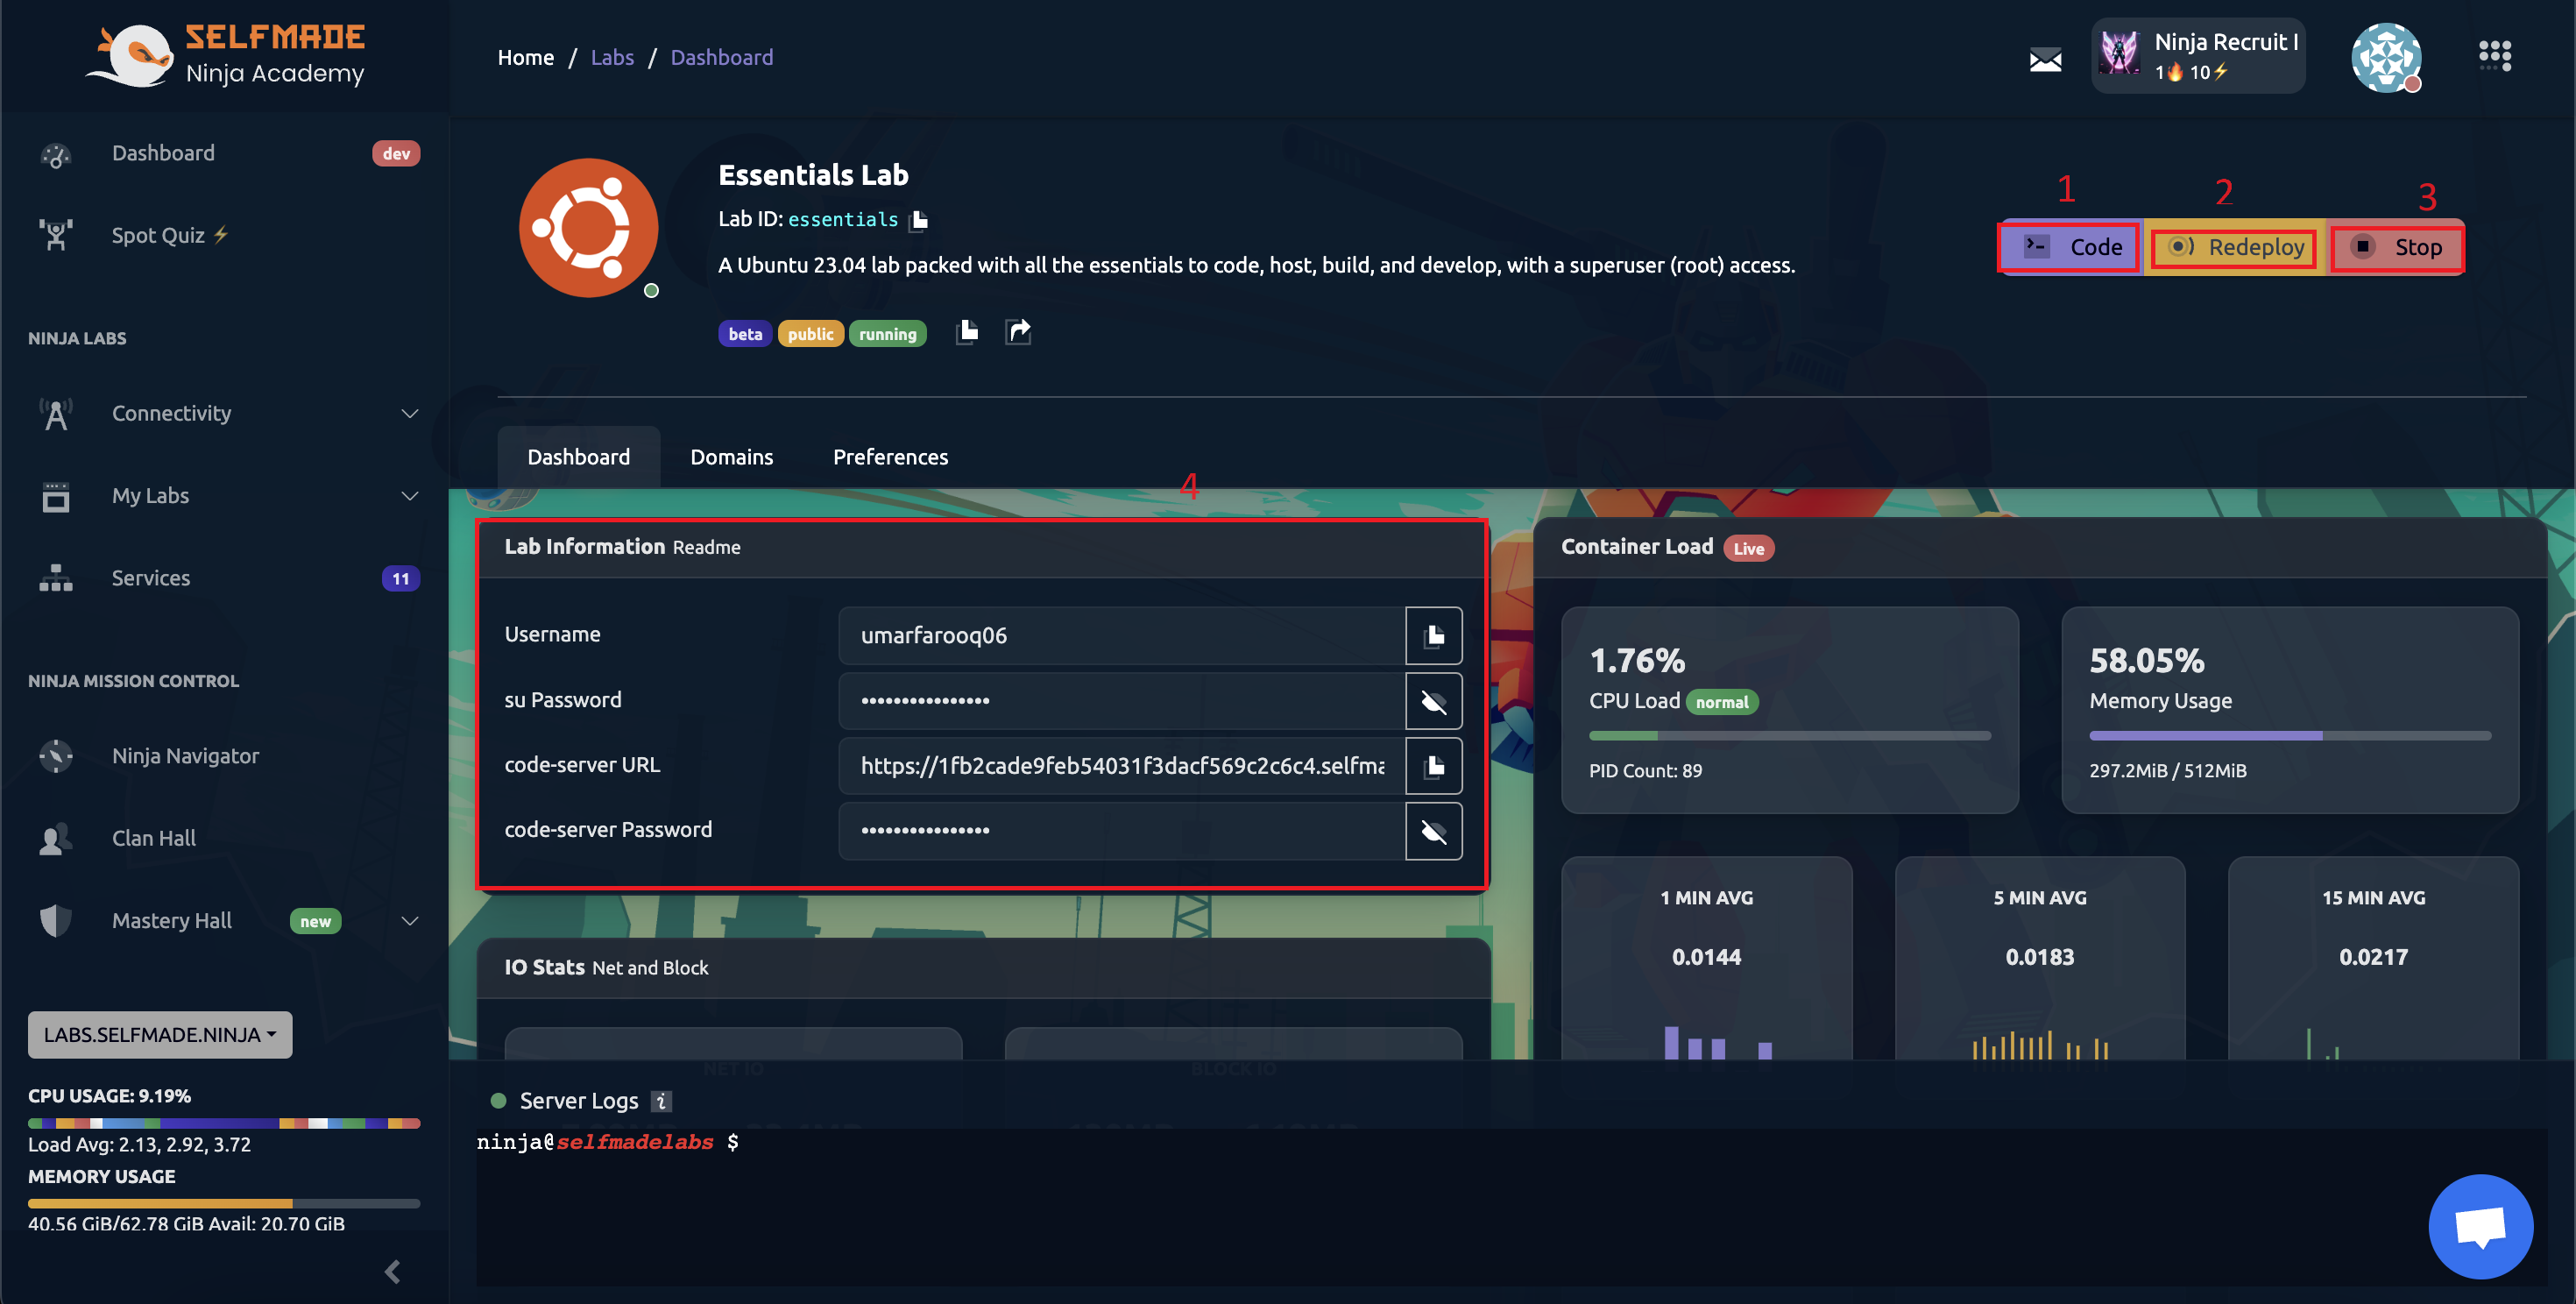
Code Button: This is your gateway to interact with your server directly through your browser.Redeploy Button: Think of this as a 'restart' for your machine handy for fresh starts.Stop Button: As the name suggests, this lets you stop the machine whenever needed.Lab Information: Here you'll find crucial details like your username, password, and links to your VS Code server and its password.
Alright, enough with the details! Let's dive in. Click on the 'Code' button, and a dialog box will pop up with a password. Copy this password, and then you'll be redirected to another page, as shown in the next image. Paste the password you copied earlier (if you forgot to copy it, don’t worry – you can find it again in the main dashboard, as mentioned in point 4). Enter the password and click 'Submit'.
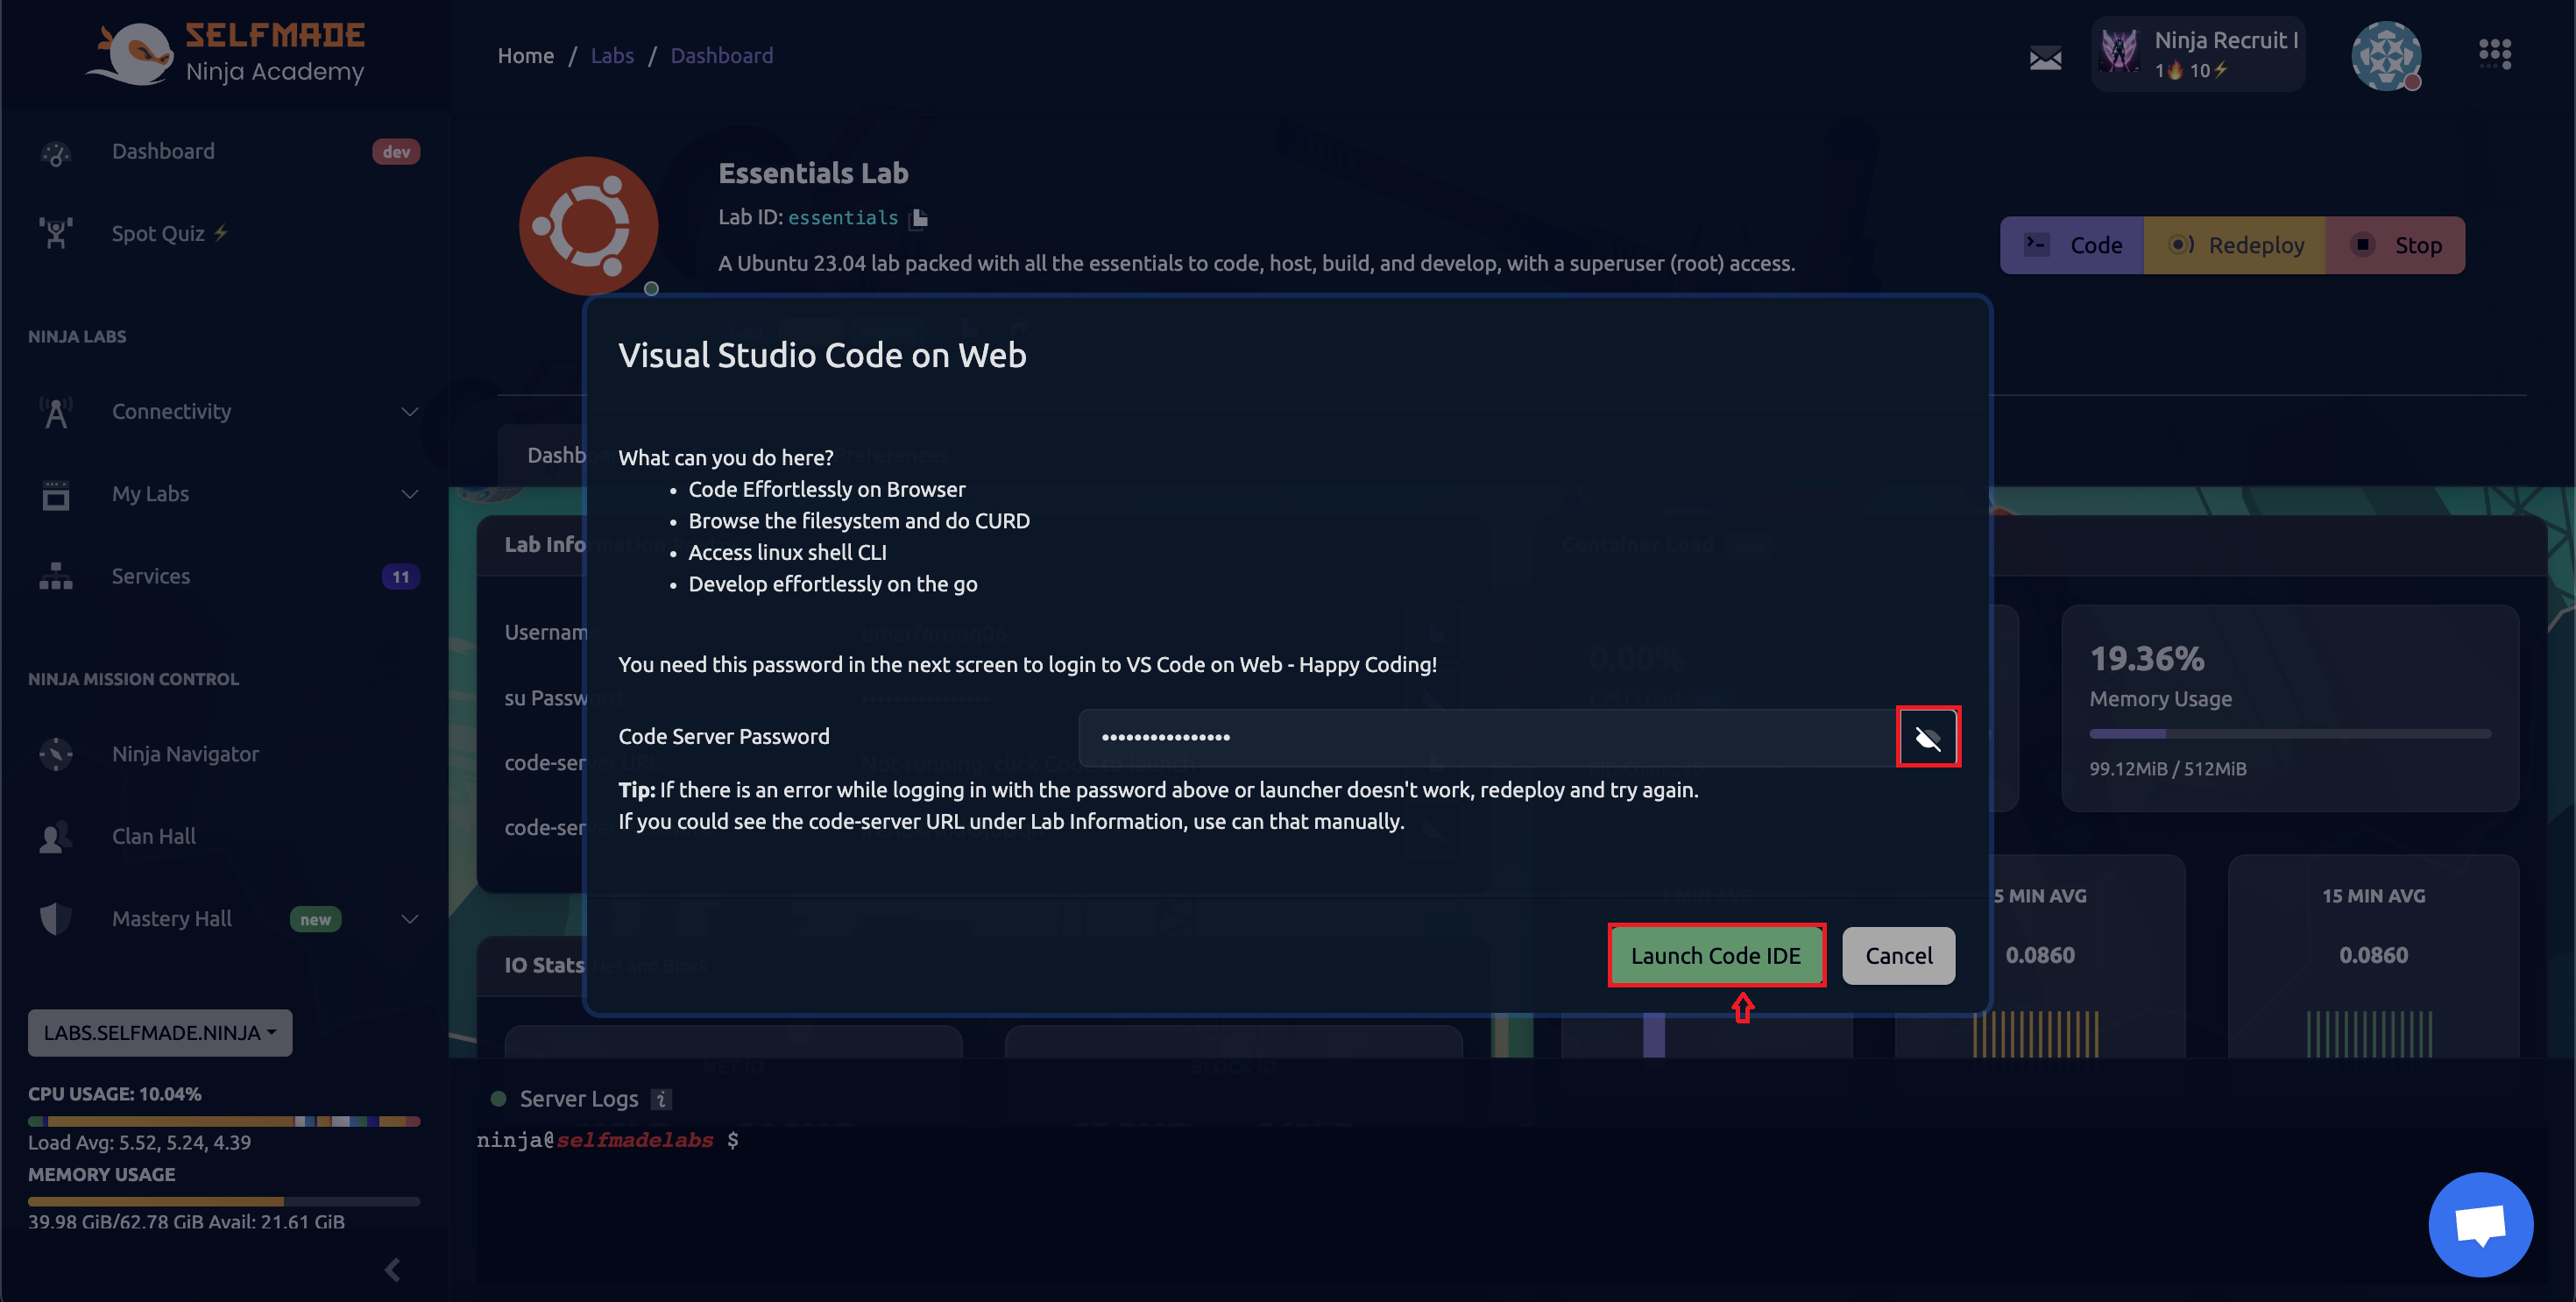

Voila! You now have your hosting server with the famous VS Code editor right in your browser – how cool is that? Next, click on the file icon, as indicated in the image below, then click on 'Open Folder', followed by another click as shown in the next image. Open the folder shown in the image.

- Now, open your home folder on VS Code, inside
htdocsfolder, create a folder for your document root. inside that folder, create a fileindex.phpand paste your HTML page to be displayed.

- In home folder, there will be a folder called 'htconfig'. Create a new config file inside the 'htconfig' folder.
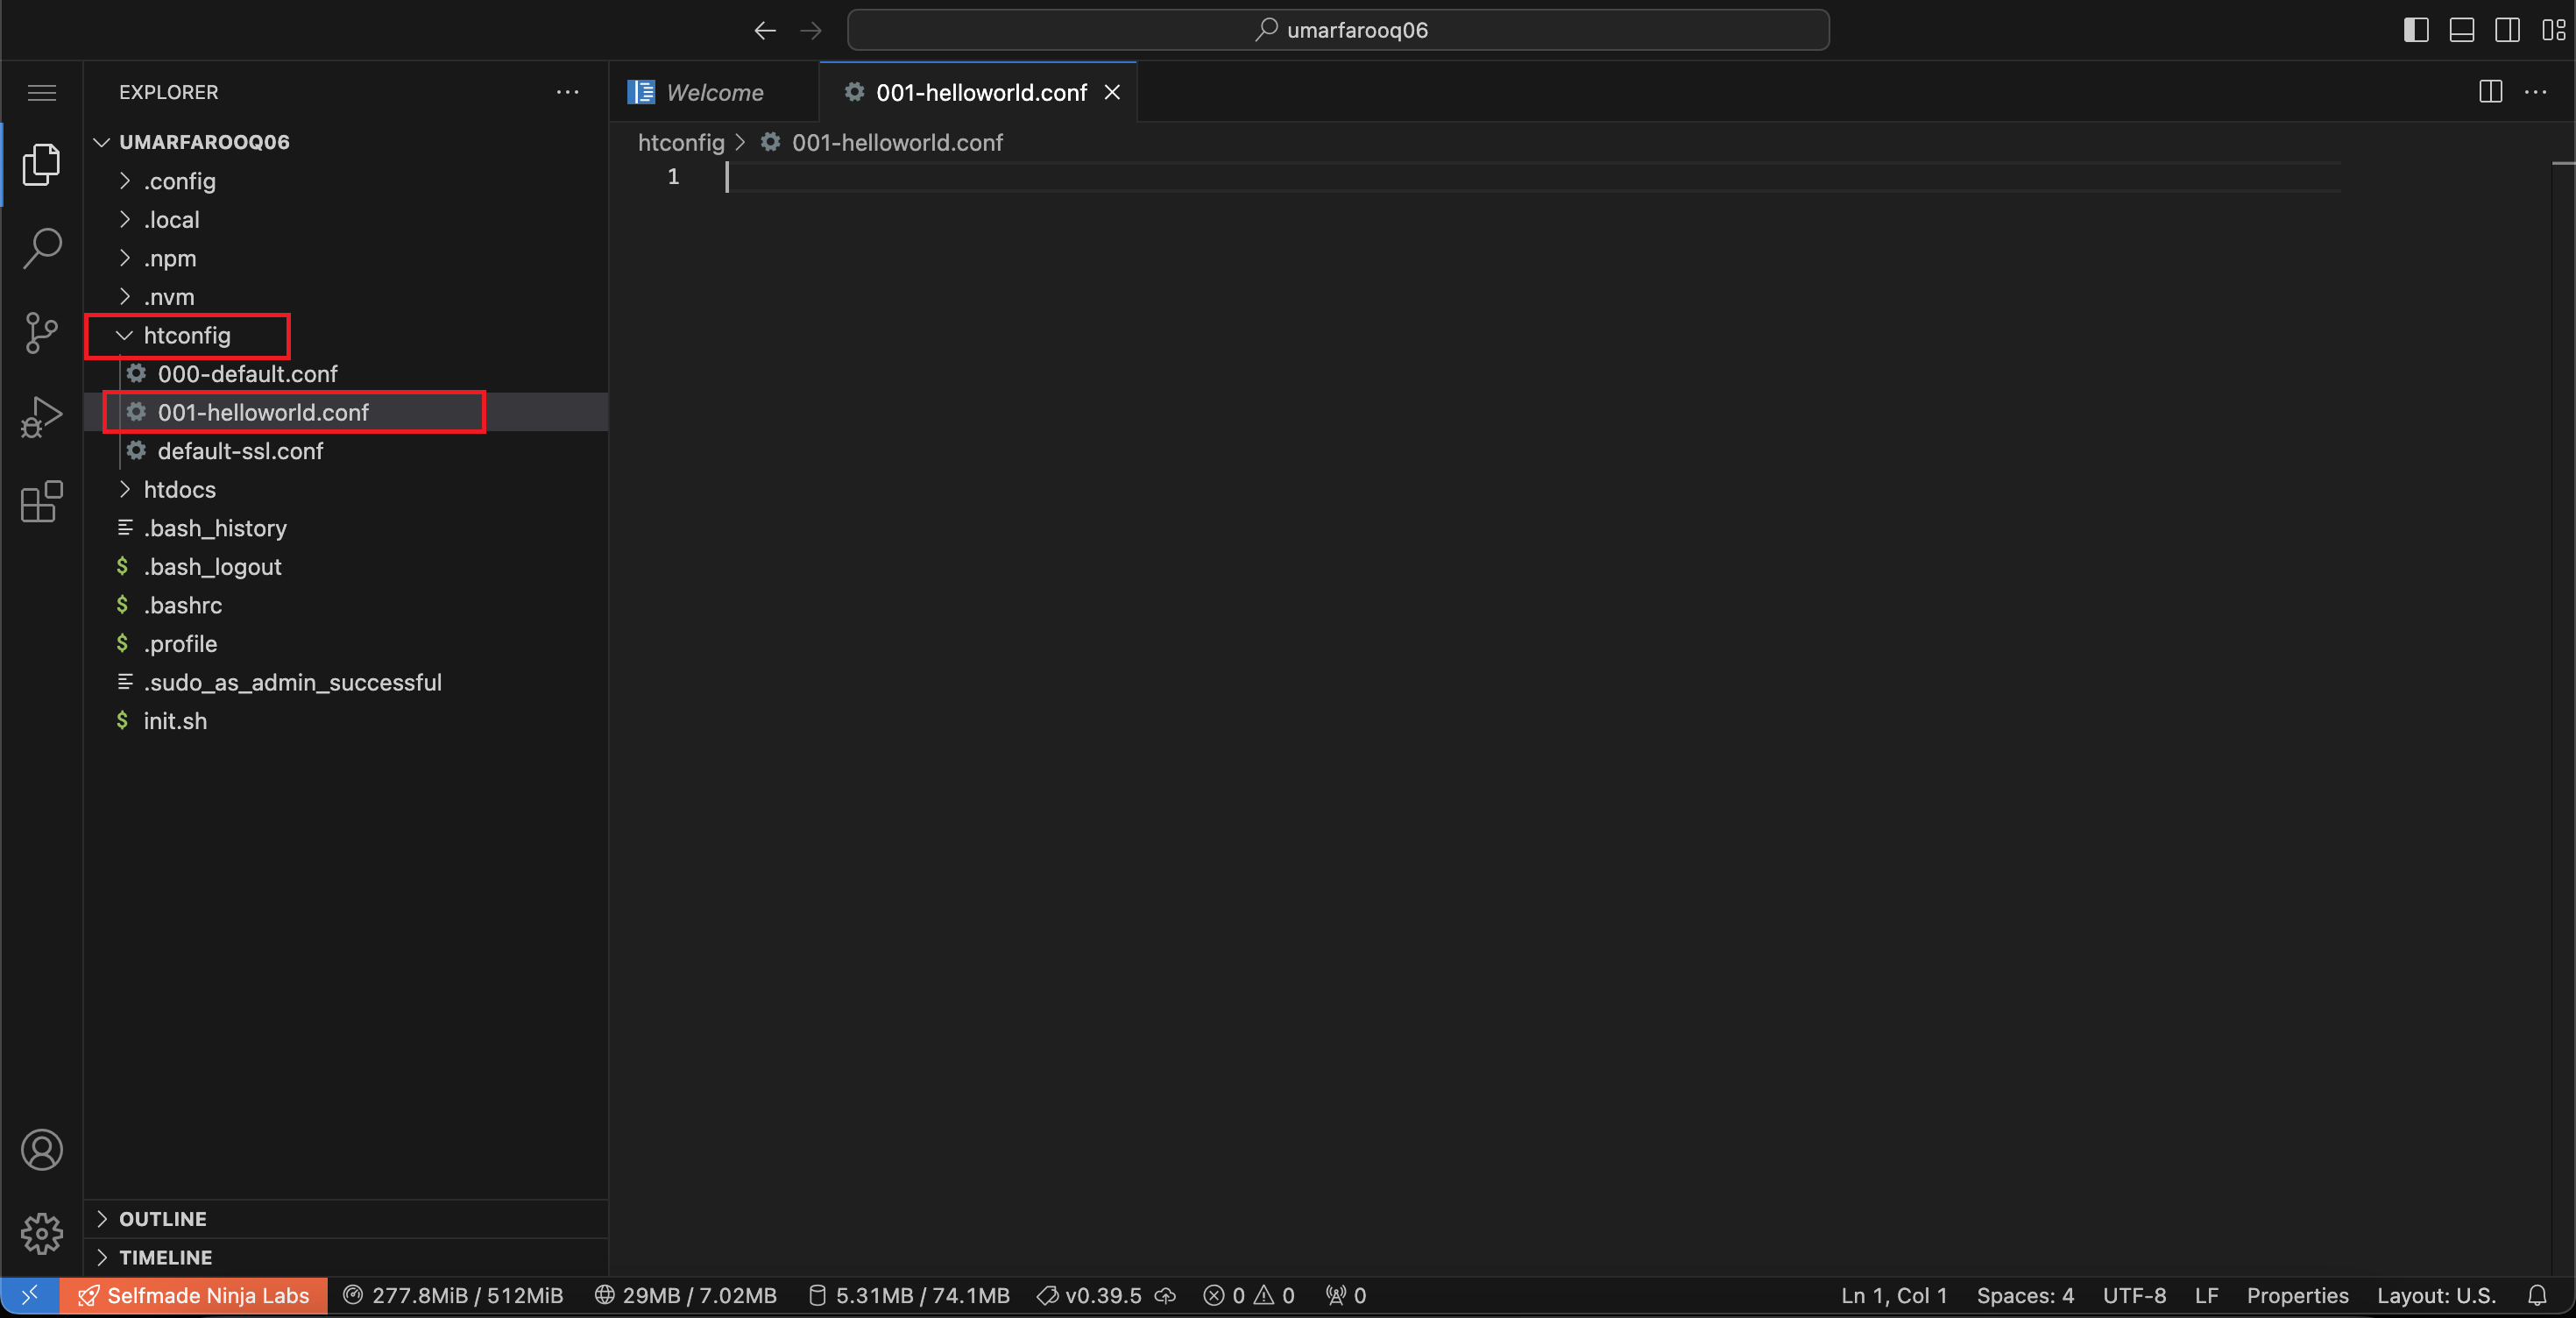
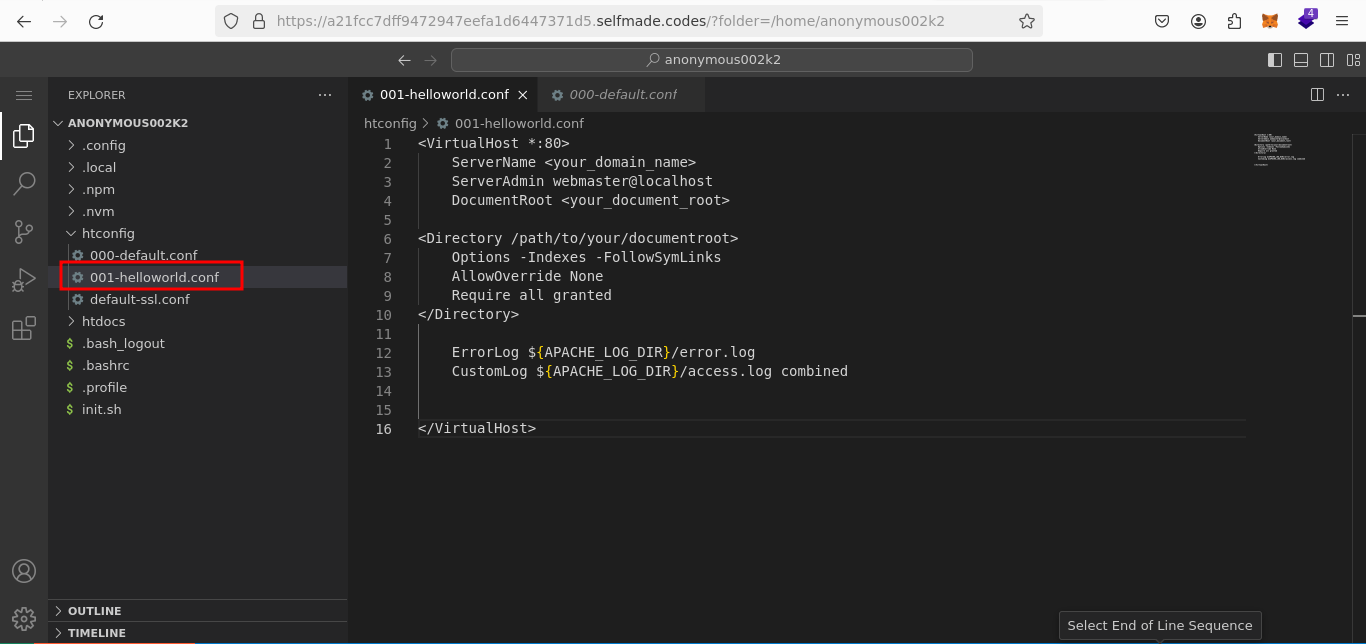
- Copy the below configuration and modify the ServerName and DocumentRoot parameters of your domain and your document root.
<VirtualHost *:80>
    ServerName <your_domain_name>
    ServerAdmin webmaster@localhost
    DocumentRoot <your_document_root>

<Directory /path/to/your/documentroot>
    Options -Indexes -FollowSymLinks
    AllowOverride None
    Require all granted
</Directory>

    ErrorLog ${APACHE_LOG_DIR}/error.log
    CustomLog ${APACHE_LOG_DIR}/access.log combined

</VirtualHost>
- Now, Copy the following commands to the
init.shfile located on your home folder.
sudo a2ensite <your_config_name>
sudo service apache2 restart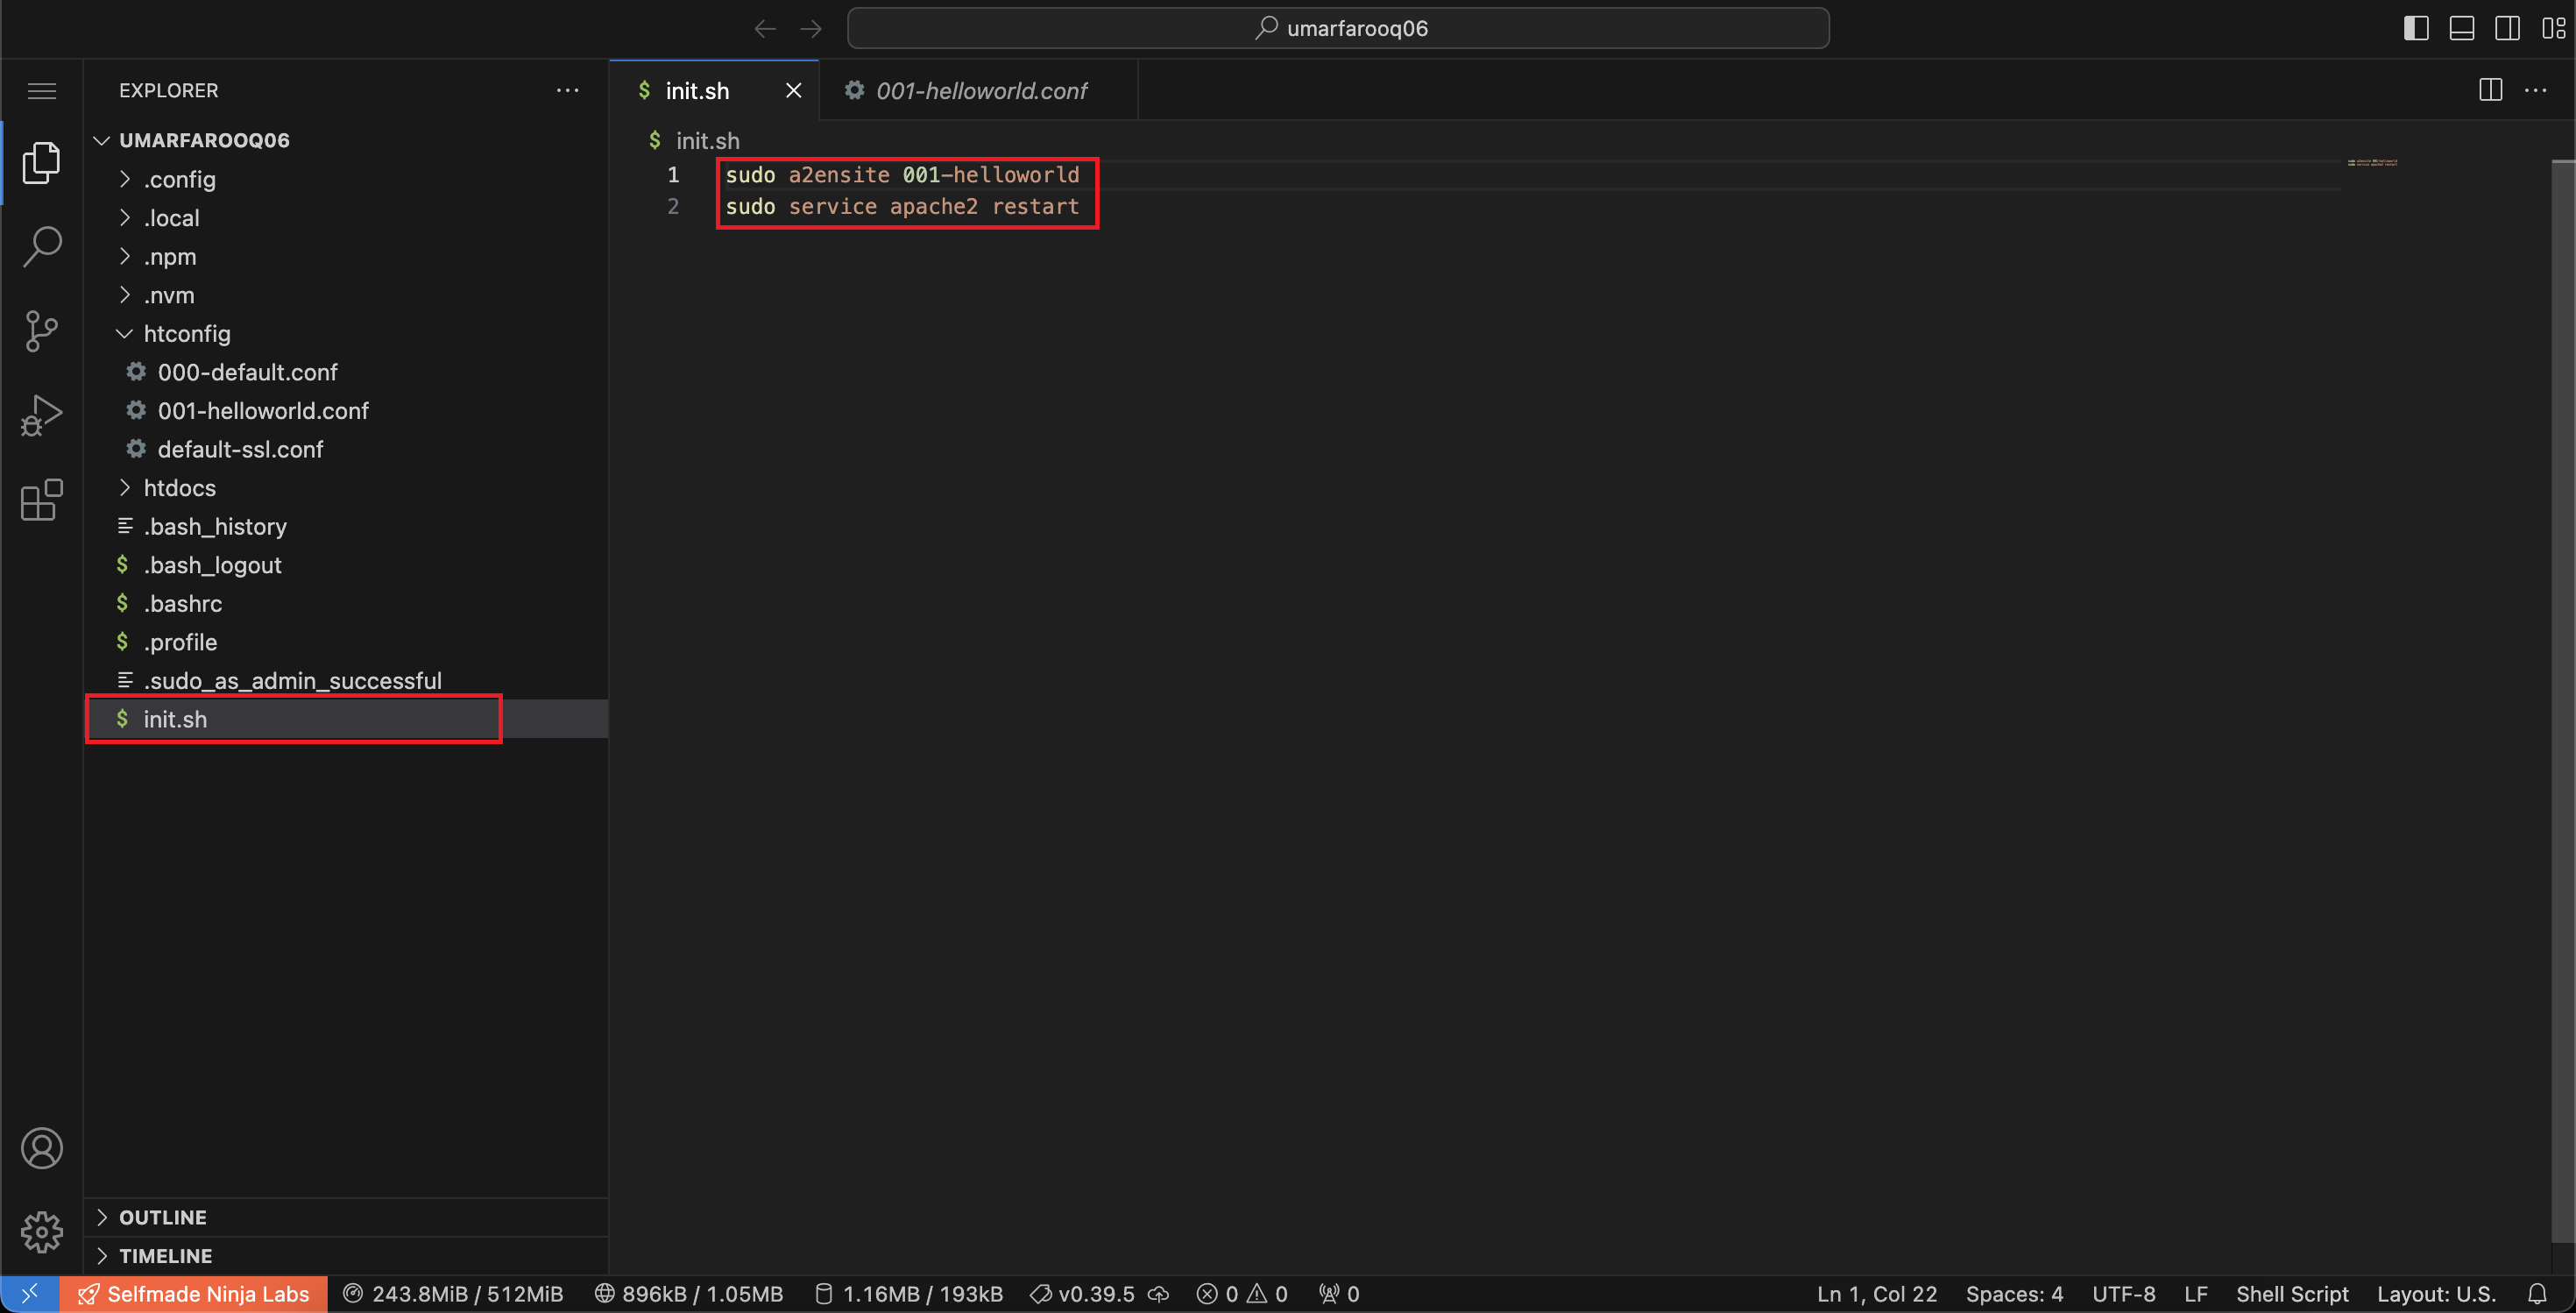
-
Let me explain how
init.shworks in our labs.- init.sh is an automation script designed for initializing and configuring your instances during redeployment.
- It executes essential commands during redeployment, preserving the specific state and configurations set by the user.
- Placing init.sh automates the code, eliminating the need for users to manually run multiple commands.
After placing the commands in the init.sh file, Navigate to the 'Machine Labs' under 'My Labs' option. Then Navigate to your Essentials Lab, Click on 'Redeploy' option as mentioned in the above steps.


- Now, wait for your instance to be redeployed. Then, Open your web browser, type in your domain and hit enter. You will see your static page hosted as public.

If everything’s been done correctly, your page should now look like the one in the following image. It's truly exciting to see your hosting server come alive with such a powerful editor at your fingertips. Let's keep this momentum going!